I would say that it's a natural selection - but things are MUCH worse. Those dummies who are not smart enough to read manuals and use safety gear making higher pressure on economy. They are sick more often and require expensive treatment. So they hey not only dumb and harmful for themselves but the whole society.
Yes, and the best part is that you don't have to wear a gas mask at all with a 3 day beard. Because the sealing line is completely useless. Eve full beard is a bit better.... it's btw... no bashing or so.
The second method using the Alclad metal lacquer paints can be improved by using the chrome paint again instead of the gold, you add a little yellow and a small amount of red food colouring gel to it, it produces a highly reflective gold paint. A prop maker on YT documented this method when he was painting medals and showed how it holds up on his wearable C3PO costume. His name is Gordon Tarpley, he has useful tips on technique too.
Don't even need to mix the colour into the Alclad. Just use Alclad Chrome as normal, and then spray with clear Acrylic yellow or orange paint over the top to get a shiny gold. Use a range of different clear colours to get a whole host of metallic and candy finishes. Yellow or orange on their own aren't quite right for a true gold, but Tamiya Clear Yellow mixed with just one or two drops of Tamiya Clear Orange can be spot on.
You could always mix a little bit of Alcad copper with the gold. I've had good luck mixing silver and chrome to make a good "base" for space kits. (It's also great to use gunmetal and white aluminum to do a zenithal for Cybermen)
This is pretty incredible for RF filters/antennas! In radio frequency design the full conductor can be replaced by a thin copper sufrace due to the skin effect. This means you can 3D print most (very expensive and often custom) RF components now!
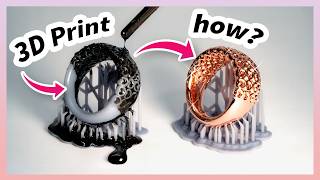
7:11 electro polishing Electropolishing is an electrochemical process used to polish, passivate, and deburr metal parts. During this process, the metal part is submerged in an electrolyte solution and connected as the anode (positive electrode), while a cathode (negative electrode) is also submerged in the same solution. When an electric current is applied, metal ions are removed from the surface of the part, smoothing and polishing it. The process can refine surfaces at the microscopic level, remove burrs, and improve the corrosion resistance of the metal. Commonly electropolished metals include stainless steel, aluminum, and nickel alloys.
Honestly,. the minimal effort resin one is the most screen-accurate, as the commbadges have a more satin finish than plated. Not to mention, that's pretty much exactly how they were done for the show, too.
Thank you so much for showing us you using gloves, and respirators. The amount of channels that either don't or don't themselves take safety measures is WAY to high.
Great video! While you used a black base- layer for both colors in the medium phase, If you used a red base-coat for the gold one, it would read as much more "golden"
Final electroplate result looks absolutely amazing. Even the airbrush resin one looks great. Can't wait to start soon, perhaps I'll get myself an electroplating kit for Christmas!
@@jothain Europe is actually really good for electroplating. Look for the Tifoo brand. They seem to be a LOT cheaper than in the US or Australia and they work well. I think @hen3drick uses a lot of Tifoo stuff. In Aus we basically have Caswell which is STUPIDLY expensive, or a bunch of cheap no-name knock-offs which may or may not be any good.
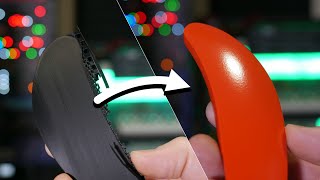
There are many layers to the techniques in your second method for getting a mirror finish. When done right it'll reflect like a mirror. A big contributor is the black paint that's used. It has to be very thin otherwise you'll end up with a bumpy surface. Proper sanding and polishing before is also important, and you can use automotive polishing compound to get that mirror finish after sanding. It's not that important if you're electroplating, but for many of us being able to have metal like finishes with paint alone is definitely achievable through paint with some practice.
Another important reminder for working with resin prints, the actual resin dust is pretty horrifically bad for you too. I suggest a mask and ideally a vacuum cleaner turned on with the nozzle near to the print to just suck up the dust as it's made. (Ideally it'd have a hepa filter too)
Try metallic lacquer some time! You spray a coat of gloss black and a coat of silver/gold, buff it with cotton, and finish it with a layer of clear. It takes a couple hours from start to finish and you can buy it in rattle cans or airbrush-ready.
You’re a life saver when it comes to tutorials, from helmets to weapons, to small props. I’m currently making a Batman costume for Halloween and electroplating, couldn’t have done it without you!
Awesome video. As always. If I ever get out of apartment living I will try this method out. For now. I can just enjoy this these master classes. Thank you!
Have you considered trying Electroforming? Basically the same as Electroplating except you plate onto a silicone mold that has conductive paint applied and are left with a copper shell that you can electroplate onto. It's yet another step and requires a bit more copper but I think its kind of neat to be left with an entirely metal part in the end.
Looks great. You should try high gloss spray paint then graphite powder and the finish with clear yellow paint. That's what I used for my Mandalorian. Super mirror reflective without the electroplating.
For painting with either aerosol or airbrush, your base coat matters a lot. Rather than black, a brown or dark red may help (I've even seen some that use a pink basecoat). Alternately, try a test piece, and add brown or a dark red to darken the colour a bit and make it warmer.
For the low effort method, you could add a step of using self-leveling primer. Not sure it will be enough to fill very rough layer-lines, but it should give a better result with not much more effort.
ELECTRO POLISHING - and one thing, though. Resin prints can be polished to a mirror finish as-is. They'll look like a piece of acrylic then. Would be interesting to see the second method on such parts.
very impressed with how good these came out, especially the fdm ones! I've seen one or two people use a similar process to intentionally rust parts to give them a weathered metal look but there seems to be very little info on it out there. I'd love a demo showing the best ways of doing this!
It's fun to think that those badges are small enough to fit the entire pcb of an earpod clone including the tiny microphone chip. So all that would have to be done would be linking touching the badge with the pcb's touch component to trigger a voice assistant.
I love your the electroplating process, especially as former jeweler who learned to do this in school for plating metals and did it a lot on the market. After seing your result with 3D printed props, I am now scared of scammers comming in with a new twist on the fake gold jewelry trick.
Haha dein Versprecher sehr sympathisch ich kann nicht einmal 2 Prozent so cool Englisch sprechen aber verstehen klappt super bei dir sehr klare Aussprache 👍👌danke dafür und für die guten Infos
Fantastic results. I've had some fun experimenting with copper sulphate but no serious project yet. I have discovered that dropping rusty nuts and bolts in solution and leaving for a few hour gets underneath the corrosion and basically removes if. The very slight copper layer is then easily removed using a wire brush. A little of topic I know. Thanks for the great video.
Awesome video! You are the master of electrating 3d printed parts. ;-) BTW ... usually best smooth results should be achieved using wet sand paper (ger: Nass-Schleifpapier). Wet sand paper is used before car is getting painted. You should change from dry to wet sand paper. The result will be so much better.
Respekt! Das sieht Mega aus, mir wär's aber zu heikel. Außerdem, mein Dorf Wertstoffhof würde mich hassen wenn ich mit sowas daherkommen würde. 😂 Danke für die super Videos!
Your com badges are beautiful . Two lesser known things about them: on the show, they're painted with a rattle an and they're not gold, they're painted brass Nevertheless, excellent work!
Thanks for explaining the grits that you use when sanding each layer of filler, primer, etc. I had to find out a method that worked for me through lots of trial and error, but it would be nice to get a more in-depth video explaining your process to get glass-smooth prints (including names of each product used at each stage, grits used at each stage, buffing compounds & their grits, etc... whether you sand with 1000+ grit between paint layers, etc, etc). For example, this is my process (which may be overkill... or their may be better ways to do it... which is why I think sharing your way could be helpful too): _My process (quite light sanding pressure, so you dont scratch things too much):_ 1) 220 grit sanding to take off any zits / sharp edges and knock layer lines down a tiny bit 2) Single coat of Primer spray paint 3) A couple coats of Motip Spray Putty to fill the layer lines. 4) 400 grit sandpaper to smooth it out. If you can still see / feel layer lines with your nail, then go back to step 3. 5) Spray with Filler Primer, then sand smoother with 600 grit 6) Spray with Primer, then sand with 800 grit 7) Spray base color coat, sand with 1000-1500 grit between coats (dont sand last color coat) 8) Spray a few coats of clearcoat 9) Switch to buffing/polishing wheel (sponge pads on my drill)... using buffing compounds 1000, then 2500, then 3800 This will get you a smooth mirror-like surface... like the surface of a show sports car... but you can stop at lower grits of sanding and ignore the buffing compound with buffing wheels/pads if you dont want that level of insane smoothness / shine. Most times, you can stop at 400 grit and not need to go higher because you wont need that smooth a surface.... but any higher grits than 400 will generally need to be wet-sanded to avoid clogging of sandpaper.
when painting with metalic paints both spray and air brushing, put a black gloss base layer, let it dry for at least 24h and than the metalic paints, youll get amazing results.
so true. also the colors were quite matching the original prop. The electroplated is more of a "hero prop" as it's what I personally had crafted for the show.
3:22 for gold metallic paint it tends to look better over a red base coat instead of black. Although my experience and where I lernean it from is for miniature painting so might not apply the same to large models
There was an old trick on UA-cam where you would zinc plate then copper plate a quarter and use a torch to melt the metals to form brass. It looked awesome and will be basically corrosion resistant without being expensive like gold. But since idk if that would be too much heat for 3d printed parts, I would love to see it tested!!
what i have come to use for sanding resign and FFF prints is abrasive mesh (in german Schleifgitter). They dont leave sand/graind behind and are easy to work with while submerged in water. what is also stronglish recommend in oder to avoid aerosol particals.
With airbrushing, I would try different basecoats to get more of a silver/gold color - use white/yellow underneath instead of black, or spray everything silver and put gold on top of the silver
As the owner of a filament printer, I'm actually blown away at how smooth you were able to get the FDM prints in the second method. Which exact products do you use for this step (prior to airbrushing)? Oh, and I live in Germany, so can probably get the same ones you are using.
Just a pro safety tip: Never wear gloves when using a polishing wheel. It may seem counterintuitive, but gloves can get caught up in the motor and rip your hands apart. This goes for any machine that has a motor, including; lathes, pillar drills, routing tables, etc.
Very good video! My usual process matches nicely to your medium effort, but I am tempted to replicate your high effort version and why not on exactly the same model!
Have you tried vibratory finishing the parts using corn cob media after plating? I use a brass tumbler for plated metal on pinball machines. I don't have to polish this way. Very good results from this method. After tumbling just clean and add your nickel or gold segment.
@@hen3drik I also use crushed walnut shells. Depending on the plating you sometimes need a bit more coarseness. I get it from petco and its reptile bedding. Corn cob media I order online. I use Berry’s model 400 vibratory tumbler. It is small but there are a lot bigger ones depending on the need.
Do you have a video on how to make the rotary jig? I'm having trouble getting the aligator clip to not rotate with my rotary set up. Thanks in advance, your videos are awesome
Sorry, no, but I modified the original. Added an cable holder for the alligator clip. In the original design a thin wire was inserted into the jig that was wrapped around the big copper wire.
Tolles Video! Des Endergebnis sieht echt spitze aus! 😁👍👏👏👏 Hätte es toll gefunden wenn du noch ein paar links zu den verwendeten Chemikalien in der Beschreibung gehabt hättest. Will mich auch mal am galvanisieren versuchen.
excellent video describing the different methods to get metallic finishes I saw you posted the link for the comb badge itself, do you have one for the little stand you used to display them?


Appreciate the safety reminder. So many channels don’t show that they wear PPE while they work, making it easy for newbies to omit.
I would say that it's a natural selection - but things are MUCH worse. Those dummies who are not smart enough to read manuals and use safety gear making higher pressure on economy. They are sick more often and require expensive treatment. So they hey not only dumb and harmful for themselves but the whole society.
I think I may stick with FDM prints which have far less toxins, and are a lot more idiot resistant than resin.
Neeeeeeeeeeerds 🤣
@@TM-ro7lhshut up
Yes, and the best part is that you don't have to wear a gas mask at all with a 3 day beard. Because the sealing line is completely useless. Eve full beard is a bit better.... it's btw... no bashing or so.
The second method using the Alclad metal lacquer paints can be improved by using the chrome paint again instead of the gold, you add a little yellow and a small amount of red food colouring gel to it, it produces a highly reflective gold paint.
A prop maker on YT documented this method when he was painting medals and showed how it holds up on his wearable C3PO costume.
His name is Gordon Tarpley, he has useful tips on technique too.
Don't even need to mix the colour into the Alclad. Just use Alclad Chrome as normal, and then spray with clear Acrylic yellow or orange paint over the top to get a shiny gold. Use a range of different clear colours to get a whole host of metallic and candy finishes. Yellow or orange on their own aren't quite right for a true gold, but Tamiya Clear Yellow mixed with just one or two drops of Tamiya Clear Orange can be spot on.
Tamiya clears are so nice. I actually spray them as candy on my nickeled parts.
🤔 good tips! Thank you
You could always mix a little bit of Alcad copper with the gold. I've had good luck mixing silver and chrome to make a good "base" for space kits. (It's also great to use gunmetal and white aluminum to do a zenithal for Cybermen)
Thank you for leaving the outtakes in when talking about the chrome paint, as a fellow german I can relate "boah"
You‘re welcome 😅
Rein in die Futterluke!
This is pretty incredible for RF filters/antennas! In radio frequency design the full conductor can be replaced by a thin copper sufrace due to the skin effect. This means you can 3D print most (very expensive and often custom) RF components now!
7:11 electro polishing
Electropolishing is an electrochemical process used to polish, passivate, and deburr metal parts. During this process, the metal part is submerged in an electrolyte solution and connected as the anode (positive electrode), while a cathode (negative electrode) is also submerged in the same solution. When an electric current is applied, metal ions are removed from the surface of the part, smoothing and polishing it. The process can refine surfaces at the microscopic level, remove burrs, and improve the corrosion resistance of the metal. Commonly electropolished metals include stainless steel, aluminum, and nickel alloys.
So you put electroplating in reverse?
Honestly,. the minimal effort resin one is the most screen-accurate, as the commbadges have a more satin finish than plated. Not to mention, that's pretty much exactly how they were done for the show, too.
You‘re are absolutely right. I think I made more of a „dream-what-if-prop“. 😅
wow, the sound after electroplating was so surprising!
Thank you so much for showing us you using gloves, and respirators. The amount of channels that either don't or don't themselves take safety measures is WAY to high.
Great video! While you used a black base- layer for both colors in the medium phase, If you used a red base-coat for the gold one, it would read as much more "golden"
Thanks for the hint. I read this at least twice now. A lot of pros out there (I’m a paint noob) 😅
Final electroplate result looks absolutely amazing. Even the airbrush resin one looks great. Can't wait to start soon, perhaps I'll get myself an electroplating kit for Christmas!
I got my first for Xmas, too 😅
I didn't know there are ready kits. Are there many suppliers in Europe?
Kit from where?
@@jothain Europe is actually really good for electroplating. Look for the Tifoo brand. They seem to be a LOT cheaper than in the US or Australia and they work well. I think @hen3drick uses a lot of Tifoo stuff. In Aus we basically have Caswell which is STUPIDLY expensive, or a bunch of cheap no-name knock-offs which may or may not be any good.
Kudos for highlighting the use of PPE 👍 So many makers set bad examples.
I do, every single time. It’s so important. And you can make it quite amusing. 😃
There are many layers to the techniques in your second method for getting a mirror finish. When done right it'll reflect like a mirror. A big contributor is the black paint that's used. It has to be very thin otherwise you'll end up with a bumpy surface. Proper sanding and polishing before is also important, and you can use automotive polishing compound to get that mirror finish after sanding.
It's not that important if you're electroplating, but for many of us being able to have metal like finishes with paint alone is definitely achievable through paint with some practice.
Toothpaste
Another important reminder for working with resin prints, the actual resin dust is pretty horrifically bad for you too. I suggest a mask and ideally a vacuum cleaner turned on with the nozzle near to the print to just suck up the dust as it's made. (Ideally it'd have a hepa filter too)
Good point. Wearing a mask with particles + dust + A2 protection does the job for me.
Do you mean the dust from sanding? Good to know!
Try metallic lacquer some time! You spray a coat of gloss black and a coat of silver/gold, buff it with cotton, and finish it with a layer of clear. It takes a couple hours from start to finish and you can buy it in rattle cans or airbrush-ready.
Des the clear kill the luster of the metalics?
The final product looks great!
turned out great! Electroplating looks cool
gold plated PLA, my mind is blown :: thanks for this awesome video!
You’re a life saver when it comes to tutorials, from helmets to weapons, to small props. I’m currently making a Batman costume for Halloween and electroplating, couldn’t have done it without you!
Awesome video. As always. If I ever get out of apartment living I will try this method out. For now. I can just enjoy this these master classes. Thank you!
Your face and body protection is better than 99% of UA-camrs!
Have you considered trying Electroforming? Basically the same as Electroplating except you plate onto a silicone mold that has conductive paint applied and are left with a copper shell that you can electroplate onto. It's yet another step and requires a bit more copper but I think its kind of neat to be left with an entirely metal part in the end.
Looks great. You should try high gloss spray paint then graphite powder and the finish with clear yellow paint. That's what I used for my Mandalorian. Super mirror reflective without the electroplating.
Super Überblick zu den Methoden. Echt tolle Ergebnisse!!
Danke für die Sicherheitshinweise.
Sehr gerne!
The resin prints looks so much better!
For painting with either aerosol or airbrush, your base coat matters a lot. Rather than black, a brown or dark red may help (I've even seen some that use a pink basecoat). Alternately, try a test piece, and add brown or a dark red to darken the colour a bit and make it warmer.
The airbrush ones looked really good
You can make an magnetron sputterer from a jar and a vacum pump.
You can plate almost everything with that
For the low effort method, you could add a step of using self-leveling primer. Not sure it will be enough to fill very rough layer-lines, but it should give a better result with not much more effort.
That electroplating is verry cool! :D
the clang of electroplated parts is music to my ears!
wow, the last one looks amazing
ELECTRO POLISHING - and one thing, though. Resin prints can be polished to a mirror finish as-is. They'll look like a piece of acrylic then. Would be interesting to see the second method on such parts.
One of the best finishing videos out there thanks!
very impressed with how good these came out, especially the fdm ones! I've seen one or two people use a similar process to intentionally rust parts to give them a weathered metal look but there seems to be very little info on it out there. I'd love a demo showing the best ways of doing this!
Thank you for all you do for hobbyists. I’m building a garage studio and you are the most informative source I’ve found!
These videos are great. Thank you for the great content you're providing!
8:20 the electroplated looks so good I feel like I just learned a secret hack to make anything look perfectly chrome or gold
You actually did 😅
My jaw is on the floor dude. 😲
Very nice
Another great video! I look forward to every one!
Thank you so much for this video! I never thought to use spray car filler to hide layer lines. Will be using these tips!
It's fun to think that those badges are small enough to fit the entire pcb of an earpod clone including the tiny microphone chip. So all that would have to be done would be linking touching the badge with the pcb's touch component to trigger a voice assistant.
The middle and best are amazing, for cosplay the middle one is very acceptable. Thank you for a very interesting video
they even sound metalic!!!!
I love your the electroplating process, especially as former jeweler who learned to do this in school for plating metals and did it a lot on the market. After seing your result with 3D printed props, I am now scared of scammers comming in with a new twist on the fake gold jewelry trick.
Haha dein Versprecher sehr sympathisch ich kann nicht einmal 2 Prozent so cool Englisch sprechen aber verstehen klappt super bei dir sehr klare Aussprache 👍👌danke dafür und für die guten Infos
Das ist so cool!! 😮😮😮 Sehr beeindruckend!!
I just found your channel, it's WONDERFUL stuff!! and nice subliminal text on electropolishing! 🙂
This is simply amazing!
Fantastic results. I've had some fun experimenting with copper sulphate but no serious project yet. I have discovered that dropping rusty nuts and bolts in solution and leaving for a few hour gets underneath the corrosion and basically removes if. The very slight copper layer is then easily removed using a wire brush. A little of topic I know. Thanks for the great video.
Those are impressive results!
Such an impressive process. I love the look and the sound of electroplating!
Awesome video! You are the master of electrating 3d printed parts. ;-) BTW ... usually best smooth results should be achieved using wet sand paper (ger: Nass-Schleifpapier). Wet sand paper is used before car is getting painted. You should change from dry to wet sand paper. The result will be so much better.
Use self leveling high gloss paint
and then someone comes along and produces awesome results using nail polish^^
This is a good candidate for solvent smoothing.
Beautiful print and plate
_bites into it._
Gold!
Respekt! Das sieht Mega aus, mir wär's aber zu heikel.
Außerdem, mein Dorf Wertstoffhof würde mich hassen wenn ich mit sowas daherkommen würde. 😂
Danke für die super Videos!
Gerne! 😃
Your com badges are beautiful . Two lesser known things about them: on the show, they're painted with a rattle an and they're not gold, they're painted brass
Nevertheless, excellent work!
I was thinking that the result was too "bright" and that the originals were slightly more brassy.
Thanks for explaining the grits that you use when sanding each layer of filler, primer, etc.
I had to find out a method that worked for me through lots of trial and error, but it would be nice to get a more in-depth video explaining your process to get glass-smooth prints (including names of each product used at each stage, grits used at each stage, buffing compounds & their grits, etc... whether you sand with 1000+ grit between paint layers, etc, etc).
For example, this is my process (which may be overkill... or their may be better ways to do it... which is why I think sharing your way could be helpful too):
_My process (quite light sanding pressure, so you dont scratch things too much):_
1) 220 grit sanding to take off any zits / sharp edges and knock layer lines down a tiny bit
2) Single coat of Primer spray paint
3) A couple coats of Motip Spray Putty to fill the layer lines.
4) 400 grit sandpaper to smooth it out. If you can still see / feel layer lines with your nail, then go back to step 3.
5) Spray with Filler Primer, then sand smoother with 600 grit
6) Spray with Primer, then sand with 800 grit
7) Spray base color coat, sand with 1000-1500 grit between coats (dont sand last color coat)
8) Spray a few coats of clearcoat
9) Switch to buffing/polishing wheel (sponge pads on my drill)... using buffing compounds 1000, then 2500, then 3800
This will get you a smooth mirror-like surface... like the surface of a show sports car... but you can stop at lower grits of sanding and ignore the buffing compound with buffing wheels/pads if you dont want that level of insane smoothness / shine.
Most times, you can stop at 400 grit and not need to go higher because you wont need that smooth a surface.... but any higher grits than 400 will generally need to be wet-sanded to avoid clogging of sandpaper.
Vielen Dank für Ihre Video! Sie haben den besten Inhalt.
Great Video thank you!
I use method 2 with a Red or ocre base to get a richer gold color
when painting with metalic paints both spray and air brushing, put a black gloss base layer, let it dry for at least 24h and than the metalic paints, youll get amazing results.
This is purely amazing 😍
That's amazing!
Great video. While I love the electroplated result, the airbrush seems to work really well too.
Ironically, the first resin print was probably the most accurate as the screen used badges were dull to avoid reflections.
so true. also the colors were quite matching the original prop. The electroplated is more of a "hero prop" as it's what I personally had crafted for the show.
3:22 for gold metallic paint it tends to look better over a red base coat instead of black. Although my experience and where I lernean it from is for miniature painting so might not apply the same to large models
Very cool!
There was an old trick on UA-cam where you would zinc plate then copper plate a quarter and use a torch to melt the metals to form brass. It looked awesome and will be basically corrosion resistant without being expensive like gold. But since idk if that would be too much heat for 3d printed parts, I would love to see it tested!!
Oh, it’s working like a charm. Will show some time. 😊
@@hen3drik awesome!!!!!!
Endlich jemand der weiß das Resin Krebserregend ist und deswegen Maske/Handschuhe nutzt 🎉
Super geworden!
If you print something with a flat top (like this) and you enable ironing. You can get near-mirror results from metallic spray cans.
Unfortunately this doesn’t have a flat top.
Super video👍
On fdm, I would print the center peace as a flat part on a smooth glass bed and bent it with the help of some heat to the main peace.
My go-to gold paints are gaiacolor 132 pearl gold, and 122 Starbright gold
Amazing!
I love this channel
Awesome video
what i have come to use for sanding resign and FFF prints is abrasive mesh (in german Schleifgitter). They dont leave sand/graind behind and are easy to work with while submerged in water. what is also stronglish recommend in oder to avoid aerosol particals.
That’s a good hint. I‘ll try these. Thanks!
Ich habe es probiert. Funktioniert wahnsinnig gut. Danke für den Tipp!
With airbrushing, I would try different basecoats to get more of a silver/gold color - use white/yellow underneath instead of black, or spray everything silver and put gold on top of the silver
yeah allclad paints! My father and I use them in our model paint jobs.
c'est trés jolie j"aime beaucoup!
Viva Star Trek
As the owner of a filament printer, I'm actually blown away at how smooth you were able to get the FDM prints in the second method. Which exact products do you use for this step (prior to airbrushing)? Oh, and I live in Germany, so can probably get the same ones you are using.
hornbach: auto-k-basic-filler-haftgrund-grau-400-ml
@@hen3drik Danke!
Just a pro safety tip: Never wear gloves when using a polishing wheel. It may seem counterintuitive, but gloves can get caught up in the motor and rip your hands apart. This goes for any machine that has a motor, including; lathes, pillar drills, routing tables, etc.
Oh, you‘re so right. I never do this when drilling but yeah, thank you!
Very good video! My usual process matches nicely to your medium effort, but I am tempted to replicate your high effort version and why not on exactly the same model!
Dare it! Getting on nice layer of conductive paint is the hardest part, everything else just works.
@@hen3drik OK, I am sold :)
Electro polishing
I think the phrasing you're looking for is " I'm not that experienced, so someone with more experience could achieve a better finish"
FDM + Acetone fumes seems like it could fit between low and medium effort
mega gute videos. hat duschonmal darüber nachgedacht die videos auf deutsch zu machen
Danke
Have you tried vibratory finishing the parts using corn cob media after plating? I use a brass tumbler for plated metal on pinball machines. I don't have to polish this way. Very good results from this method. After tumbling just clean and add your nickel or gold segment.
I will try that
@@hen3drik I also use crushed walnut shells. Depending on the plating you sometimes need a bit more coarseness. I get it from petco and its reptile bedding. Corn cob media I order online. I use Berry’s model 400 vibratory tumbler. It is small but there are a lot bigger ones depending on the need.
OMG VOYAGER FAN!!!!!!!!
8:06 i wasn't aware, thank you
Awesome! How to do another color such as green, purple or blue?
You can also apply some clear orange on your gold.
Oh, I will try that!
Do you have a video on how to make the rotary jig? I'm having trouble getting the aligator clip to not rotate with my rotary set up. Thanks in advance, your videos are awesome
Sorry, no, but I modified the original. Added an cable holder for the alligator clip. In the original design a thin wire was inserted into the jig that was wrapped around the big copper wire.
Super top cool taf😊
Tolles Video! Des Endergebnis sieht echt spitze aus! 😁👍👏👏👏
Hätte es toll gefunden wenn du noch ein paar links zu den verwendeten Chemikalien in der Beschreibung gehabt hättest. Will mich auch mal am galvanisieren versuchen.
excellent video describing the different methods to get metallic finishes
I saw you posted the link for the comb badge itself, do you have one for the little stand you used to display them?
Oh, I guess I haven’t saved it 🤦🏼♂️
All paramount had to do was produce screen accurate badges for 30 years. Now we make our own :)