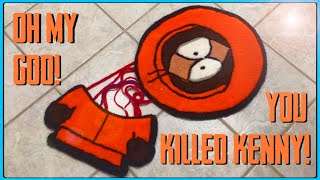
Making A Peter Griffin Death Pose Rug For The Meme

Вставка
- Опубліковано 23 лис 2022
- In this video I am tufting Peter Griffin from Family Guy into a rug. And what better pose to use than his "death pose" after one of his many falls down the stairs. Great for the bottom of your stairs at home!
As always, I start by laying out my tufting cloth on a smooth, flat surface. From there I measure the width and length that is required to fit my 3x3 tufting frame. Then, I bring up my selected image onto a laptop that is connected via HDMI to a projector. Once the projected image is aligned appropriately on the frame, I begin tracing the design with permanant markers. Once I'm satisfied with how the design looks, I will gather the yarn that I've already skeined. From there I thread two strands of yarn (one from each skein) through the eyelets that are attached to the tufting frame, and into my tufting gun. Then it is time to start tufting! I always like to start with the outline, and from that point, its just a matter of finishing one color at a time, making sure to keep the lines close together, until all the tufting is complete.
After the tufting is completed, and I've made sure all loose threads have been pulled out or snipped off, it's time to glue the back. As shown in the video, I use a generous amount of Roberts Carpet Adhesive. Dollop after dollop until every fiber of yarn is completely saturated. Then I like to take a slick, wet hand and really lather the glue in. I feel this helps to further make sure there's adequate glue coverage. And now we wait a day or two.
After the glue has had ample time to dry, we begin to remove the tufting cloth from the tufting frame and start the latter half of the rug making process.
With the rug laid glue side up on a flat surface, I will trim off the excess cloth. I like to leave about a three inch border of tufting cloth, so that it can be folded over and hot glued down to the back side. I then use scissors to cut the cloth into chunks that are about 4 to 5 inches wide. I then use a hot glue gun and apply an ample amount of glue to each chunk. Then carefully and safely, I fold the piece over, pulling with a slight amount of force. This is done so that the edge of the rug will roll over slightly and give a more visually pleasing edge. Once all the pieces of cloth have been glued down, and I am happy with the outcome, we need to cut a piece of backing material.
The backing material is laid out the same way as the tufting cloth was at the very start. I place the nearly finished rug onto the backing material and trim around it loosely with scissors. Then its just a matter of peeling up one half at a time, soaking both the back of the rug and backing material with spray adhesive, and firmly pressing the two parts together.
After giving the rug a few minutes to dry, I once again grab the scissors and trim off all the excess, overhanging backing material. From this point all that needs to be done is a final rug shearing. I have a jig that very much comes in handy. The jig locks the rug shears into place to ensure an even height throughout the rug. I start to shear row after row of the rug. Much like cutting the lawn. Taking it slower when resistance is felt. Once the rug is at a uniform height all that's left to do is hone in some of the lines. This can be done with scissors or the shears.
And after a whole lot of vacuuming, and a few more passes with the shears... And more vacuuming, and more shearing... The rug is finally finished! So I hope you've learned something and enjoyed this video and in-depth breakdown of all that goes into making a DIY rug.
Sidenote:
I've always enjoyed the visual arts so when I saw rug tufting for the first time, I knew I had to try it. From here on, I plan to continue making art showcase and tutorial videos of all things rug tufting. Hoping to continue getting better, and more goofy with it. If that's something you're interested in, feel free to subscribe!
-Michael - Навчання та стиль


And what's even more great about the rug is the more you use it and step on it, the more mangled and beaten he looks 😂 I love it!
I'm new to rug tufting so I've been watching ALL the videos out there. Just wanted to thank you for putting in the time to demonstrate your process. I love the way you do your backings. Much appreciated.
Nahh brooo this was legit !!! Perfect all around !!! I was like this is a dope idea !!!
Dude. You are so underrated. I loved this trough and through and I swear I HAVE to buy this rug. It's just so good.
I am new to rug making but I learned a trick recently that works perfectly for cleaning up your lines between colors/border color. After each color you tuft, trim it on the sides with scissors before you start your new color. Hope this helps. Happy rugging. 😊
best small channel ever keep up the good work
This was such an awesome step by step of a cool project. You make me want to learn this type of rug making!
Can definitely tell that this channel is going to blow up. Keep up the good work!
bro u are not only informative but also u throw in a dash a comedic gold, props keep up the good work. And to add u can use the trimmer to get into the outlines to make the rest of the rug pop out more, like where the cuts are, the hair, finger tips, and pants
Thanks :) I do quite a bit more trimming and shaving in my newer videos. Someday I might make a video where I go back through some of the older rugs and give them a real good sculpting with the trimmers.
That’s absolutely amazing.. totally subscribing
Having it the body of say, basement stairs, would be hilarious 😂
This channel is so cool. Very chill, nice work
Smashed the like button due to the video name, but subscribed cause of the channel name 😂🫵👍
This is sooo good :D
Nice rug! Family guy is simple the best thing ever 😂
Anyway, great job and great video!
Where did you get the jig thing to level the shaver at?
I found it on Amazon. It comes up if you search "rug shearing guide"
i would be super happy every time i saw that at the bottom of my stairs🤣
I would buy it how it is it looks nice
Looks amazing man! It would be hilarious at the bottom of your stairs haha
this is excellent
amazing, loveit
Thank you :)
Good shit tic tac toe looks 👍 👌
Shut up and take my money :) greetings from Poland :) cool job :)