Brian May Red Special Guitar Build: Fretboard Position Marker Repairs

Вставка
- Опубліковано 19 чер 2024
- This video covers the drilling out and replacement of several unsatisfactory mother of pearl (nacre) fretboard position marker dots on an oak fretboard for a Brian May Red Special guitar neck.
The marker dots turned out too thin after final radiusing with a StewMac radiusing beam and 320 grit 3M Stikit Gold self-adhesive abrasive paper.
I mill out the installed dots by mounting the fretboard back onto my Stepcraft 2/840 CNC machine with the help of a custom designed and CNC cut acrylic (perspex) alignment template.
I then glue in replacement dots and abrade them flush with the radiused fretboard surface using a flat bladed diamond file.
Time Index of Chapters
00:00 - Introduction.
00:26 - Discussion of why this fretboard needed to be repaired.
00:43 - Showing the test/practice neck that this fretboard will be mounted to.
01:08 - Showing translucent, thin mother of pearl marker dots.
01:20 - Flash card montage of my other UA-cam video thumbnails.
01:41 - Introducing my unorthodox method for mounting the fretboard to the neck.
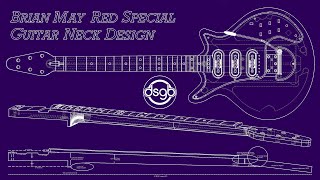
02:17 - Showing the third iteration of my Brian May Red Special design and CNC cut.
02:55 - Showing the acrylic fretboard alignment jig/template.
03:14 - Mounting the acrylic fretboard alignment template on the CNC machine bed.
03:34 - Centring the CNC machine router head in the X and Y planes.
03:57 - Finding the zero point in the vertical (Z) plane.
04:10 - Discussion of a two-stage drilling method.
04:34 - Checking the dimensions of the 1/4” (6.35 mm) and 6.0 mm mother of pearl discs.
05:08 - Removal of the installed mother of pearl dots by CNC milling.
05:51 - Gluing in the replacement mother of pearl marker dots with cyanoacrylate superglue.
06:25 - Hammering in the mother of pearl discs using a nylon rod to cushion the impact.
06:38 - Run down of the newly inserted replacement marker dots.
06:51 - Removing the acrylic alignment template and fretboard using plastic shim material.
07:09 - Inspecting the fretboard before filing the marker dots flush.
07:25 - Filing the marker dots flush with the oak fretboard surface.
07:44 - Removal of nacre dust build up with isopropyl alcohol and a microfibre cloth.
07:51 - Removal of nacre dust build up with a vacuum cleaner.
07:56 - Filing and clearing the nacre dust off the diamond file blade on my laboratory coat sleeve.
08:16 - Cautionary note on why water raises wood grain but isopropyl alcohol and acetone don't.
08:39 - Final inspection of the finished work.
08:58 - Outro 1.
09:07 - Outro 2.
Please check out my other UA-cam videos which cover a wide range of topics related to Brian May’s guitars and musical equipment and also my website, dsgb.net which features in depth information on my guitar build and modification projects.
#BrianMay #RedSpecial #fretboard


These are skills that always so far away from me until I see your videos. Masterfully produced, explained and executed 👏🏻👏🏻👏🏻
Thanks for your kind words Thomas. 💜😀🙏🏻
Absolutely brilliant idea to leave the 1mm waste material on the sides! 🤯
Yes. So brilliant, I didn't think of it for seven years. 😫
Love this video Doug. Well done. Such a great insight in to what goes on and the challenges of using CNC. Must watch Red Special content. Keep it up
Thanks buddy. 👍🏻😀 That was the first fretboard I cut from the timber you supplied which was really good quality and a pleasure to work with.
Another great video as always Doug ❤
Thanks for your support Tribesman John. 👍🏻💜😀
8:16 Thank you for the knowledge
Thinking about studying chemestry in the future
I recommend any flavour of engineering over a pure physical science. 👍🏻😀
Very Interessant video as always !
Merci beaucoup Nolhan! 👍🏻😀
Hi Doug. I doubt that I would have the confidence to ever attempt this procedure but it was interesting to see it done. I guess CNC will only deliver precise results if you align everything correctly. Did you consider just drilling out the dots on a drill press aligning by eye?
Hi Adam. Yes, I did consider avoiding all the alignment faff and just drilling the dots out manually using my drill press. However, I thought it would be more of a challenge and, if it worked out o.k., make an interesting video. 👍🏻😀
I've done this with an under sized forester bit and a hand drill... chip out the remainder, done in a few minutes
I assume that you meant "Forstner" drill. I needed to remove the old dots and drill the existing holes deeper so the job was a bit more involved than just a straightforward remove and replace, that's why I chose to re-run the CNC toolpath. 👍🏻😀
Afternoon Doug! I'd like to follow up on your advice about not letting water to contact a finished wood surface. I agree and disagree, however this is not atypical of me as you might expect by now. Water is actually incredibly useful as part of a finishing schedule as the cells that comprise the fibres of wood will readily take on water and swell, as is their biological purpose. The main point is that fibres which are cut, damaged or unsupported from sanding processes will swell and rise up from the sanded surface. They can then be knocked back with a lick of 320 grit paper at 10 o' clock and 2 o' clock with respect to the grain direction, as in line has a higher likelihood of pushing them back in place. This handles the initial fuzzies raised from finishing. In general it is unwise to get surfaces wet for no reason. I'd probably say this is more of a wood biology issue than one of chemistry in terms of informational value. ;-)
Thanks for chipping in.
It's sound general advice rooted in physical science principles. Some species are relatively impervious to water such as ebony. Of course, several factors such grain orientation, structure and damage from cutting or abrasion will influence water take up.
Please bear in mind that I pitch my videos to a general audience including people with a primarily musical or artistic background and try to edit them so that they have some pure entertainment value, rather than being informative or instructional. 👍🏻😀