Це відео не доступне.
Перепрошуємо.
Homemade cartridge brass annealer

Вставка
- Опубліковано 21 вер 2020
- My Water Cooled Induction annealer. Again, I want to make it 100% clear that I am not an electronic engineer, so take anything in this video with a grain of salt. Handloading can be dangerous and annealing is one of the last steps you need to do to maintain accuracy in your loading. It is not necessary, but it will (if done properly) lengthen the life of your brass and lengthen the window of consistency that you will have. Proper annealing will help maintain consistent neck tension and shoulder bump as you size cases.
Sniper’s Hide thread: www.snipershid...
Annealing Article: vacaero.com/in...
Amazon parts list: As of September 2020, the cost of the parts is around $170. I did not include wiring (use something like 12 AWG stranded) and the pigtail (for an appliance like a dishwasher, use a 3 wire pigtail) for the power supply, as I already had those on hand, but you can include those as well.
Power Supply: www.amazon.com...
ZVS Induction Board: www.amazon.com...
Timer Relay: www.amazon.com...
Button: www.amazon.com...
Water coolant reservoir and pump: www.amazon.com...
Buck converter: www.amazon.com...
Water cooler radiator with fan: www.amazon.com...
Copper tubing: www.amazon.com...
Clear tubing: www.amazon.com...
Brass compression fitting: www.amazon.com...
Brass fitting: www.amazon.com...
Water Wetter: www.amazon.com...
I'll monitor the comment section on here to respond to questions. I will do another video when I rewire it, so that everyone can see where everything goes.


Very nice. Like a number of others I've been noodling what I could fab together as a low quantity output reloader. Your water cooled system is rather unique and the parts list provides a wealth of information for a low budget DIYer like myself as a starting point. Thanks.
Glad I could help
Thanks for the video and MANY THANKS for the component list!
So I put the 750 tempilaq inside the case mouth and when it turns black from green I consider it complete. My torch is pointed at the neck/shoulder junction. Seems to be working ok for me.
And the mad scientist reloader award goes tooooooo.... 👏😄🤠
Have you tested the conductivity of the coolant? Ideally you want distilled water so the conductivity is close to zero.
I just got done building one of these, here is what I changed:
I went with the power supply that was recommended and found it to be a little light in power the internal breaker would trip at times I went with a 20 amp power supply.
The next thing I did was to put in a 40 amp relay to control the board this takes all the strain off of the small PC board power controller.
I to burnt out one of the induction boards the silver tape that connected the capacitors melted and took out the capacitors I ordered new ones 10 for 11$ and replaced the old ones. When I installed the new ones I left the wire tails on and folded them in line with the foil tape and soldered the whole strip together. I think this is a weak point in the board.
I don't know if I can post a pic of my finished project or not, maybe someone can help with this.
I'm not sure how to post pics on a video here. I would definitely go with relays next time. I mention that in the video I think. I'm going to do an update video soon. Just kind of short on time
I'm just wondering, did you say that you used tap water in the water cooling setup? If so you may want to use some distilled water and a kill coil. The distilled water has no minerals in it like the tap water does. It's hard on the rad and pump and can caz problems. As for the kill coil it does what it says, it kills anything from growing in the loop. So if you have a little bit of silver you can put it in the reservoir. And it will keep the loop nice and clean of any bacteria or algae from growing. You can get a kill coil from new egg or maybe even Amazon. Hope this helps......
Yea, I used distilled. It's more of an experimental thing for me, I'll change everything out later if needed.
Very very cool man, I’d consider making it higher maybe on som legs, out an old press below it and use that to put cases in and out.
Nice all this needs now is to have a drop door when the timer goes off.
Looks like it needs another circuit for a retractable stop that the case rests on, and a Dillon or similar case feeder.
Old video, but this is pretty sweet lol I am in the middle of ordering parts.
lol i did almost the SAME thing independent from you. I even used OSB for mouinting everything and the same water radiator.
A tipp. I use a relais between the powersupply and the induction pcb. the relais is controlled by an arduino uno (controllable down to 1millisecond).
Yea my timer has sufficient capacity to nit need a relay with a 24v supply. I can literally melt a 308 case in 8 seconds. If/when I rebuild it, im going to do a 48v supply and use relays. Thats the proper way to do it anyway
@@ryridesmotox i got an 48v 600w supply. works great. 1000w would be better but price/performance is not worth it. the nice thing about the arduino is, you only need a stepper motor to make it full auto. that is my next (and maybe final) step
Thanks for sharing, I'm in the middle of the same build and also trying to automate it with Arduino controlled stepper as @asdf jklo mentioned ;)
I was originally going to automate mine. I really only about 100 at a time. I'm not an electrician or overly tech savvy with electronics. So I really haven't needed it to be honest.
Sweet set up! Besides your list you have what would you add to it to make the makes a case drop out the bottom And maybe a faster more powerfully annealing
That's would take some extra parts. To be honest that above my knowledge level at this point. It doesn't take enough time annealing 100 or 200 at a time for me to justify spending the kind of time/money to automate the process. There is a bunch of people that have done it though. Check the accurate shooter forum for the Gena-eric annealer, can't remember the actual name. But a Google search should get you there. They've completely automated theirs.
What did you use to twist your coil evenly?
1/2 inch socket extention. I coiled it and then used pliers to kinda squish it together, then ran a folded up piece of paper to get it to have some clearance between the coils. If they touch, then it disturbs the magnetic field.
Have you experimented with other means to verify temp on the brass such as a temp gun? I’m interested in building one, but have been trying to get my ducks in line before I get all of the supplies. I’m not sure if a heat gun would be able to pick up the temp fast enough. What are your thoughts?
No idea about the heat gun. Honestly, the tempilaq is fine or, turn the lights off, hit the button and wait for the glow to go down the neck to the beginning of the shoulder then that's your time. You're after accurate neck and shoulder sizing.
So maybe I completely missed the point of the Annealing article. In the article he's annealing cases anywhere from 4 mins to 30 mins at various temps. I still didn't see anything in the article where he clarifies the "prefect" annealing time and temperature based for a piece of cartridge brass.
Just an idea, but perhaps you might ask the author of the article instead. The correct time would be cartridge dependent, coil dependent, amperage dependent, and etc. Basic idea is to figure out what works best for given your circumstances and particular equipment. Or purchase one of the professionally constructed annealers where the company has put the R&D into calculating the parameters. Even then, I'm sure they will have disclaimers based on a variety of factors.
Do you have a schematic for your build?
Very cool, one thought could you support an inverted case from the top of the coil held in a shell holder
Yea I may actually do that. I'm going to be doing some 300prc soon, so I gotta figure some wa to control depth more adequately.
bill 6920 No, anything metallic close to the coil will resonate coil and heat up. This is the tricky part. Like he mentioned a simple trap door that can even me manually activated is a way to go.
@@ryridesmotox I recommend you insulate your coil with heat resistant sleeve or if you accidentally touch and short your coil it will fry your board. I am really surprised you're able to pull this off with only 360 watt! I was reading it was taking people too long with such little power. I also noticed you are using thick tubing and 10 coils rather than one original design that used something like 7-8 coils and 1/8 copper tube. With 600 watt PS 50v and less coil I think my anneal time was around 4 sec for 223. I was planning to glue a copper block under the board learn the first set of capacitors are with a special non conductive glue to water cool because it gets super hot there! I placed thermocouple there and it was reaching 400F! But this was under continuous run, if I use relay to activate it might not be so bad and I'll just glue a heatsink and use computer fan.
@@DimaProk I blew up my first board running it with minimal ventilation. Risky my fault. I haven't put any sleeve in any of my coils never had a problem. I've made 4 different ones testing the amount of turns and diameter. I still plan on making a follow up to show how the stuff goes together and outlining the improvements i would make next time.
I would definitely run a 48v 20a 960w board with relay next time. It would definitely anneal quicker.
@@ryridesmotox Same here, I didn't even have ventilation and I was using to anneal metal parts and it burned out. Now I use 1800W board and water cooled coil and it holding up, but I only run it for maybe couple minutes. My 600W power supply though, first the amp/voltage meter went out sadly and now I feel like it's operating at lesser capacity because I can't get parts hot enough for tempering. I do have 2400W power supply LOL but it runs on 240V. I did try it and the part I was annealing got blinding hot and when I dunked in oil it came out ruined - all pitted! ua-cam.com/video/DsQ7mEab9Qo/v-deo.html
Excellent! Annealing Made Perfect has some good published studies on their website...they found no annealing for even an hour until 660F. Their AMP anneals a .223 case for a peak of 1000F in 3.4 seconds. How do you assess the consistency of your neck annealing? Do you have a gauge with an arbor press?
Pin gages.
Edit: they can be found on amazon
@@ryridesmotox Thanks. Do you use an expander mandrel to set your neck internal dimension?
@@RetrieverTrainingAlone I do. A 21st century mandrel. But I don't think it's entirely necessary to be honest. It us nice when testing to see if more or less tension is beneficial, but I've found that .002 of interference is plenty adequate.
Do you happen to have an updated shopping list for this with any upgrades you made ?
I dont really. The snipershide thread I linked to has a bunch more info. This works for me, it's not the most ideal setup, but as much shooting as I do, it works just fine
very cool
Now that's pretty damn slick!!!! Too bad I just found this video - just ordered one a couple days ago from EPintegrations.
That’s the one I’m going with as well. I like the versatility of it as far as adjusting it for different case sizes.
I want to try this. I followed the link to the timer board and ordered it. I then read the questions and answers and it says it will count in milliseconds to 999 or whole seconds, but will not count fractional seconds like 7.2. It this the correct link?
Mine is graduated in .1 second. I can't guarantee that the timers haven't changed since I bought mine though.
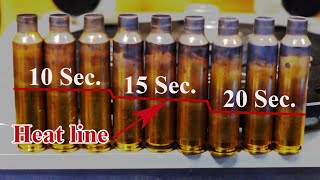
That looks like they are getting really hot. I thought 750° was the ideal temp.?
750 isn't hot enough to get a full anneal in a short enough amount of time where it won't propagate to the rest of the case.
I linked to an article that explains the process far better than I could ever explain it. It's a good read. Highly recommend
@@ryridesmotox I'll take a look at it. I should also say that I put the 750* tempilaq on the inside of the case neck. So the inside has to reach that temp. I guess everyone does it a little different. I always thought if it were placed on the outside it would reach temp before it permeates through the brass. Then of course I wet tumble afterwards.
Thanks for sharing! I am reviewing different videos on annealing. And the parts used.
Same here. I narrowed it down to two. One is a DIY kit, which I still might get down the road because I like it, and the other is a complete unit which rightnone is the one I decided to go with. Neither is induction which obviously then means they use propane.
Smart!
How is the coil connected to the board? I would like to build one for myself.
The board has posts where the coil is, more or less, clamped in. It isn't overly tight, just enough to keep it from falling out. Its conducting electricity from the brass fasteners on the board to the copper tube. If I o an updated video of rewiring it, I'll cover that more appropriately. I have some other projects to do right now though, so it may be a few weeks.
@@ryridesmotox Ahh ok I get it now.
How can a person look you up on Facebook
I dont post on FB much.
I lost all interest at 3:30. You never got to the point which was supposed to be your 'Homemade cartridge brass annealer'. I would highly suggest that you delete this video and start from scratch. Right out of the gate you should be talking about your annealer and your annealer only!
I enjoyed the video.
Ya, maybe he could build the damn thing and send it out to you for free..... Personally I feel the video sparked enough interest for me to do a little more research using the provided links and start thinking if this is the annealer project for me. I think that is the point of the video and never once thought the title was misleading. If it was titled step by step DIY induction build then I would feel a little let down.