How much would you say this entire process costs- for example, If I have a CNC and the Oven - How much would the cnc board cost? How much would the CNC sealer cost? How much would the prepreg mold cost? How much would the bags cost? so on... Even a rough estimate would help. Is there a minimum size required per roll order? - Thanks.
Excellent videos. I have one question you might be able to answer. I'm using currently XC110 3k and 6k prepregs. When I intend to use them, I defrost them for four hours usually. But the problem I'm facing is that prepregs become very hard, unlike the ones in your videos. What could be the reason if I may ask? Thank you. FYI, I have not exceeded the recommended out time.
Excellent demo. This is how you sell products. By making these great tutorials you mitigate any confusion or misguidance that may result in poor ratings from the ignorant. Currently i have no room to store this Prepreg in a freezer nor do i have space for a suitable oven. Knowing those requirements i wont end up buying something i cant store or use properly. In my case vacuum impregnation is the best option although a bit more involved. I already have a suitable vacuum pump. i just need a few other things to get started.
Glad you liked the tutorial, even if you've concluded that for you resin infusion will be a better fit. It is worth pointing out that although we state an 'out-life' of 30 days for our XC110 system, this is VERY much on the safe side and we have used material that's been out of the freezer for 2-3 months without any problems at all. Officially we'll stick with the 30 days figure but this is not a reactive system and so if you do want to experiment with prepregs without the ability to keep them frozen then you wouldn't have to worry too much about them being out for more than 30 days at ambient.
It blows me away how amazing your products come out! I dont believe that I have the talent nor patience for this, but would love some CF parts on my car or motorcycle.
Great video, as usual. Tip for future videos, though; please, if you're going to hold the part/focus object, please hold it still or better yet just set it on the table so the camera can see it easily.
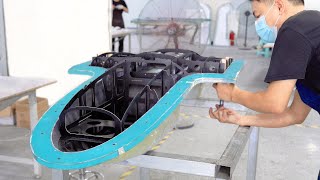
Great presentation, easy to understand but very detailed. It came clear to me that it will take lots of practice to build something looking as perfect as the part shown there. Best regards from Germany
Could you show how make it when the object, like a bumper, have 2 different faces ( An external clean and other with brackets in the interior. ) ? Really thanks for everything. Very helpfull. Best, P R E L !
Could you guys do a video on the different surface finishes different methods produce? I'd love to see how I can get a perfect, glass smooth glossy finish!
You can get a very good finish straight from the mould (as you see in this video). Achieving a 100% flat surface finish from the mould is not actually possible (using the out-of-autoclave method or an autoclave cure system) because the carbon fibre will always print through slightly on the surface. Almost always, this amount of print through would be acceptable but if it isn't, the only way to achieve a perfect flat gloss is to clear coat, then flat and polish the part after it's been made.
Absolutely excellent video how-to with PrePeg! I am interested in using 3D printing with PEEK plastic(Stratasys's out of patent Ultem9010 and 9085) using 3DP-Platform WorkBench Series #400 printer ("X"axis 57" by "Y"axis 39" by "Z"axis 27" high get their 2 largest diameter extruders with this rig(about 55k$ with enclosures). The method suggested skips the expensive female molding processes and gives the customer flexability with his own parts or panels(no longer wasted time making molds however u must design on CAD for actual parts destined for PrePeg coverings).
I've got a few questions, first doesn't a your standard twill weave carbon fiber cloth lay down extraordinarily well as in very flat and without creases into even the most intricate of molds, one of the reasons it's a beloved material for parts prototyping, what I'm asking is this stuff is not for making parts that require such precision then? in which case you'd go with a standard two part epoxy resin? I know it's strength and light weight are why it's used in motorcycling but they also use it for exhausts, because the stuff basically won't be effected at those temperatures but you were worried about excessive heat from a heat gun, does this stuff have different heat properties? So other than less mess and added material, actual time it would take and the skill needed; if you can do work with carbon fiber cloth you can do pre peg just as easily right and? What about costs over time and vise versa? plus repeatability, if you were making similar parts over and over you'd be doing it with cloth and resin correct, to yeild the most consistent results over and over, while if you were just doing a certin project once every couple years then the convenience will be worth using pre peg? what about the same parts cloth and pre peg does one out preform the other or are they apples and oranges? sorry for so many questions but this is my first time seeing pre peg, what cool stuff. made me a subscriber, thanks
Pretty good tutorial I have to say. It’s not structural so both plies at 0 and the second ply also cut into the corner is no big deal although I’ve never heard of a cure being done without breather over the whole job. Even just an oven cure should still have light breather over it.
It's definitely better to not put the breather over the laminate surface when using the XC110 out-of-autoclave. It is convention for autoclave prepregs and an autoclave-cure to put breather over the whole laminate surface but we find the results are improved by not using breather over the surface under these conditions. Also, it's certainly not unheard of to use breather more sparingly even for autoclave cure conditions and actually quite important to avoid breather in particularly tight geometries.
Easy Composites Ltd yeah I mean I've never used that material so i can't speak from experience, but all clave cures should still be allowed to have the air channel that breather gives. Light can work it's way round most corners, especially if you dib the bag, and of course you can still tailor the breather into the corners if you're using heavy; kind of the same way you would the laminate on a visual ply.
Amazing video, thanks a lot for sharing this knowledge How does prepreg stick to aluminum parts: Would embedded the aluminum parts in your prepreg layers, or would you glue the aluminum parts once the prepreg is cured and sanded. I'm making about mainly tube fitting (aluminum tube to carbon tube (partially wrapping the alu tube) transition) Great job Cheers
Prepreg can be cured directly to aluminium using the resin to bond however, for this type of application with tubes, it would probably be better to cure the carbon separately and bond in place as a secondary operation. The difference in thermal expansion of the aluminum vs carbon can cause issues as the 2 materials expand and contract at different rates during the curing phase.
I've made an absolutely perfect mould using Airtech LTC3 tooling prepreg and a PU master, sealed with a very thin coat of epoxy and about 8 coats of MPP712EZ sealer from Chemtrend. I wonder why LTC3 worked so well and some other tooling systems fail with PU masters...
Imagine you've laminated and vacuum bagged, how long can you keep them like that before you cure in the oven? I was thinking of laminating several parts over a day or two in the evenings after work, say Thurs-Fri, then run the oven early Saturday morning whilst at I'm home all day.
Not a problem at all. The outlife of the pre-preg is fine in most cases and a few days under vacuum at room temperature may very slightly help with consolidation on some difficult parts - in the same way debulking helps.
Awesome video, thank you for sharing! Quick question. If I was to use a powder coating oven, how would you go about working the vacuum pump in? Thanks!!
A form of bulkhead fitting (Pneumatic/airline suppliers) that allows attachment of the pump the the fitting and then internally from the fitting to the part.
I have one question, it’s my first time that I will be working with Prepregs Here is the question: The XC110 cycle mentions a pressure of 10 mbar , is this vacuum pressure applied while vacuum bagging and as well as while heating ? Or is it different vacuum pressure applied during vacuum bagging (what is the value) and a pressure of 10 mbar while heating in oven.
Full vacuum, or as close as possible to full vacuum is pulled throughout the process. For both debulking and then the heated cure cycle. 10mb is the minimum vacuum level you need to achieve.
Could this be achieved using dry reinforcement and wet laminating for small production purposes to save on cost? What would the cons be exactly? Thank you!
congratulations for your videos.. they are always very useful. one question, is it necessary to keep the vacuum pump on during the entire curing phase in the oven or is it enough that there is a perfect vacuum in the bag?
Really solid presentation. two questions here: 1. does industry also use the draping and prepreg procedures shown in this presentations? Since it seems to involve a lot of manual adjustment, large deviation may occur in large production. 2. in your channel, carbon fiber composite is mostly manufactured for laminate which has excellent lateral mechanical property but weak along out of plane direction. do you guys also make bulk composite parts which have fiber direction not only in plane but also in out of plane direction? Thank you.
Higher volume parts may need slightly different process and tools, however there are plenty of business using these techniques and materials to make parts in smaller and medium volumes. You can make parts stronger in those direction by rotating the plies of the material in a lay up. For many non-structural parts, this is not necessary though.
Hi! Excellent video! Could I use a mid layer of foam to increase the overall strength of the final piece, or it doesn't make sense with those pre peg sheets? Thanks
Creating a cored panel with pre-preg materials is commonly done to improve strength and stiffness so it is possible to do so. You need the right core material to withstand the cure temperatures and depending on the resin uptake of the core, you may need to use a film adhesive to add resin adhesive to bond them together properly.
If we have two CF finishes parts and want to join them ... can we put them back into the oven ? errr.... I have to make a Component which has two parts ... that need to be joined together in a super strong bond. They cannot be made in one go hence two parts and then join ... So after the two are made and cured in the oven ...can we join them together by putting them together back in the oven. (with off course CF applied) (I am sure i have not explained that well)
That method generally is not necessary. Modern structural adhesives would be the easiest way to bond as long as you create a reasonable overlap/bonding joint.
@@easycompositestv so I could in theory if I wanted a V pattern on one sheet, Id just have to lay the V pattern for the surface layer, then over lap the underlying layers???? trying to figure out how to make a v Pattern carbon part with out pre preg
@@spencerhansen5804 Hi Spencer, yes, that's correct lay the first ply with the herringbone pattern then all the following plies can be laminated as normal.
I have two questions Can the carbon look nice finished when the mold side isn't the part we want to look at? How are we going to achieve nice quality finish in this situation? Second question is when do we need to use extra epoxy on the fibers? Also the weight of the new carbon part you made vs the old engine cover. Thanks!
In this tutorial the mold is female. You can always use a male instead of a female mold. The process isn't much different from that with a male mold. The 2 molds at 8:59 are male.
I've watched quite a few of your videos and they're all very helpful! However there is one thing i'd still like to ask, that is; how to manufacture a part that has 2 moulds (a negative and a positive side)? Meaning that one mould has the relative "bottom" side of the part and mould 2 has the relative "top" side of the part. How do i go about gluing or curing the two moulded parts together seamlessly to make one smooth and perfect finished part? Thanks!
If you make them as 2 parts, then use a structural adhesive to bond them together seamlessly. Alternatively, depending on equipment and facilities available to you, it may be possible to make them with matched tooling, but this can be quite complicated. It is not a process we have videos for yet but is something we may cover in the future.
You would need an inner mould or matched tooling. You can make it in two parts and bond together, or use carefully designed matched tooling to make one piece.
I wonder how important the temperarture during the curing process of the carbon fibre really is, does it make´s the material really that much stronger ?
Yes Matt, in the case of curing a prepreg material like we used in this video it simply won't cure without elevated temperature. The precision on the terperature (in terms of ramps and dwells) is more important for out of autoclave prepregs (like our XC110) but you will always find that prepregs have a cure cycle. It's often not a matter of the exact cure cycle making the cured laminate stronger but rather controlling the temperature in order to prevent an exotherm or to ensure proper resin flow.
Yes, we did choose to make a component with some very tight radii in this video. Tight radii like those on this component do make the layup more difficult and also increase the chances of bridging or pin-holes/micro voiding on these corners so wherever possible they should be avoided, however in this video we wanted to show what is possible. I would suggest trying to avoid corners with a radius of less than 1mm but wherever possible, make them as large as the design allows.
For a flat sheet you can use a toughened and tempered glass. They come with a range of heat resistance so you'll need to check that it can withstand the 200°C you're looking for.
How much suction is needed when vacuum bagging the wrapped part? Would attaching the suction hose to a common heavy duty shop-vac be sufficient or does it require much greater amounts of suction to pull out any air bubbles?
I'm going to make a stupid question. I never used prepreg because I don't a freezer to keep the material. Is a really bad idea to use my freezer at home? I wonder if the food is going to be contaminated. Of course I will seal the bags with the prepreg very very well.
Hi Sebastian, that's not a stupid question at all. If the prepreg is in sealed bags then I would say it would be fine to be in your domestic freezer, especially in small quantities. If you become a regular user of prepreg then of course you'd switch to a separate freezer but for small amounts occassionally I would not have any concerns at all. It's also worth pointing out that - especially with the XPREG XC110 you see used in this video - the out-life of the prepreg (i.e. how long it can spend out of the freezer) is actually extremely long, probably more like 6 months (although we state 6 weeks). We're starting to find out that users have no problems from prepreg that's been out of the freezer for several months and in fact the XPREG XC110 datasheet might soon be updated to reflect this.
Adding to what tuiapele was saying, keeping it in a freezer prevents moisture from getting into the resin matrix before use. Moisture is bad because it could introduce voids while curing.
In theory, yes, it should be possible - you would need to incorporate some of the fibres at +/-45 degrees as well as 0/90 to ensure you had uniform mechanical strength in each direction. As a starting point, I would recommend matching the thickness of the original part if made in metal - doing so will result in a lighter finished piece but with similar overall strength.
Just quick question, does it make difference if I use this oven and not autoclave? I find very hard to find any autoclave to buy out of EU. I would invest in one of the ovens you are selling, but I need to know if its sufficient to me. (Im start up company)
It really depends on the materials that you are wanting to process. Our XC110 material for example, is an out of autoclave pre preg which can be processed in an oven at vacuum pressure.
Can I put forward a suggestion for a tutorial video. Visiting the Autosport show every year the carbon WRC spoilers never fail to amaze me up close. All multi element with smooth faces on all sides.
Nice video, but what do you do if you have some threded screws on the inside of the part ? How do you make a screw thred inside the part, as you generally are making the carbon fiber part on one face of the main part ? Thank you.
Generally screw threaded fixings like that are created after the main part. As the typical carbon moulding processes are "single sided" it can be hard to create fixings on the reverse. Different ways can be done, including bonding in aftermarket threaded studs or fixings, cutting up the original part to salvage fixings or fabricating or casting them in resin then bonding into place.
Hello, I love your videos, thanks for everything, there are so well explained ! I'm looking for a video about latex bladders, is that in your plans ? And do you think that a latex bladder part could be stronger than one using a vacuum bag, a vacuum bag put on the piece 1 atmospheric pressure, is not it ? And a latex bladder could be pump up to few atmospheric pressure ? ????
Hi Jean-pierre, we might well do a video in the future about positive pressure bladders. At the moment, I don't think it's imminent because we have lots of other things to cover too and - to be honest - moulds that can take high pressures come with several risks which make them less suitable for home projects but it's still something we could cover in the future. To answer your question, there could be advantages to higher pressure (more consolidation) over just the one bar of pressure available in a vacuum only setup, although if done correctly, the difference would be small.
Dear Sir, If I want to make a sphere of FRP of having the dia around 1000mm then how it is possible have the same in FRP in outer side as finished....!
No, that's true, there a great deal. There is more 'slack' on the full rolls, which I guess are the ones that are likely to be in and out of the freezer more times, but on the shorter rolls it's really a matter of taping them back up if you need to re-freeze them. Some 2" wide clear tape will do the trick fine.
Can i make a fixed wing drone like a MQ9 Reaper model or a Boeing 747 model fuselage and wings using carbon fiber only? Or do i have to mix it with Balsa wood which has been traditionally used in model aeroplanes?
Yes you can use carbon for these parts either on its own or in combination with a core material to add stiffness. Be aware that if you have internal areas, carbon will reduce signal strength.
Laser cutting is generally not suited to composite cutting - you wouldn't want to use it pre-curing anyway but post curing, the burn temperature of the carbon is too high for the resin so you end up destroying the resin locally to the cut. It is best cut by mechanical means (CNC Router or Waterjet) or in its uncured form with a rotary/ blade cutter
i could see how this could appeal to a chef or someone in the culinary/food industry, all the prep is a lot like baking a cake. which sucks for me cause i'm impatient and have never gotten on with cooking. however my wife and mother could probably build chassis for Bugatti Veyrons as they LOVE this kind of prep and set work. lol
The Tg of the resin system used in the XC110 prepreg is 120°C therefore it should not be used for applications where it will be exposed to service temperatures of around 115°C. The service temperature around the intake and valve covers will depend on a number of factors so you're best checking your configuration using an infrared thermometer in order to know what temperature you have in these areas.
Carbon fibre itself is charcoal in colour. You can have hybrid fabrics made with a half carbon, half dyed polyester mix but that is clearly a half black, half red look. To get an even red colour like on the Chiron, the easiest method is to spray the car with a tinted lacquer. Various paint companies offer tinted lacquers. With multiple layers and a strong tint, you could get the effect they have on the Chiron.
@13.35, I disagree. Even on visual parts, wherever it is practical to do so, I've always completely covered the component in air bleed for a cure because it is good practice to minimise the risk factor of air becoming trapped within the bag face.


Not sure how I got here, but this guy is a really solid presenter. 11/10
i give it 9/11
@@ahriman46 a explosive score!
L
@Kobe Jabari SCAM. Go away fool
@@GordonGreenCincinnati They're bots. Just report them as spam.
These are honestly some of the best tutorials in all of youtube. Clear, thorough, gives options, does and dont's, and general tips. Fantastic work!
Glad you like them!
I absolutely agree.
{always} Outstanding video tutorials... Presenter is top notch. Thank you
Sorry, had to re-upload the same tutorial when I realised it was missing the sidebar which helps to navigate through the content!
Easy Composites Ltd awesome this series of prepreg tutorials, I'm in love with that oven 😍.
How much would you say this entire process costs- for example, If I have a CNC and the Oven -
How much would the cnc board cost?
How much would the CNC sealer cost?
How much would the prepreg mold cost?
How much would the bags cost?
so on...
Even a rough estimate would help.
Is there a minimum size required per roll order? - Thanks.
Excellent videos. I have one question you might be able to answer. I'm using currently XC110 3k and 6k prepregs. When I intend to use them, I defrost them for four hours usually. But the problem I'm facing is that prepregs become very hard, unlike the ones in your videos. What could be the reason if I may ask? Thank you.
FYI, I have not exceeded the recommended out time.
Easy Composites Ltd hi where can I order from you to the USA?
Where can I get those tools to laminate. I just started a job but in need of some tools
superbly written script and confidently presented. excellant work all involved.
Having today a job interview as a starting composite engineer, thanks for the clear videos guys! :)
Hope the interview went well!! :)
Excellent Tutorials from Easy Composites. Very clearly explained and a great introduction. Thanks for putting these together.
Excellent demo. This is how you sell products. By making these great tutorials you mitigate any confusion or misguidance that may result in poor ratings from the ignorant.
Currently i have no room to store this Prepreg in a freezer nor do i have space for a suitable oven. Knowing those requirements i wont end up buying something i cant store or use properly.
In my case vacuum impregnation is the best option although a bit more involved. I already have a suitable vacuum pump. i just need a few other things to get started.
Glad you liked the tutorial, even if you've concluded that for you resin infusion will be a better fit. It is worth pointing out that although we state an 'out-life' of 30 days for our XC110 system, this is VERY much on the safe side and we have used material that's been out of the freezer for 2-3 months without any problems at all. Officially we'll stick with the 30 days figure but this is not a reactive system and so if you do want to experiment with prepregs without the ability to keep them frozen then you wouldn't have to worry too much about them being out for more than 30 days at ambient.
Wow, That did not feel like a 17 min video. Great work
Seriously the best how to I've ever seen. You are exceptional honestly
Thank you Mitch, that's very kind.
I do this for a living , and this is spot on! Good Job!!
Seal of approval! Thanks Chuck.
This guy LOVES carbon fibre. Has a carbon fibre butter knife and everything
excellent tutorial. looking forward to learn more from you. you are the best among all other videos I've watched
Great tutorial, with all the detail hand work involved no wonder CF parts like that timing cover can be expensive.
It blows me away how amazing your products come out! I dont believe that I have the talent nor patience for this, but would love some CF parts on my car or motorcycle.
Guys you are the best. Wish I could have enough budget to study on your courses.
Great video, as usual. Tip for future videos, though; please, if you're going to hold the part/focus object, please hold it still or better yet just set it on the table so the camera can see it easily.
you know the presenter is solid when he makes you want to buy their product haha
Great presentation, easy to understand but very detailed. It came clear to me that it will take lots of practice to build something looking as perfect as the part shown there. Best regards from Germany
Thanks F lx, we appreciate the great feedback and best wishes to you in Germany! :)
What a beautiful material. I am glad I found you.
Ok so now I’m ready to make my own f1
Still the best composites videos on youtube. Su perb
Excellent presentation! Very informative and clear. Kudos to the presenter!
Thankyou to the Author 😅 I learnt so much 💙
Noted. Looks like I need to go shopping before I attempt fenders for my project car
You guys are so awesome. Great video.
Could you show how make it when the object, like a bumper, have 2 different faces ( An external clean and other with brackets in the interior. ) ? Really thanks for everything. Very helpfull. Best, P R E L !
bhai bohot sahi explain kiya tumne:-)
Could you guys do a video on the different surface finishes different methods produce? I'd love to see how I can get a perfect, glass smooth glossy finish!
You can get a very good finish straight from the mould (as you see in this video). Achieving a 100% flat surface finish from the mould is not actually possible (using the out-of-autoclave method or an autoclave cure system) because the carbon fibre will always print through slightly on the surface. Almost always, this amount of print through would be acceptable but if it isn't, the only way to achieve a perfect flat gloss is to clear coat, then flat and polish the part after it's been made.
Absolutely excellent video how-to with PrePeg! I am interested in using 3D printing with PEEK plastic(Stratasys's out of patent Ultem9010 and 9085) using 3DP-Platform WorkBench Series #400 printer ("X"axis 57" by "Y"axis 39" by "Z"axis 27" high get their 2 largest diameter extruders with this rig(about 55k$ with enclosures). The method suggested skips the expensive female molding processes and gives the customer flexability with his own parts or panels(no longer wasted time making molds however u must design on CAD for actual parts destined for PrePeg coverings).
i am doing this for a few months now
I've got a few questions, first doesn't a your standard twill weave carbon fiber cloth lay down extraordinarily well as in very flat and without creases into even the most intricate of molds, one of the reasons it's a beloved material for parts prototyping, what I'm asking is this stuff is not for making parts that require such precision then? in which case you'd go with a standard two part epoxy resin? I know it's strength and light weight are why it's used in motorcycling but they also use it for exhausts, because the stuff basically won't be effected at those temperatures but you were worried about excessive heat from a heat gun, does this stuff have different heat properties? So other than less mess and added material, actual time it would take and the skill needed; if you can do work with carbon fiber cloth you can do pre peg just as easily right and? What about costs over time and vise versa? plus repeatability, if you were making similar parts over and over you'd be doing it with cloth and resin correct, to yeild the most consistent results over and over, while if you were just doing a certin project once every couple years then the convenience will be worth using pre peg? what about the same parts cloth and pre peg does one out preform the other or are they apples and oranges? sorry for so many questions but this is my first time seeing pre peg, what cool stuff. made me a subscriber, thanks
Pretty good tutorial I have to say. It’s not structural so both plies at 0 and the second ply also cut into the corner is no big deal although I’ve never heard of a cure being done without breather over the whole job. Even just an oven cure should still have light breather over it.
It's definitely better to not put the breather over the laminate surface when using the XC110 out-of-autoclave. It is convention for autoclave prepregs and an autoclave-cure to put breather over the whole laminate surface but we find the results are improved by not using breather over the surface under these conditions. Also, it's certainly not unheard of to use breather more sparingly even for autoclave cure conditions and actually quite important to avoid breather in particularly tight geometries.
Easy Composites Ltd yeah I mean I've never used that material so i can't speak from experience, but all clave cures should still be allowed to have the air channel that breather gives. Light can work it's way round most corners, especially if you dib the bag, and of course you can still tailor the breather into the corners if you're using heavy; kind of the same way you would the laminate on a visual ply.
The surface looks great in Glossy
For cutting more peices of pre preg accurately, a fabric cutting machine can be used effectively.
Amazing video, thanks a lot for sharing this knowledge
How does prepreg stick to aluminum parts:
Would embedded the aluminum parts in your prepreg layers, or would you glue the aluminum parts once the prepreg is cured and sanded.
I'm making about mainly tube fitting (aluminum tube to carbon tube (partially wrapping the alu tube) transition)
Great job
Cheers
Prepreg can be cured directly to aluminium using the resin to bond however, for this type of application with tubes, it would probably be better to cure the carbon separately and bond in place as a secondary operation. The difference in thermal expansion of the aluminum vs carbon can cause issues as the 2 materials expand and contract at different rates during the curing phase.
@@easycompositestv thanks a lot, indeed I've forgotten this CTE differences during curing
I've made an absolutely perfect mould using Airtech LTC3 tooling prepreg and a PU master, sealed with a very thin coat of epoxy and about 8 coats of MPP712EZ sealer from Chemtrend. I wonder why LTC3 worked so well and some other tooling systems fail with PU masters...
Its going to be down to some specific chemistry of the resins used in different pre-preg systems.
Great common sense filmography imo. It’s made real simple for deplorables like me.
Imagine you've laminated and vacuum bagged, how long can you keep them like that before you cure in the oven?
I was thinking of laminating several parts over a day or two in the evenings after work, say Thurs-Fri, then run the oven early Saturday morning whilst at I'm home all day.
Not a problem at all. The outlife of the pre-preg is fine in most cases and a few days under vacuum at room temperature may very slightly help with consolidation on some difficult parts - in the same way debulking helps.
Yes I have enjoyed this tutorial! 👌
this is helpful for my masters thesis
Thanks, I'm glad it's helped.
Fantastic tutorial, wish you guys were in Australia!!
agreed!! buying composites in Australia is a pain in the arse
agreed!
@@oliverlavermicocca2455 Thank you for spelling arse properly. I can't stand all the wannabe Americans populating this country.
Awesome video, thank you for sharing!
Quick question. If I was to use a powder coating oven, how would you go about working the vacuum pump in?
Thanks!!
A form of bulkhead fitting (Pneumatic/airline suppliers) that allows attachment of the pump the the fitting and then internally from the fitting to the part.
@@easycompositestv thank you
You mention CAD flattening methods when making templates, could you point us in the direction of where to find more information about this?
Very much depends on the Specific CAD package being used as to if it has an appropriate tool built in.
Excellent demonstration!
Wow, clean work
I have one question, it’s my first time that I will be working with Prepregs
Here is the question:
The XC110 cycle mentions a pressure of 10 mbar , is this vacuum pressure applied while vacuum bagging and as well as while heating ? Or is it different vacuum pressure applied during vacuum bagging (what is the value) and a pressure of 10 mbar while heating in oven.
Full vacuum, or as close as possible to full vacuum is pulled throughout the process. For both debulking and then the heated cure cycle. 10mb is the minimum vacuum level you need to achieve.
@@easycompositestv so basically 10mb pressure is minimum for both debulking and heating.
@@saurabhbagwe2631 Yes although ideally you would want to be as close as possible to full vacuum for best results.
Could this be achieved using dry reinforcement and wet laminating for small production purposes to save on cost? What would the cons be exactly? Thank you!
Great job
congratulations for your videos.. they are always very useful. one question, is it necessary to keep the vacuum pump on during the entire curing phase in the oven or is it enough that there is a perfect vacuum in the bag?
Yes we always recommend keeping the pump on throughout the cure cycle.
This is good information
Really solid presentation. two questions here:
1. does industry also use the draping and prepreg procedures shown in this presentations? Since it seems to involve a lot of manual adjustment, large deviation may occur in large production.
2. in your channel, carbon fiber composite is mostly manufactured for laminate which has excellent lateral mechanical property but weak along out of plane direction. do you guys also make bulk composite parts which have fiber direction not only in plane but also in out of plane direction? Thank you.
Higher volume parts may need slightly different process and tools, however there are plenty of business using these techniques and materials to make parts in smaller and medium volumes.
You can make parts stronger in those direction by rotating the plies of the material in a lay up. For many non-structural parts, this is not necessary though.
Hi! Excellent video!
Could I use a mid layer of foam to increase the overall strength of the final piece, or it doesn't make sense with those pre peg sheets?
Thanks
Creating a cored panel with pre-preg materials is commonly done to improve strength and stiffness so it is possible to do so. You need the right core material to withstand the cure temperatures and depending on the resin uptake of the core, you may need to use a film adhesive to add resin adhesive to bond them together properly.
If we have two CF finishes parts and want to join them ... can we put them back into the oven ?
errr.... I have to make a Component which has two parts ... that need to be joined together in a super strong bond.
They cannot be made in one go hence two parts and then join ...
So after the two are made and cured in the oven ...can we join them together by putting them together back in the oven. (with off course CF applied)
(I am sure i have not explained that well)
That method generally is not necessary. Modern structural adhesives would be the easiest way to bond as long as you create a reasonable overlap/bonding joint.
@@easycompositestv so I could in theory if I wanted a V pattern on one sheet, Id just have to lay the V pattern for the surface layer, then over lap the underlying layers???? trying to figure out how to make a v Pattern carbon part with out pre preg
@@spencerhansen5804 Hi Spencer, yes, that's correct lay the first ply with the herringbone pattern then all the following plies can be laminated as normal.
I HOPE YOU GUYS ARE AROUND FOREVER BECAUSE NEXT YEAR I PLAN TO USE A LOOOOOOOOT OF YOUR TOOLS.
Certainly don't plan on going anywhere!
I have two questions
Can the carbon look nice finished when the mold side isn't the part we want to look at? How are we going to achieve nice quality finish in this situation?
Second question is when do we need to use extra epoxy on the fibers?
Also the weight of the new carbon part you made vs the old engine cover. Thanks!
In this tutorial the mold is female. You can always use a male instead of a female mold. The process isn't much different from that with a male mold. The 2 molds at 8:59 are male.
I've watched quite a few of your videos and they're all very helpful! However there is one thing i'd still like to ask, that is; how to manufacture a part that has 2 moulds (a negative and a positive side)? Meaning that one mould has the relative "bottom" side of the part and mould 2 has the relative "top" side of the part. How do i go about gluing or curing the two moulded parts together seamlessly to make one smooth and perfect finished part?
Thanks!
If you make them as 2 parts, then use a structural adhesive to bond them together seamlessly. Alternatively, depending on equipment and facilities available to you, it may be possible to make them with matched tooling, but this can be quite complicated. It is not a process we have videos for yet but is something we may cover in the future.
Great tutorial but I need some advice? I am trying to copy a motorcycle part but how do I copy the inside too to match the top part?
Thanks
You would need an inner mould or matched tooling. You can make it in two parts and bond together, or use carefully designed matched tooling to make one piece.
@@easycompositestv ok that makes sense ! What weight carbon would you recommend ?thanks
I wonder how important the temperarture during the curing process of the carbon fibre really is, does it make´s the material really that much stronger ?
Yes Matt, in the case of curing a prepreg material like we used in this video it simply won't cure without elevated temperature. The precision on the terperature (in terms of ramps and dwells) is more important for out of autoclave prepregs (like our XC110) but you will always find that prepregs have a cure cycle. It's often not a matter of the exact cure cycle making the cured laminate stronger but rather controlling the temperature in order to prevent an exotherm or to ensure proper resin flow.
Can I get the links of previous you have discussed in starting
Very nice and informative video!
Q: Looks like you have very sharp corners/edges, what is the minimum corner radious you would recommend?
Yes, we did choose to make a component with some very tight radii in this video. Tight radii like those on this component do make the layup more difficult and also increase the chances of bridging or pin-holes/micro voiding on these corners so wherever possible they should be avoided, however in this video we wanted to show what is possible. I would suggest trying to avoid corners with a radius of less than 1mm but wherever possible, make them as large as the design allows.
What kind of glass would you use as a mould that is suitable for oven temperatures up to 200 degrees Celcius?
For a flat sheet you can use a toughened and tempered glass. They come with a range of heat resistance so you'll need to check that it can withstand the 200°C you're looking for.
How much suction is needed when vacuum bagging the wrapped part? Would attaching the suction hose to a common heavy duty shop-vac be sufficient or does it require much greater amounts of suction to pull out any air bubbles?
Your vacuum pump needs to be capable of high levels of vacuum eg 29.9inhg or better. A vacuum cleaner will not get anywhere near close enough.
If anyone is concerned about prepreg, Formula Atlantic, Cart, and Indy cars all used prepreg. I can't speak for F1 because I was not in the industry.
F1 was the first one to use carbon. If I'm not mistaken they started to use it back in the 80'
Yes, i believe it was Lotus who first used it.
McLaren mp4
@@argentosebastian he's talking about prepreg carbon fiber specifically.
What is the shrinkage value of this 6k 416g prepeg
it was great like always
Thanks Kara :)
Awesome video !
Question, is it possible to use pre-preg carbon without heating it in the oven?
sorry but I'm inexperienced
Pre-preg needs a heat source applied in the proper cure cycle to cure properly, so generally an oven is the most common source for this.
@@easycompositestv Okay, thanks a lot !
I’m not sure how I didn’t see this video six years back… I guess the UA-cam life.🙃
I love the idea of not using an autoclave.
🇦🇺🤜🏼🤛🏼😎🍀☮️
I'm going to make a stupid question. I never used prepreg because I don't a freezer to keep the material. Is a really bad idea to use my freezer at home? I wonder if the food is going to be contaminated. Of course I will seal the bags with the prepreg very very well.
Hi Sebastian, that's not a stupid question at all. If the prepreg is in sealed bags then I would say it would be fine to be in your domestic freezer, especially in small quantities. If you become a regular user of prepreg then of course you'd switch to a separate freezer but for small amounts occassionally I would not have any concerns at all. It's also worth pointing out that - especially with the XPREG XC110 you see used in this video - the out-life of the prepreg (i.e. how long it can spend out of the freezer) is actually extremely long, probably more like 6 months (although we state 6 weeks). We're starting to find out that users have no problems from prepreg that's been out of the freezer for several months and in fact the XPREG XC110 datasheet might soon be updated to reflect this.
How about ceramic, I do moulds in ceramic and that avoifs a lot of barriers that are needed
Can you share video on liquid compression molding composites
We certainly plan to cover this in the future so stay tuned.
Do we need to apply releasing agent over mould surface before first ply?
Yes you always need release agent.
I layup for a living... I build nacelles for the A320 Neo and the G500/G600
Great video! Please make me some carb fiber wheels.
Honey why is there carbon fibre in the freezer
Because it has a cure time / lifetime depending on the resin used. It keeps it fresh longer and even then it still has a shelf time.
Adding to what tuiapele was saying, keeping it in a freezer prevents moisture from getting into the resin matrix before use. Moisture is bad because it could introduce voids while curing.
I have a question can I use it on a motocross clutch cover which has a hard life so do I need more layers to make it stronger? (If yes how many)
In theory, yes, it should be possible - you would need to incorporate some of the fibres at +/-45 degrees as well as 0/90 to ensure you had uniform mechanical strength in each direction. As a starting point, I would recommend matching the thickness of the original part if made in metal - doing so will result in a lighter finished piece but with similar overall strength.
This is so helpful, thanks
Still waiting for tutorial manual making helmet with making manual molding too
Just quick question, does it make difference if I use this oven and not autoclave? I find very hard to find any autoclave to buy out of EU. I would invest in one of the ovens you are selling, but I need to know if its sufficient to me. (Im start up company)
It really depends on the materials that you are wanting to process. Our XC110 material for example, is an out of autoclave pre preg which can be processed in an oven at vacuum pressure.
Why can’t we get plain weave hi-modulus in usa??
Can I put forward a suggestion for a tutorial video. Visiting the Autosport show every year the carbon WRC spoilers never fail to amaze me up close. All multi element with smooth faces on all sides.
How would we go about something like this www.rally24.com/rally-parts/all-ford-focus-wrc-36247.html
A lot of them are made in multiple parts using the same principles.
is it stronger to have morelayers of lighter weight or less of a heavier weight ?
Depends on the specific application but there are minor differences between the two which may be relevant in a high level structural application.
Good one
Nice video, but what do you do if you have some threded screws on the inside of the part ? How do you make a screw thred inside the part, as you generally are making the carbon fiber part on one face of the main part ? Thank you.
Generally screw threaded fixings like that are created after the main part. As the typical carbon moulding processes are "single sided" it can be hard to create fixings on the reverse. Different ways can be done, including bonding in aftermarket threaded studs or fixings, cutting up the original part to salvage fixings or fabricating or casting them in resin then bonding into place.
Easy Composites Ltd is there a tutorial on how to do that? If not, maybe you can make one. It would be very helpfull. Thank you.
Every item is different so there no real way of covering them all in one tutorial.
Hello, I love your videos, thanks for everything, there are so well explained !
I'm looking for a video about latex bladders, is that in your plans ? And do you think that a latex bladder part could be stronger than one using a vacuum bag, a vacuum bag put on the piece 1 atmospheric pressure, is not it ? And a latex bladder could be pump up to few atmospheric pressure ? ????
Hi Jean-pierre, we might well do a video in the future about positive pressure bladders. At the moment, I don't think it's imminent because we have lots of other things to cover too and - to be honest - moulds that can take high pressures come with several risks which make them less suitable for home projects but it's still something we could cover in the future. To answer your question, there could be advantages to higher pressure (more consolidation) over just the one bar of pressure available in a vacuum only setup, although if done correctly, the difference would be small.
@@easycompositestv Thanks ! That's helpful 👌👍
May I know how long does it take to defrost?
Depends on the roll size. A large roll can take up to 24 hours. A couple of meters of fabric will only take 4-6 hours at room temperature.
Dear Sir,
If I want to make a sphere of FRP of having the dia around 1000mm then how it is possible have the same in FRP in outer side as finished....!
What is the best way to reseal the carbon roll bags after each use? Doesn't appear to be much bag material to twist or fold.
No, that's true, there a great deal. There is more 'slack' on the full rolls, which I guess are the ones that are likely to be in and out of the freezer more times, but on the shorter rolls it's really a matter of taping them back up if you need to re-freeze them. Some 2" wide clear tape will do the trick fine.
Can i make a fixed wing drone like a MQ9 Reaper model or a Boeing 747 model fuselage and wings using carbon fiber only? Or do i have to mix it with Balsa wood which has been traditionally used in model aeroplanes?
Yes you can use carbon for these parts either on its own or in combination with a core material to add stiffness. Be aware that if you have internal areas, carbon will reduce signal strength.
Can you cut the Material with an co2 Laser with a nice edge or is a plotter required?
Laser cutting is generally not suited to composite cutting - you wouldn't want to use it pre-curing anyway but post curing, the burn temperature of the carbon is too high for the resin so you end up destroying the resin locally to the cut. It is best cut by mechanical means (CNC Router or Waterjet) or in its uncured form with a rotary/ blade cutter
At what tempararure heating and coolingis done ,Sir
i could see how this could appeal to a chef or someone in the culinary/food industry, all the prep is a lot like baking a cake. which sucks for me cause i'm impatient and have never gotten on with cooking. however my wife and mother could probably build chassis for Bugatti Veyrons as they LOVE this kind of prep and set work. lol
im always curios how do you put a hole for screw like a deep one that doesnt penetrate to the back of it
its very good materials
When you ship to Germany, how you ensure it will never get too warm?
We use an express courier service for all pre-pregs to minimise the transit time and thus preserving as much of the outlife as possible.
can you explain the oven cure tell us the times and temperature in detail? i want to make carbon fiber rims
The full cure cycle detail is in the Technical Data sheet for the pre-preg you choose to use.
What is the heat properties of the prepreg? can it be used for intercooler piping intake manifolds and valve covers?
The Tg of the resin system used in the XC110 prepreg is 120°C therefore it should not be used for applications where it will be exposed to service temperatures of around 115°C. The service temperature around the intake and valve covers will depend on a number of factors so you're best checking your configuration using an infrared thermometer in order to know what temperature you have in these areas.
Hallo, perfect video tutorial. Thanks for it:) How do you repair the surface imperfections on prepreg parts?
In many cases they can be filled by lacquering the parts if you choose to go that route.
Thanks for answer:)I will try it:)If it will not work,I will try a high temperature epoxy resin.
Hi! How can I change the color of the carbon fiber? Like the carbon fiber on the new bugatti chiron? It's prefabricated red or ?
Carbon fibre itself is charcoal in colour. You can have hybrid fabrics made with a half carbon, half dyed polyester mix but that is clearly a half black, half red look. To get an even red colour like on the Chiron, the easiest method is to spray the car with a tinted lacquer. Various paint companies offer tinted lacquers. With multiple layers and a strong tint, you could get the effect they have on the Chiron.
could you theoretically use a crock pot to cure the pieces?
A crock pot is unlikely to have the appropriate temperature control abilities nor even heating to cure pre-preg properly.
@13.35, I disagree. Even on visual parts, wherever it is practical to do so, I've always completely covered the component in air bleed for a cure because it is good practice to minimise the risk factor of air becoming trapped within the bag face.