Finally, something straight forward and to the point in under 3 minutes... why people feel compelled to make 20 minute videos on this type of thing is confounding. Thank you for being direct.
Finally someone who knows how to stay on topic and explain step by step how to do something, without rambling on and on! I am so tired of watching 15 minute tutorials that should last only 3 minutes! THANK YOU!
Ah ha! I watched your terrific ScreenFlow beginners tutorial, and afterward, visited your channel. This video, "Photoshop Tutorial - Convert Photo To Line Drawing," is your "welcome video" for those who are not subscribed to your channel. As it turns out, this tutorial on converting a photo to a line-drawing-look is EXACTLY what I need for one part of a current client project. Synchronicity! I love it!
Great simple idea. Works with landscape and flower photos also. I collapse the layers above the initial photo layer and use the eraser to bring out selected color of eyes, lips, leaves and flower petals. Paul
I decided to go back to the deep dark past of photoshop before jumping in with Generative Fill. This is because my first try with Gen Fill was so ridiculous. Thanks I am going to use your tutorial for reference while using the 2023 app.
Thank you! I've been wanting to do this for a long time as I have a role-playing game magazine where some of my pictures would make great illustrations, but not as photographs. Now subscribed!
Still works for me. I actually converted 20 photos using this technique, saved them as .png and was then able to easily covert them to .svg files for a whiteboard video for a client. Thanks for the tutorial!
Man..i never bother clicking *like* or *thumbs up* etc. But you've made it so simple to understand and learn. clear, concise and no bs. Good work buddy... u have de-virginised my thumb. *thumbs up*
thank u for taking the time to explain the precise procedures to accomplish this! most youtubers don't even bother to show the tools used to apply their effects, it becomes annoying, almost seems like they're trying to show of their work instead of taking time to show you the tools used and how to apply them. good tutorial, simple but very well explained! keep up the good work. thats why we're here for to help out each other.
Absolutely Amazing! This is exactly what I needed to convert our conference event artwork into decorative agenda elements in the margins participants can color! I would never have intuitively come up with this combination of steps. It must make you feel great knowing your videos help so many people! BIG THANKS!
I have to say your video is straight forward and simple to follow. thank you! I cannot wait to try this with some family photos and share them on face book!
Nice angle to go (was using different techniques but this one escaped me). You can flatten the result and use artistic or scetch filters to alter the effect for whatever style you wish, it works really cool with poster edges for instance ...
After creating the sketch effect, it can be striking to bring back just the eye color using a layer mask. You can even change the eye color to anything you like and punch it up using a hue/saturation adjustment layer. I did a model this way, creating the sketch, bringing back her washed-out blue eyes as the only color, and then changing them to punchy greenish-gold cat eyes. Very effective!
paint.net has a feature like this under effects, where you can just press drawing, and you can play with how much shading it has, how thick the lines are, etc.
I love how well you enunciate everything and how well you direct the user on what to do. I am a beginner and this helped me greatly to understand. You didn't rush nor go too slow. You didn't talk too much. Perfect, great job. You got a subscriber and a like. :)
seems like you could put a tracing paper over this (you would print it out), and just trace/create the empty or solid areas... around the face, hollow the eyebrows, and other features.. then copy machine..
Exactly what i needed i remember when i was like, 8 or something i saw a video on this then i started doing photoshop but i havent used it in such a long time i cant find the other video and this is the best tutourials iv seen so far Keep it Up! :)
Love the video! Helped immensely. Been wanting to know how to do this for a long time. Also love your enthusiasm! I will share this tutorial on my FB page. Thanks!!


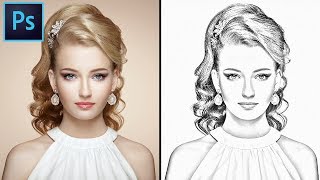


Step by step; Take image layer, duplicate layer - Color Dodge, invert, Gaussian Blur, desaturate layer, play with levels.
John Bonjovi, Thank you my dude
Well I am glad it helped, and yes I am continually trying to improve the quality of my videos!
Thanks for the feedback!
Finally, something straight forward and to the point in under 3 minutes... why people feel compelled to make 20 minute videos on this type of thing is confounding. Thank you for being direct.
Finally someone who knows how to stay on topic and explain step by step how to do something, without rambling on and on! I am so tired of watching 15 minute tutorials that should last only 3 minutes! THANK YOU!
Ah ha! I watched your terrific ScreenFlow beginners tutorial, and afterward, visited your channel. This video, "Photoshop Tutorial - Convert Photo To Line Drawing," is your "welcome video" for those who are not subscribed to your channel. As it turns out, this tutorial on converting a photo to a line-drawing-look is EXACTLY what I need for one part of a current client project. Synchronicity! I love it!
You are very welcome! Thanks for the positive feedback!
You are very welcome! I am glad you enjoyed it.
You are very welcome! Thank you for the positive feedback, and I hope things are well in France!
No problem! So glad you enjoyed it.
Thanks! I am glad you liked the video.
Great simple idea. Works with landscape and flower photos also. I collapse the layers above the initial photo layer and use the eraser to bring out selected color of eyes, lips, leaves and flower petals.
Paul
Thank you so much for the positive feedback!
I remember watching this tutorial back in my secondary school years. 10 year later this tutorial pops up in my recommendations...time flies indeed.
This is absolutely PERFECT tutorial!!! Just what I needed!!!
Thank you! I am glad you liked it!
You are very welcome! I am glad that I could help!
You made it so simple to follow. Thanks a million! You are truly a master Photoshop instructor.
I wanted this I searched so many videos but I didn't get the perfect explanation thank u so much searching this for a long time
I decided to go back to the deep dark past of photoshop before jumping in with Generative Fill. This is because my first try with Gen Fill was so ridiculous. Thanks I am going to use your tutorial for reference while using the 2023 app.
Thanks for getting straight to the point! Too many tutorials waffle on for ages before getting to the subject matter. Very helpful, thankyou.
AMAZE BALLS! Just what I was looking for! And fast too!
I completely agree it is and its EASY as well.
I have watched MANY(too many)... tutorials!! you are by far the best that I've seen! thanks for your time and help!
Thank you! I've been wanting to do this for a long time as I have a role-playing game magazine where some of my pictures would make great illustrations, but not as photographs. Now subscribed!
BEST tutorial ever! So simple!
Still works for me. I actually converted 20 photos using this technique, saved them as .png and was then able to easily covert them to .svg files for a whiteboard video for a client.
Thanks for the tutorial!
Man..i never bother clicking *like* or *thumbs up* etc. But you've made it so simple to understand and learn. clear, concise and no bs. Good work buddy... u have de-virginised my thumb. *thumbs up*
I havent seen a youtube tutorial yet where I learned as efficiently and effectively as this one. good job
Quick and easy! Thanks for sharing this.
Thank you for the simple tutorial. I don't want to be an PS
expert and this gets it done. Thanks!
thank u for taking the time to explain the precise procedures to accomplish this! most youtubers don't even bother to show the tools used to apply their effects, it becomes annoying, almost seems like they're trying to show of their work instead of taking time to show you the tools used and how to apply them. good tutorial, simple but very well explained! keep up the good work. thats why we're here for to help out each other.
This video is a lifesaver. THANK YOU!
Thank you for the positive feedback! I am glad that you liked it!
Absolutely Amazing! This is exactly what I needed to convert our conference event artwork into decorative agenda elements in the margins participants can color! I would never have intuitively come up with this combination of steps. It must make you feel great knowing your videos help so many people! BIG THANKS!
divide is easier than color dodge because it inverts it quickly while lightening the photo up and making sketch photos out of those.
You are immense,Sir.God's blessing I wish
I have to watch your video every time I want to do it, because I already forgot how to do it :D Thanks for video :)
Very helpful. I made a professional document to impress my boss in mere minutes! Thank you.
Well thank you! I am glad you enjoyed it.
You are very welcome, Glad I could help.
Thank you for making this very simple to understand. You also speak in a way that is easy to hear and follow along with! Great video
THIS VIDEO IS BETTER THAN SCHOOL IN THE SUMMER-TIME LOL !
I am a cartoon master now , with photoshop bragging rights :D
thanks youz sir ...
I have to say your video is straight forward and simple to follow. thank you! I cannot wait to try this with some family photos and share them on face book!
Nice angle to go (was using different techniques but this one escaped me). You can flatten the result and use artistic or scetch filters to alter the effect for whatever style you wish, it works really cool with poster edges for instance ...
THis Is The AWESOMEST (is that even a word?) Photoshop video EVER I SUBBED BECAUSE OF IT !!!!!!!!!!!!!!!!!!!!!!!!
CMND is the Command key. If you have a mac it is directly to the left of the space bar.
I had sub immediately, ran through like five videos that were all over the place. this was the easiest!
You are very welcome! I hope things are well in Tanzania.
Thank you for sharing simple and easy to follow steps. Big fan.
Well thank you for letting me share this with you!
Still the most helpful video I could find. Being a Guru is not just about what you know, but how you help others learn. YOU are a GURU! Thank you!
OMG works like a charm =D, nice and easy to follow as well
This is great. Well done and you deserve all the views you've received.
Afi Scruggs Great! Thank you for the positive feedback!
2years after and that"s still hepfull thanks
VinesFromMovies Why thank you!
Technologyguru77 for the tutorial
VinesFromMovies 月
which photoshop version is this cause i can easily tell this isnt cc
4 years after and thats still helpful
Nice very nice man, thanks for your simple and quicly change.
10 out of 10! This got me in the right tracks! Been looking how to make line art from a photo and this totally helped! Adjustment layers!!! Thank you!
Very interesting and simple technique. THanks for sharing!
This is a great video, I am on a long search for how to make sketchy effects and this one suits my demands perfectly.
Very glad I could help!
You are very welcome!
Very Helpful, now just have to figure out how to batch this to process 100's of images in a directory structure.
Excellent tutorial. Fast and easy.
I used these instructions in Photoshop Elements 11 and every thing worked just the same. Thanks for the clear tutorial.
After creating the sketch effect, it can be striking to bring back just the eye color using a layer mask. You can even change the eye color to anything you like and punch it up using a hue/saturation adjustment layer. I did a model this way, creating the sketch, bringing back her washed-out blue eyes as the only color, and then changing them to punchy greenish-gold cat eyes. Very effective!
extremely easy to follow - thank you! did it in no time at all
Paula McGarry That was the goal! Glad you liked it.
That's fantastic, I would never have thought to follow those steps, thank you
paint.net has a feature like this under effects, where you can just press drawing, and you can play with how much shading it has, how thick the lines are, etc.
i know a lot of people said this already but i wanna say thank you personally.
Awesome, works like a charm!
thanks!!! the first easy way I find on youtube to do this! all of the other tut were complicated and looong... Good work!
I love how well you enunciate everything and how well you direct the user on what to do. I am a beginner and this helped me greatly to understand. You didn't rush nor go too slow. You didn't talk too much. Perfect, great job. You got a subscriber and a like. :)
man u should be awarded with Nobel for this truly
How could I create a line drawing for kids to paint? I mean an image without shades, only keeping the edges.
use adobe illustrator maybe?
erase the shadows, yes I know its destructive editing but with what I'm doing it works! desrtuctive editing
seems like you could put a tracing paper over this (you would print it out), and just trace/create the empty or solid areas... around the face, hollow the eyebrows, and other features.. then copy machine..
Step by step and very comprehensive. Excellent tutorial dude. Keep 'em comin'.
Nicely explained. Although an additional step might be to use levels to refine the line work
Yeah, this came in handy! Thanks!
all i want to say... it is awesome
thank you so much for this. i really appreciate how simple and clear you made this.
This is so well explained. I now know how to do this. Now what I want to learn is how to merge 2 images.
Long time I am looking easiest way and get it from You !!! Thanks a lot man ! My like and subscribe for you.
Thank you for not going down rabbit trails.
thanks man first thing I ever did besides adjust temperature in Photoshop
Great tutorial! Thanks so much!
thanks, helped me out tremendously! first time using PS and it's so easy to just follow your steps and get the result I needed!
Thanks. I thought that I had lost this technique. Thanks for sharing!
Thanks for taking the time to show us this!
Exactly what i needed i remember when i was like, 8 or something i saw a video on this then i started doing photoshop but i havent used it in such a long time i cant find the other video and this is the best tutourials iv seen so far Keep it Up! :)
I love the way u explain it , very clear and easy !! subscribed and 5 stars.
love your videos. I'm learning this in school and just love it. your videos are so helpful.
thanks for sharing your talent.
Exactly what I was looking for!! Thank you!
Love the video! Helped immensely. Been wanting to know how to do this for a long time. Also love your enthusiasm! I will share this tutorial on my FB page. Thanks!!
Subscribed, Liked and Commented !!! That really really helped me !!! Thanks much !
Thank you I have being try to do this by checking out various tutorials but you have slam dunked it thank a lot from the UK
Techguru, I am having the same problem too. Moving the saturation slider is only changing the hue and not desaturating the picture. Thanks!
excellent tutorial very to the point......and easy to follow thank you
Yes, this is correct. Thanks alex.
Very nice man thanks for taking time to show us this tutorial,very helpfull what I been looking for
Thumbs up for keeping it real simple. Subscribed for having a nice walktrough voice!
Well thank you, I am glad you liked it and honored to have you as a Sub.
Fantastic and simple. Exactly what I wanted to achieve
Quick and easy. Thanks!
Thanks man I'm learning ps at the mo. This will help alot