Clock Spring Replacement - Toyota / Lexus

Вставка
- Опубліковано 4 жов 2024
- Here's how to replace a clock spring on a Toyota or Lexus vehicle.
This video also goes into the tear-down of how a clock spring works.
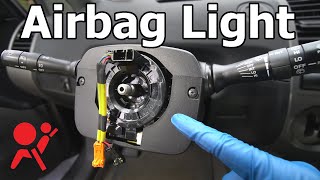
A clock spring is responsible for translating the electronic inputs from your rotating steering wheel (such as steering wheel audio controls, horn, airbag, cruise control, etc.) into the car.
A clock spring consists of a long ribbon cable wrapped up in a spiral. Its length allows it to rotate roughly 5 turns before the wire comes under tension. The housing is simply made of plastic with sturdy connections at either end for the airbag and accessories.
Often an airbag light on the dash, or lack of steering wheel controls (horns, audio control, etc) can be traced to a bad clock spring. Usually the thin ribbon cable is severed at some point and needs to be replaced or patched.
The clock spring is located behind the steering wheel. Be cautious when working around the airbag as its an explosive. Disconnect the battery and let the system drain for 15 mins before removing the airbag.
Also be sure to mark your steering wheel position before removing it from the splines. That way it can be reinstalled in the exact straight position. - Авто та транспорт


This is very informative without a lot of chatter , pausing , and obnoxious noises. Great editing . Thanks it helped a lot.
+spencer spencer Thanks short and to the point is how it has to be
True. Very informative, well done.
Yes it is perfect! so much shitty how to videos out there.
Agree!!!!!! Great video.
Agreed, it's a very well done video. One thing I wanted to see was how to install the ribbon cable into the round plastic housing. How many turns of the cable should there be? If I get too many or too few, the steering wheel won't be able to turn enough, and the cable will probably break again pretty quickly. Best thing to do it count how many turns are in the ribbon cable before I take it out, but if I forget to do that before pulling it out....
Hey there. My neighbor diagnosed my wife's Camry issue with the horn back to a faulty clock spring. He sent me this video and, after watching a few times, I proceeded to replace the clock spring without issue on the first go round. Thanks for a well documented process around the procedure of changing this out. Thanks again!
I'm glad it helped!
Fantastic, thanks! Not only clear and informative but well explained without a lot of extras and junk.
Thanks for the feedback
Thank you...one of the best "how to videos" I have watched. Loved the tearing apart and explanation of how the clock spring works.
+Wayne Gardner I love the tear down too. Makes it easy to understand how it works and how the clock spring can fail. Thank you
I went through half a dozen videos before I found yours. It is by far the best most informative video that I found. I will be replacing mine later today while using your video as reference. Thanx for a great video.
Glad you enjoyed it
yeah gotta do my TUNDRA I had'nt used my horn in like forever but cruise control has been out for aminute buddy asked to borrow truck for drivers test MECHANICAL FAIL on vehicle becuase horn would not sound so no drivers license went to NAPA bought fuse kit for $33.00 but the fuse puller tool was way to big for under dash fuses needle nose only to find fuse was good so now its thisCLOCK SPRING crap gonna bitch slap the engineer /designer being soooCLEVERLY STUPID
G'day, I have a problem with the horn not working in my Hilux, after watching your excellent video I'm confident that I can do the repair myself. Thanks for taking the time to make such a clear and informative video. I look forward to watching more of your content.
Well done. Very professional. And no kids running around making noise in the background.
Haha no kids or cats
I try to make it straight and to the point
Nice work, straight to the point and clear explanations of what you are doing. Thank you
Hands down one of the best video presentations on youtube.
another great high quality video, never heard of/saw a clock spring before this, very informative
Thanks for the feedback, glad you learned something
This is by far the best video I've seen so far on UA-cam, now I understand how the clock spring works.
Glad it helped
Excellent video. Before mounting the CS I would turn it until it reaches the end, then turn it back 2.5 turns so I'd know it's dead center. It has a 5 turn limit from complete close to open or vice-a-versa. :-)
Thanks for a great video, I love how you publish your skills to help others save hundreds in labour that is so DIY, thank you!
+Sonya Carpenter Glad it helped. I do this firstly for myself to document my experience and then to help you.
My dude! I can't thank you enough!! Your engine removal video gave me the confidence for doing an engine swap after mine finally petered out and the only other thing I wanted to fix was the clockspring. Helping keep me sane with a fun project during the corona. Hope you're well
Glad this helped
I wanna know can I kinda make my own make shift clock spring with audio control
A really informative how to video. The rip down of the spring clock really helped .I am now going to attempt to replace my seat Ibiza spring clock with a lot of confidence. Many thanks.
+Don Cameron thanks I'm glad you found this useful!
The best and most useful video on changing this out. Thank you! Heading out to DIY now.
All the best
@@speedkar99 finished in less than 2 hours. Everything working like new. Thanks again.
great video, thanks so much for taking the clock spring apart and showing the components!
Glad you learned something. I always enjoy taking things apart
That was great to see how the system is made. To think that in Canada the Toyota dealerships are charging 600$ for a ribbon wire, contacts and super high end plastic engineering.
Get a used one from the junkyard!
Yup, same with my Hundai. I got a new spring off ebay for $22 tho! Took less than an hour to install.
A most impressive video, straightforward and informative. Most YT instructional videos obligate the viewer to see a batch of BS with a selfie part in the video. I don't have a Toyota, but I am currently experiencing some issue with my German car. removing the steering wheel from it is not as easy as on your vehicle. Thanks.
Wow , that's a great video, Clock spring is so simple designed.
I thought it was contains bearings and some complex ..
excellent concise explanation and demo. i appreciate the safety precautions on the airbag too. the spiral thingy on my '07 prius went tilt & i will soon replace it, aided by your fine vid.
+GEODEAHOLIC M thanks, it should be similar to replace on your Prius
Good video and a very good explanation of what goes on there. I am amazed at the relative complexity of this, compared to my old 1989 BMW 316i. I removed once the steering wheel and what it had was a brass ring mounted on the back part of the steering wheel, while on the steering column there were a couple of protruding brass buttons, mounted on springs. These buttons were always out, pushed by their springs, and when one installed the steering wheel, a permanent contact was made between these buttons and the brass ring on the back ofthe wheel, therefore, no matter the wheel's position, there was always contact between the controls in the wheel and the steering column. I thought it was a very sturdy and simple solution, compared to this damn reel of cable inserted on the steering column.
+RL R I for see there being some contact issues with that design once things start wearing down.
With the amount of buttons on the steering wheel controls, there isn't enough room behind the steering wheel for slip rings. You now resort to a clock spring with a chip to communicate to the CAN BUS.
Excellent video! My cruise control on my 2009 Yaris (332,000 miles) has stopped working, and after checking fuses and replacing the cruise control stalk, my cruise control is still not operating. Further inspection revealed that it will work sporadically depending on the position of the steering wheel which makes me believe my clock spring is faulty. Thank you for creating this video!
2nd time around having to do this on my 2007 RX 450h. Lasted about 5 years!
:(
Thanks so much again!
Awesome. Glad it helped
may i know what is the symptoms if this part goes bad or faulty? as i have many errors like Malfunction VSC, ABS, Traction Control & Cruise Control with Radar Malfunction as well as when i took my RX350 for the inspection they said it may cause of the bad cable spiral clock (Not Sure) and i hesitating to change it as it wil cost me 500$
@@speedkar99 hello Sir... . I really which to know you more am an automobile engineer but I need more knowledge sir. I will be glad if you accept my request...
Thats great ooo...
Crazy how simple this is yet we are so technologically advanced but simply functional. Need to change this on my 05 taco, air bag blew and horn glitched here and there so I disconnected it
Agreed. Did you crash or it just blew?
@@speedkar99 it was crashed, I bought it salvage, was working great fore a while but then it slowly started to honk here and there to the point where it would honk when the truck would be off.
Exactly what I was looking for. Very detailed.
Awesome, thank you!
Thanks! Your videos are perfect. Short and informative without watching for hours how folks turn nuts and bolts.
Thank you, short and to the point is my style!
@@speedkar99 I love that...
Hey thanks for the video, but I must share a useful tip that you didn't do (and it was dangerous somehow not to do it): When removing the central screw for the steering wheel, unscrew it about half-way, and wiggle the steering wheel as if you were going to remove it completely. Given that the steering wheel usually gets stuck or kinda "glued", doing so will prevent you from getting a SMACK IN THE FACE or injuring yourself!! So: 1- unscrew the screw half-way / 2- give the steering wheel a wigle and pull it towards you to free its "glued" state / 3- the steering wheel is now loose, continue unscrewing the screw and remove it, then NOW it's safe to remove the steering wheel.
Excellent video!!! Keep up the good work!
Thank you! Will do!
Thank you for making this excellent video! Top Notch!
Glad you appreciate it
Excellent video! Thanks for the disassembly! Excellent job
You are welcome
absolutely the best how to videos.no BS
Hey Speedkar99, I used your vid to replace my 1998 4Runner clock spring. Horn works like a charm now! The directions were identical with the exception of the left torx bit cover. Mine were two circular covers. For the benefit of others to improve on your otherwise excellently shot and narrated video, I'd mention to apply the tape at the top and then cut it. Also the torx bit size for mine was a T27, which I'm sure was the torx bit size on yours too. Total time was about 45 mins for me as I misaligned the wheel by a spline or two, totally forgetting I put the tape there!
+Bob Kim I'm glad my video helped. Thanks
Wow !! Great vid ! I recall the old cassette tape. Thank you !!!
Using the tape to mark the position is such a smart idea.
Kevin Bowrin Agreed. The paint on the spline didn't work so well.
Thank u so much!!! Worked on my lexus 🙏
You sir are the cat's meow! Thank you for sharing. BTW, proper torque specs on steering wheel nut: 2001-02 Models: to 25 ft. lbs. (34 Nm) and
2003-05 Models: to 37 ft. lbs. (50 Nm)
You are welcome!
Learned something. Thank you.
Glad to hear it!
A beautiful video clip right there derived from knowledge and experience.I have watched some video clips on a similar subject but not well explained.thumb up for you brother
+jacob ekoba Thanks I'm glad you appreciate it
Your very good at this keep up the great work!! Thanks
Thanks
Really good video. Clear and to the point. Thank you.
You are welcome
Outstanding video, you taught me a lot and saved me money. Great job
Thanks
The best auto youtuber.
Excellent how to! Very informative!
Thank you very much.
i cant believe that they cannot create a better system than this
+BOBspellitbkwrdsSMFS its not that hard is it?
at least for the horn, i had a 65 beetle and the horn was just a mechanical connection no wire. seems that would be a better option.
BOBspellitbkwrdsSMFS who is they?
I actually think the spiral cable of the clock spring is really clever. Beats having sliding brush contacts that can corrode. How else would you do it?
Great video. should be an easy repair for me now if mine ever breaks
Yep! I'll have a Honda clockspring video coming up
So well done and informative. A big help in understanding this process, even though my car is a different make and model I can see it will be very similar. Thanks so much.
Thanks I'm glad you found it useful
Excellent video
Really interesting vid. Cool to see how it works.
It sure is neat!
You're the man, keep it up
Thanks
Excellent, concise, informative video. We're going to use it to change our clock spring. Pray it works. Should we test it first to see if it is the cause of the airbag light coming on? The ECU was already changed and the airbag light is still on.
+Brenda Warren You should test the airbag and its wires...there's resistance values in the manual
Very Informative, well made video. It was a great help. Thanks.
+Kevin Staunton thanks glad you learned from it.
Thank you. Now I know what that flat white cable was that came out of my daughter Jeep Wrangler steering wheel column. Looks like I have some work ahead of me.
Excellent tutorial!
I love the format of this video, super fast paced =) keeps you paying attention at all times
Maybe you can answer this question.. is the steering angle sensor within the clock spring on modern cars?
I have a 2015 Scion FRS and I'm thinking my steering wheel is not exactly centered on the gear teeth of the steering column, because i replaced the inner tie rods, and when putting the tie rods back together, i counted threads on both sides to make them even, and the steering wheel became a good 15 degrees offset from top dead center when going straight. Of course, they fixed it on the alignment rack by screwing in one side's toe arm a good amount of threads more, but I'm thinking the correct thing to do would be to set both toe arms equal and then move the steering wheel one or two teeth over. I'm just afraid the steering angle sensor will be all off
Very good video. One thing, the stearing wheel nut should be properly torqued to 37 ft lbs with a torque wrench.
Very informative and a highly professional presentation -- Thanks!
Glad you enjoyed!
Very nice and informative, can you also make some videos on how can we replace motion sensor in steering column, would be great.
Thanks
Good tip
wow, a very good video explanation! i need to do that to my 2007 sentra and i think is a very similar procedure. Thanks for the video help!
+Joaquin77 Thanks, best of luck on your clock spring replacement.
Good video, but remember to apply thread locker to the steering column nut to avoid it backing off.
Good idea
Good video. But better turn the Ignition on before connecting the battery. So in case (you did something wrong and) the airbag detonates you are outside the vehicle.
No
huge help as always
Excellent video, thanks this was very helpful
Good way for explanation , bravo, I have corolla 2007 , it's not much different ofwhat you explain. most of the Japanese cars has the same way of replacement for (clock spiral) , I think the rest car brands have the same similer way, just some little differences
Thanks for your good effort
+Ahmad Al Samaraiy Thanks, yes the procedure is similar for many cars, involving airbag and steering wheel removal.
Nice demonstration thanks 💐💐👍👌🕺🔧⭐⭐⭐⭐⭐
You are welcome
Great video 👌
Thanks
Thanks for the Awesome video! I think I’m going to do it myself
Very good information...
Good video, Thank you!
+bigbigspoon thanks
Beautiful video youve got yourself a like and a sub 😊
thank you so much!
❤Great explanation bro
very educative. great teacher . Regards
Gen2 Prius - I found that the Torx screws must be removed. Also the Airbag connections are different. Pull out the yellow center tab to release the wires. The steering wheel would not lock, held it while loosing and tightening the 19mm nut.
+Kevin B thanks for the tips. I expected it to be similar.
Your good. Very informative.Thanks I have a 99 toyota sienna but the horn will work if I push or pull on the steering wheel and it makes connection that way. Sounds like bad terminal connection instead of the ribbon cable as that would not effect anything by prying or pushing if the cable was bad. Thanks.
+John Smith agreed, there's something touching under the steering airbag.
Thanks for the video. 👌👍
You're welcome
Excellent video..thanks
Welcome
Great video, this guy is good !
+Connie Apiscopa Glad you liked it. Thanks
3:00 Thanks for showing us the inside. My problem is that whenever I drive, I started hearing rattling noise inside my steering wheel. I put pads on headlight and wiper switches attached a metal plate on the steering and tied up any loose wires, but I still hear the noise. I bet this spring wire keeps moving back-and-forth on mine.
Very helpful
Thanks
Outstanding vedio dear sir
You are welcome
i got the same battery yesterday for about $80 from firestone....best deal :D
Clear & understandable
Thanks for sharing knowledge bro. Liked n Subed👍
+Mansour Ahmad your welcome
Great explanation! I have an 07 Tacoma and replaced my clock spring (spiral cable) because of an airbag light. Went off for two weeks and now it’s back😢. Any ideas what could be causing this?
Good work 👍
Très bien expliqué Merci
So mush more than just power to the controls. It plays a big part in your traction control.
Traction control?
Yes. The computer reads the direction of the tape to know the angle of the steering wheel to know what wheels should get power. My friends clock spring popped off on his Jetta when he did a steering wheel swap and the spring came undone and permanently lost his traction control
Cuando el horn sigue pitando puede ser el clock spring ya está fallando ?
Great Video, Bro can I ask you , if the car is pulling to one side in my case left, and all the four wheels are aligned . I can hear a small knock sound when I turn the wheel all the way left or right, its a very small knock. What could it be?? There are people saying is something with the clock spring, a plastic inside the steering wheel is wear out, or something like that . What is your thoughts, Thanks.
GREAT VIDEO WELL DONE CLEAR AND CONCISE VERY HELPFULL🛻
Good job, very good video
You are the best
Thanks for this wonderful video I will test it on my Toyota Corolla 2006 Model (Middle east-Specification).Hope it will be same - Muhammad Saqib
+Mohammad Saqib yes
My god, your steering wheel came off with ease. Mine, i had to use a pulley to pop it out. There was no way it would came out by just yakking on it.
Peter Smith Interesting. I took off a few steering wheels no problem from Camry's and Solara's in the junkyard before doing this one and they all came off by wiggling it with ease.
If you are going to make a video on repairing something you would normally run through it a couple times for practice before actually making the video to make sure everything comes apart and you know how to put it back together. The young man was good and knew what he was doing and didn’t screw up his words. Good job.
Good work
Very informative.
Thank you very much.
Thanks for another great video! Never knew a clock spring even existed. Do you have to worry about setting a code that would have to be reset by a dealer since you're removing the airbag?
+Matt Bono As long as you don't turn the ignition ON with the battery connected, the car's computer does not know that the airbag was removed.
As an aside, you don't have to take the car to a dealer to diagnose airbag codes. For $25 you can get a techstream cable and do everything the dealership can do:
ua-cam.com/video/KDpldAv0uQE/v-deo.html
+speedkar99 that was a cool video. I like the way tech stream allows you to personalize settings
Thanks bro. For the video saved me. $500 in labor and instalation from the toyota dealership. ,. I got a question are you able to fix the old clock spring because mine causes the airbag light to come on and i wanted to know what caused it to come on and what was defective on it ? Before i buy the replacement piece maybe i cud. Fix the old piece would it be the connection part or something.
Glad it helped
@@speedkar99 appreciated bro. For the explaining and the time u took to make this video; very valuable info. .. 👆👨🏻🔧💯👍
Tq so much