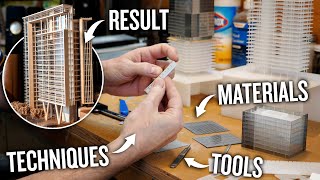
Detailing N-Scale Structures: Part 1

Вставка
- Опубліковано 11 січ 2019
- I take a common Walter's modular kit (Paragon Heating) and take it up a notch or two with details made from scrap, strip and sheet, some stretched sprue and wire, and some vague interpretations of reference photos. This video covers up to the priming stage, part 2 will cover painting and weathering.
A video from the Workshop Recorder by Scott Head - Навчання та стиль


I liked the beginning of this, where is Part 2?
Found a complete N-scale lay-out in boxes from my late father. All packed in boxes in my old moms attick lately. At 51 I’m considdering finishing the job my father didn’t finish. Thnx for your inspiration in detailing. Grtz from the Netherlands.
Only 18 public comments??
I've watched 40 or 50 layout videos. I learned more in this one video than in 15 of those. This is amazing. I'm literally slack-jawed. Can't wait to see part 2. Can't thank you enough.
Well thanks for sharing you're doing a more amazing job of detailing these than anybody else I've seen and it's really inspired me
Perhaps the best video I've seen on this topic! Is there a part two?
Can't wait for part 2
Sadly due to a lack of attention, the model was largely destroyed. I'll revive it one day if I can but there probably won't be a part 2 any time soon. So sorry to leave everyone hanging.
this is amazing, cant wait for part 2
Nice video - THANKS! Where is part 2?
Taking some notes! Thank you.
Hi, I am sitting watching your video and noticed your clan emblem behind you. What’s your story? I am originally from Glasgow, Scotland but live in Toronto now. I model in British 00 scale but I am enjoying your video with all your insights, techniques and tips👍
Great content... subscribed!
Your layout looked great! I wish I was around when you were selling it haha
Very interesting, thanks
Thanks for sharing. Did you ever do part 2?
good info no matter what scale you model
Aloha. Did you ever get to Part 2?
Great video! Where is part 2??
when is part 2 coming?
Hi Great video, you mentioned the primer and the mix ratio, could give the psi, and the needle size for the airbrush, I noticed you use a side feed airbrush, have purchased the primer, not sure best way to spray. Thanks U.K.
Hi Robert. Thanks for taking time to comment. As for PSI, I generally spray between 10 and 15 PSI for primer, sometimes a little more, but just enough to atomize the liquid. I'm not sure what needle size the Paasche is that I use to spray primer, I bought that airbrush 35 years ago and have forgotten, but its not the smallest, probably any decent mid-range needle will do. I have other airbrushes that I use to paint with, but you can also use primer in a fine tip if you take your time, build up the primer slowly, not trying to cover too much, and thinning it more. I did just that last night in fact, it would be frustrating on larger models but it can be done. With your airbrush, you just need to practice and adjust until you find the combinations of variables that would for you. Let me know if I haven't been clear. Thanks for watching!
Yes? Where is Part 2? Left us completely hanging?
When’s part 2 coming out?
🤔🤔🤔 waiting for #2 🤔🤔🤔🤔
Nice... but where’s part 2??
Nice build but copper is water or gas and aluminum tubing would be conduit
Where is part 2
WHY IS THERE NO PART 2!!!!
Great video but unfortunately I can't find part 2 which makes it almost useless without knowing where to go from here? I've never seen this type of painting method. Did you paint EVERYTHING by hand including each small detail after priming the entire building ?
so..that told me what?????
hey ,if anyone else wants to discover how to build a model railroad layout plans try Pycanta Model Railroaders Protocol (Have a quick look on google cant remember the place now ) ? Ive heard some extraordinary things about it and my m8 got cool success with it.