Curios about specification for this oven? Check the video description! And while you are there check out my Patreon page too for early access and a voice-over edit of my videos. If you like what I do consider supporting me so I can keep on making: www.patreon.com/blackbeardprojects
any saw with a thin kerf will work great on these IFB's (insulated firebrick). I've used olfa knives, files, heal of my trowel etc. to cut them, Once cut , if the cut is ugly just get a scrap piece of brick and rub the two together, just make sure to protect yourself from the dust. Not healthy to breath.
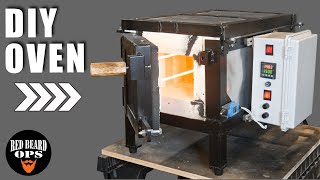
I see more safety concern than usual, let me address some! The frame is grounded and all connection are nice and tight. Someone suggested a door switch to cut power to the heating element with the door open, I will do it asap. Some sort of box around the heating element terminals would be better too. Anyway, I'm the only one using my homemade tools so I'm not worried at all even as is!! Thank you all for the suggestion and preoccupation. Be safe :)
Yeah I recommend a door switch, you don't want to touch the life wire with the non insulatet thongs. By the way is the input line cold or does it heat up very much?
7dusedr10: if he shorts to the grounded frame, it will trip the trip switch (aka residual current device, ground fault interrupter) in his fuse box, which is designed specifically for this purpose. Now, a trip switch only protects against shorting live to ground/earth, not against shorting live to neutral. The fuse in your fuse box protects against that, but is usually overdimensioned in regards to what your device realistically consumes. So your point is valid: having an appropriately sized one on the device itself is always a good idea.
Yes, good point about the RCD, but you assume that he has an RCD, unless you know where he lives :-D. Not all countries mandate them and most only mandated their use in the last 20 years or so. In some places installation is infeasible ie: the UK is a death trap. If he doesn't have one he should buy a plug in one for the garage or wherever he needs it. Fuse will also take the burden off the earth wire gauge. It must to be rated to handle the fault current for the duration it may take to gaurentee that the breaker in your fuse box trips. Normally earth bond testing is something like 20A or 30A for 30s and total impedance must be
Safety is first, please add some isolation to points where cables are connected to heat element, it's outside under voltage!!!!! Rest of the project super ;)
I have had heating coils break on different things like hairdryers and the such. The hole through the bolt connector you made had never crossed my mind to do. I live with 3 daughters and a wife which means we have a budget item for at least 3 to 4 hair dryers a year. 90% of them fail at the rivet connection at the board. Thanks for the fix.
our clothes dryer heating element the nichrome wire broke . really wore out. i just wrapped the broken ends together a couple times. then i broke down and spent the $30 for a new element
Things like this are why I enjoy the 'Net...a self-taught Italian fellow showing how he constructed something useful that anyone can copy for themselves.
WOW, I searched for a proper heatment oven for a long time and that is my absolut favourit! Came here for your stabilized cork video, but that oven is seriouly the thing i will build first!! Congrats, your channel is amazing, cant wait for more! Greetings from Germany ;)
Have you ever checked how warm the lower outside side of your oven is after some hours of use? I consider using it a forge as well or wouldnt you recommend doing this? Thanks!
Absolutely fascinating, bro. I wish you gave a few more details on the heat control and exhaust fan that you installed. Also, the insert you made on top of the oven. Thank you so much for this.
I really like that. I've got a spare couple of PIDs here somewhere and some thermocouples and RTDs. If I ever get on top of my health problems, I should throw one of those together. (A lot of things I need to do if I ever get better) Nice work.
That is a really great design, great job man! I was thinking of making something like this but a bit shorter someday but I haven't been able to decide on a PID controller yet. I hope it lasts a long time and is nice and efficient for you. Even at that size it must be pretty heavy once fully assembled.
Small correction: With the blocks arranged as shown, the internal depth will be 15.5" (due to the rear center block subtracting 2.5" from the 18" overall length). I plan to make one exactly this same size for your same reasons, including being easier to move around and store than most.
Great! Just a question= what is the outside temperature of the bricks, ie can I make the casing from plywood instead of metal? (I don't have iron cutting or welding equipment). Thanks !
great work. That 3d printer is cheating! I was with you until the PID and computer portion of the build. The channel iron you used to hold the knife in the beginning will cast a shadow on the IR that reaches your object to be heated. You need a plate with stainless steel pins or something coming out f it to balance stock between. Wonderful concept and application, though. I am impressed.
Francamente, quando eu vi você usar o solidworks eu já fiquei intimidada (risos); depois, quando eu vi a impressora 3D entrar em ação... Me humilhou!... kakakakakakaka Parabéns, Belo trabalho. Pense em um dia, ensinar os brasileiros a construir um desses. Deus lhe abençoe!
Finally someone who does not build craps with a 3d printer !!! How far can you heat this oven (depends on your coil I suppose) ? During my studies I programmed a prosthetic oven, during a bench test I left it reach 1600°C...
coil diameter is significantly larger than recommended by Kanthal, I assume it is Kanthal A1 wire and sticking metal things into the oven with "electrically hot" element, that is something.
Bellissima realizzazione ma ti consiglio di fare subito due modifiche per la tua sicurezza: 1)collega il telaio alla terra 2)metti un interruttore sulla porta che interrompe l'alimetazione dell'SSR così quando apri la porta la resistenza non e' alimentata.
How did you insulate high electric voltage from the frame of the oven? I'm curious about an instant death by touching the frame, and the current of the heat coil is going through a person instead of creating heat
Respected sir/madam, This technique is very useful.please tell me,can we use it as sanitary napkin incinerator?...if possible,help us for our project....just say what are the equipments needed... I think you'll help us....if it become a success it may be helpful for the society 🙏
Very cool build, although Id use a swinging knob to lock the door. When I saw the 3D printer. My mouth dropped.. love those things. Are you happy with it and what would it run $. I work at an EMC lab We/they test anything electric so you can licence to sell. Just sent a guy out to "3D printers and Co. to calibrate there building". Wished I had been able to go. Nice oven !!!
Nice work as usuall, you might want to add a thin metal plate over the controller box in case sth slips and falls on it and some insulation on the resistance wire terminals. The beard wont look nice if it is electrocuted. :P
Hi, I follow all your instruction in order to buildo my oven and I used the materials yuo used, but there is a problem: as soon as I reach 400°C bricks cracked in lot of points!! The briks are J23 Type...Have you any suggestions?
Greeting, Did you do isolation for the oven? And if there is no isolation, what is temperature out of the bricks, and how much time should be heated to 1000 degrees?
Sorry to ask a weird question out of curiosity, but what is the maximum temperature one can put their hand in the oven without burning themselves. I mean just to stick your hand in without touching the coils or the walls or anything inside it such as a crucible.
Hi congratulations for the job ... My concern is about the frame. Since the bottom part (the control box) is smaller them the top part, there is a risk of overturning... how do you handled it?
Hi. Nice project :D I was wondering if i can replicate it head for head, but im wondering if it can hit 1100C? I need to heat treat rwl and i require 1050-1100c.
What do You think about TUS test on this furnance? I do IT in my company (on bigger furnances) and i see that the TC termocopules sometimes shows diffrent temperature what is inside dedail. Think about fan 😃 the idea ja great. Congratulations from Poland 😀
Unrelated kinda, wanted to do a heat treatment chamber like this BUT i'm also wondering if you can use the same technique to build an electric pizza oven since we could easily reach 500C° in those chambers. With some refractory stones at the Bottom to store the heat...
What's type element heater do you used ? It is furnace or tubular or what And i have question to ,i wanna make heater can reach 1000°C ,but what's element heater must i used (how much P element heater i need to make 1000°C) ? Please can you answer ?
I once heard a guy in a bar claim Black Beard Projects can't make it rain. But that was after a few pints, and the bugger didn't particularly strike me as trustworthy to begin with. ;)
Blackbeard, How long does it take for your oven to reach 800 Celsius ? I followed your instructions to the best of my ability but it seems to take a while to reach 1900 degrees F.
Did you have any issues with the PETG warping and/or melting? I would really like to build one myself some day and was also considering 3D printing the control box, however seeing at what distance to the furnace door you put it, I wonder if that would impact the PETG, since it's a thermoplastic? Great video in any case, thank you for documenting your build!
Magnificent work as always. Very inspiring! Do you think this oven can be used for forging? I mean will it be quick enough? Do you intend to use it for forging or only heat treatment? Thanks and keep the videos coming! One of the best DIY channels on YT.
hi great build. i am making a copy hèhè 1 question what size axle did you use to make the kanthal coil. 8 mm ? hope you can anser my question and help my build further. Greets robbert
Buongiorno. Avrei intenzione di costruire una fornace simile alla tua. Non ho capito se la molla che scalda il forno viene collegata alla 220 v con solo il positivo e il negativo. Puoi aiutarmi? Ti ringrazio. Andrea


Curios about specification for this oven? Check the video description! And while you are there check out my Patreon page too for early access and a voice-over edit of my videos. If you like what I do consider supporting me so I can keep on making:
www.patreon.com/blackbeardprojects
Black Beard Projects where can I get one of those knives that cut bricks like butter?
Nice work ,im studying mechanics and tools in high school.
Clayton Firth He's cutting high temp fire bricks. They'd cut like that with a butter knife. The bricks aren't very dense and are very fragile.
quale è il nome di quei mattoni ?
any saw with a thin kerf will work great on these IFB's (insulated firebrick). I've used olfa knives, files, heal of my trowel etc. to cut them, Once cut , if the cut is ugly just get a scrap piece of brick and rub the two together, just make sure to protect yourself from the dust. Not healthy to breath.
I see more safety concern than usual, let me address some!
The frame is grounded and all connection are nice and tight.
Someone suggested a door switch to cut power to the heating element with the door open, I will do it asap.
Some sort of box around the heating element terminals would be better too.
Anyway, I'm the only one using my homemade tools so I'm not worried at all even as is!!
Thank you all for the suggestion and preoccupation. Be safe :)
As long as your happy with it is all that matters!! lol
Yeah I recommend a door switch, you don't want to touch the life wire with the non insulatet thongs. By the way is the input line cold or does it heat up very much?
Hey dude you should consider a fuse inline with the wiring. Because if you short to the frame which you say is grounded.... Just my 2c.
7dusedr10: if he shorts to the grounded frame, it will trip the trip switch (aka residual current device, ground fault interrupter) in his fuse box, which is designed specifically for this purpose.
Now, a trip switch only protects against shorting live to ground/earth, not against shorting live to neutral. The fuse in your fuse box protects against that, but is usually overdimensioned in regards to what your device realistically consumes. So your point is valid: having an appropriately sized one on the device itself is always a good idea.
Yes, good point about the RCD, but you assume that he has an RCD, unless you know where he lives :-D.
Not all countries mandate them and most only mandated their use in the last 20 years or so. In some places installation is infeasible ie: the UK is a death trap. If he doesn't have one he should buy a plug in one for the garage or wherever he needs it.
Fuse will also take the burden off the earth wire gauge. It must to be rated to handle the fault current for the duration it may take to gaurentee that the breaker in your fuse box trips. Normally earth bond testing is something like 20A or 30A for 30s and total impedance must be
Safety is first, please add some isolation to points where cables are connected to heat element, it's outside under voltage!!!!! Rest of the
project super ;)
I have had heating coils break on different things like hairdryers and the such. The hole through the bolt connector you made had never crossed my mind to do. I live with 3 daughters and a wife which means we have a budget item for at least 3 to 4 hair dryers a year.
90% of them fail at the rivet connection at the board. Thanks for the fix.
our clothes dryer heating element the nichrome wire broke . really wore out. i just wrapped the broken ends together a couple times. then i broke down and spent the $30 for a new element
Every design you share with the subscribers demonstrate your capabilities and ingenuity, thank you and have a nice day.
It's cool but a pizza doesn't fit in there.
Not so "cool"
How much HRC do you prefer for your 🍕?? 😂😂
Dude, just roll it up like a taco, it’ll fit then!
@@syariefdirgantara7670 at LEAST 58 Pepperoni HRC
That was absolutely great! I meant to make one for really long... bravissimo!
Grazie Giaco :) :)
Giaco whatever you speak portuguese
@@leonidasmiglioriniplaster he speaks italian
@@rogaldorn605 Thanks
@@leonidasmiglioriniplaster no problem
Things like this are why I enjoy the 'Net...a self-taught Italian fellow showing how he constructed something useful that anyone can copy for themselves.
Well I am speachless! I m kind of hypnotized watching your creations you are the modern version of Leonardo Da Vinci!
Veonardodalinci
Nice build man! you make it look so simple, yet so useful! one day i'll make one!
WOW, I searched for a proper heatment oven for a long time and that is my absolut favourit!
Came here for your stabilized cork video, but that oven is seriouly the thing i will build first!!
Congrats, your channel is amazing, cant wait for more!
Greetings from Germany ;)
Have you ever checked how warm the lower outside side of your oven is after some hours of use? I consider using it a forge as well or wouldnt you recommend doing this?
Thanks!
Thank you, for putting this and your other videos on the internet.
So many makers are going to copy this project! Complimenti!
Absolutely fascinating, bro. I wish you gave a few more details on the heat control and exhaust fan that you installed. Also, the insert you made on top of the oven. Thank you so much for this.
I really appreciate this video. This oven could be built for a fraction of the cost. Thanks so much!
Looks like it is not an expensive thing to do. May I ask how much money did you spent on the parts?
this is great idea :) i will definitely make one at home :)
Thank you brother!
I really like that. I've got a spare couple of PIDs here somewhere and some thermocouples and RTDs. If I ever get on top of my health problems, I should throw one of those together. (A lot of things I need to do if I ever get better)
Nice work.
Pretty cool how that piece of metal at 10:48 evaporated
Good work! Seeing the math behind your build is most helpful too.
This is epic! Great build and great video; thanks for sharing this.
That is a really great design, great job man! I was thinking of making something like this but a bit shorter someday but I haven't been able to decide on a PID controller yet. I hope it lasts a long time and is nice and efficient for you. Even at that size it must be pretty heavy once fully assembled.
Small correction: With the blocks arranged as shown, the internal depth will be 15.5" (due to the rear center block subtracting 2.5" from the 18" overall length). I plan to make one exactly this same size for your same reasons, including being easier to move around and store than most.
This is very cool! Awesome build. I hope one day to attain this level of fabricating skill. Thank you for posting and the motivation.
Wow, great job! You certainly planned that out nicely, and executed it so well. Thanks for sharing!
What a great job. I love to see what you come up with.
I think its time for another shop tool build! Hmm.... You should try making a metal cutting band saw.
Maybe suggest a video on a temperature controlled oil tempering tank? Fantastic video!
3:47 That fitment :D
Good work
Great! Just a question= what is the outside temperature of the bricks, ie can I make the casing from plywood instead of metal? (I don't have iron cutting or welding equipment). Thanks !
Absolutely brilliant! The content on your channel just keeps getting better. Thanks for another great video. Have a great weekend!
Thank you my friend! Same to you :)
I just joined you site as a patreon. I love your heat treat oven design
great built and great details in the description for any one trying to build it 👍👍
Oh wow, 1000c
And those bricks seem very soft.
The Lazer printer box takes out of the range of average diy dude, yep I easily have a work around making a box.
Awesome video overall
great work. That 3d printer is cheating! I was with you until the PID and computer portion of the build. The channel iron you used to hold the knife in the beginning will cast a shadow on the IR that reaches your object to be heated. You need a plate with stainless steel pins or something coming out f it to balance stock between. Wonderful concept and application, though. I am impressed.
Great 👏👏👏👏
Thats d most Spectacular and professionel work of a forge i hv ever seen .🏆
Excellent project
Francamente, quando eu vi você usar o solidworks eu já fiquei intimidada (risos); depois, quando eu vi a impressora 3D entrar em ação... Me humilhou!... kakakakakakaka Parabéns, Belo trabalho.
Pense em um dia, ensinar os brasileiros a construir um desses.
Deus lhe abençoe!
This one is really nice better than the old
Excellent job! Thanks for making this video.
great work..!! riesci a rendere semplice ogni cosa.. 👍👍
Great build! It looks very professional.
Finally someone who does not build craps with a 3d printer !!!
How far can you heat this oven (depends on your coil I suppose) ?
During my studies I programmed a prosthetic oven, during a bench test I left it reach 1600°C...
That was an outstanding build. Great video. Thanks
coil diameter is significantly larger than recommended by Kanthal, I assume it is Kanthal A1 wire and sticking metal things into the oven with "electrically hot" element, that is something.
Bel lavoro!
Volevo costruirmelo anche io, però riesco a trovare solo i mattoni refrattari rossi, c'è differenza con quelli bianchi?
Bellissima realizzazione ma ti consiglio di fare subito due modifiche per la tua sicurezza:
1)collega il telaio alla terra
2)metti un interruttore sulla porta che interrompe l'alimetazione dell'SSR così quando apri la porta la resistenza non e' alimentata.
Il telaio è già messo a terra, l'interruttore sulla porta è un'ottima idea grazie!
How did you insulate high electric voltage from the frame of the oven?
I'm curious about an instant death by touching the frame, and the current of the heat coil is going through a person instead of creating heat
Adding a door switch and make sure you ground your oven
Hello Black Beard. I have a q. What is the diameter of the Kanthal A1 wire? Thanks!!
Those bricks are super soft.
Respected sir/madam,
This technique is very useful.please tell me,can we use it as sanitary napkin incinerator?...if possible,help us for our project....just say what are the equipments needed...
I think you'll help us....if it become a success it may be helpful for the society 🙏
Thanks for the video man! Helped me decide what wattage to use on my own oven.
Awesome video. Thank you!
Your amaze me thank you black beard for the uploading video you inspired me awesome invention
I'm really impressed!
Very cool build, although Id use a swinging knob to lock the door.
When I saw the 3D printer. My mouth dropped.. love those things. Are you happy with it and what would it run $. I work at an EMC lab We/they test anything electric so you can licence to sell. Just sent a guy out to "3D printers and Co. to calibrate there building". Wished I had been able to go. Nice oven !!!
Nicely done. Looks great.
Ok so welding is not your strong suite..🤭 .. but using Fusion 360 is impressive. Another outstanding project!
Very nice build. Where the heck you live that you only get 2kw service to your house? In Canada 48kw (200 amps at 240v) service is common.
Grandissimo progetto vecchio! Stima e rispetto 👍🏻
Amazing project. I like this
Hi BBP, I really appreciate your project, but I do not understand something, have you installed a bridge rectifier to the output of the transformer?
You are a true master 🙏🏻😭
Anybody else half expect ole boy to saw his finders right off cutting the square tube on the bandsaw?
Awesome job brother the only thing I did different was I sanded down the inside of mine:)
Nice work as usuall, you might want to add a thin metal plate over the controller box in case sth slips and falls on it and some insulation on the resistance wire terminals. The beard wont look nice if it is electrocuted. :P
Ahah! I'm looking after my beard don't worry :') Thanks mate
Beautiful work. It's on my wish list for me to make one as well. I want to make one that does about 1500w on 110v....
Awesome video
Hi, I follow all your instruction in order to buildo my oven and I used the materials yuo used, but there is a problem: as soon as I reach 400°C bricks cracked in lot of points!! The briks are J23 Type...Have you any suggestions?
double or triple twist at the point of insertion of the spiral! Otherwise copper wire will heat strongly and burn.
Awesome project man... good job!
Greeting,
Did you do isolation for the oven?
And if there is no isolation, what is temperature out of the bricks, and how much time should be heated to 1000 degrees?
So satisfying to watch~
Excellent as always. I learned some things.
Sorry to ask a weird question out of curiosity, but what is the maximum temperature one can put their hand in the oven without burning themselves. I mean just to stick your hand in without touching the coils or the walls or anything inside it such as a crucible.
Hi congratulations for the job ...
My concern is about the frame. Since the bottom part (the control box) is smaller them the top part, there is a risk of overturning... how do you handled it?
All ways the best videos and best ideas :) cheers mate
Hello! Can i ask you the link for buy the termocuple ? I see on amazon but the review are not positive... tank you black🤙🤙👍👍👍🔥🔥🔥
Hi. Nice project :D I was wondering if i can replicate it head for head, but im wondering if it can hit 1100C? I need to heat treat rwl and i require 1050-1100c.
What do You think about TUS test on this furnance? I do IT in my company (on bigger furnances) and i see that the TC termocopules sometimes shows diffrent temperature what is inside dedail. Think about fan 😃 the idea ja great. Congratulations from Poland 😀
Love this idea
amazing
How much does this project cost ? from where to buy material.
waiting your reply.
I'll like to know the same thing.
Unrelated kinda, wanted to do a heat treatment chamber like this BUT i'm also wondering if you can use the same technique to build an electric pizza oven since we could easily reach 500C° in those chambers. With some refractory stones at the Bottom to store the heat...
Is the PID capable of running programs for more complicated stainless steels that need soak times at different points in the process and whatnot?
MEEEN!!! AMAZING!! GREAT VIDEO! This is awesome, so good explained without words! Great great video! Thanks for sharing!!
Great job 👍
What's type element heater do you used ? It is furnace or tubular or what
And i have question to ,i wanna make heater can reach 1000°C ,but what's element heater must i used (how much P element heater i need to make 1000°C) ?
Please can you answer ?
Very cool. Is there anything you can't make or do.
I once heard a guy in a bar claim Black Beard Projects can't make it rain. But that was after a few pints, and the bugger didn't particularly strike me as trustworthy to begin with. ;)
Blackbeard,
How long does it take for your oven to reach 800 Celsius ? I followed your instructions to the best of my ability but it seems to take a while to reach 1900 degrees F.
Did you have any issues with the PETG warping and/or melting? I would really like to build one myself some day and was also considering 3D printing the control box, however seeing at what distance to the furnace door you put it, I wonder if that would impact the PETG, since it's a thermoplastic? Great video in any case, thank you for documenting your build!
Where did you order your bricks and all other materials? Or can you suggest us with low prices, it's for our project
Awesome black beard, as usual!
Magnificent work as always. Very inspiring!
Do you think this oven can be used for forging? I mean will it be quick enough? Do you intend to use it for forging or only heat treatment?
Thanks and keep the videos coming! One of the best DIY channels on YT.
Thank you sir! Only for heat treatment. It does not heat quick enough in my opinion :)
Really cool. Would be great for tempering knives.
Great design and video. Any chance you can share the control box 3d printer file?
What was total cost of the project? I am thinking of building one for Metal 3D printing.
Hi !Nice work congratulations! Excuse me.....the Watt power consumtion is high??
hi great build. i am making a copy hèhè 1 question what size axle did you use to make the kanthal coil. 8 mm ? hope you can anser my question and help my build further. Greets robbert
Thank you!! Yes 8mm. I think anything from 5 to 10 would work the same :)
Have fun making mate!
thanks i am on my way now
Very well done. Cheers
Buongiorno. Avrei intenzione di costruire una fornace simile alla tua. Non ho capito se la molla che scalda il forno viene collegata alla 220 v con solo il positivo e il negativo. Puoi aiutarmi? Ti ringrazio.
Andrea