I hope you continue this project, and thank you for sharing even the pitfalls and failures with everyone. A "how NOT to" guide can be every bit as useful as a "how to" guide!
Just an fyi based on my local electrical experience(s), when dealing with mains voltages and current above 5amps you should only use mechanical connections to secure conductors throughout the circuit as solder can & often will soften under load and break free from connections. Take it or leave it, just my 2 cents on an otherwise beautiful build. My hat is off to you sir! 👏🏻
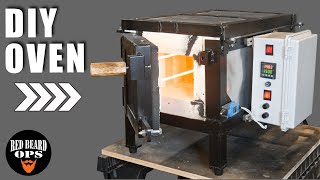
Wow. Thanks for sharing! This is awesome! Looks like the heat damage is from radient heat being near and touching the surface of the kiln. Seperate the enclosure from the surface (attached but stand off type mount) to create an air gap between and add high heat resistant insulation. to reflect the heat away from the enclosure. Same principle as the heat sinks of the SSR in that the fins have air gaps between to dissipate the heat.
Thank you for continuing your project. I'm working on upgrading an old kiln from 1x 230v 3600w to 3x230v 6600w. It seems SSR relays need to be quite beefy to handle the power.
Indeed it is better to at least double the current ratings of the SSR and even more importantly make sure they are kept cool. I learned it the hard way by having them in the enclosure mounted directly to the kiln without ensuring proper active cooling.
Laboratory Heat Plates use a Semiconductor and a mechanical Switching Element. Fine Tuning is done using the MOSFET and steady Heating applies the Relais. I don’t know if there are easy to find Controllers for that, but that Way you have the Upsides of both.
Yes, that would improve the cooling and airflow - I am thinking of making the control box a bit bigger to allow for this. The current orientation just made the wiring easier, but was not a good decision regarding thermal performance.
Hi Dam! I have been able to reach 1110 °C when drawing little less than 5kW for four hours. At that point the temperature increases by around 2°C per minute.
@@timtravelnomad it gets somewhere around 100-150°C on the outside surface of the kiln, depending on hot you warm it up to and for how long. And yes more insulation will make it able to reach higher temperatures quicker :)
@@jakobhalskov thats for the great videos Jakob! If you're looking for a new interesting project that's has some overlap, but then pushes the boundaries a little, i'd suggest looking at thermal heat storage. E.g turning your kiln into a heat storage battery, that can be used for delivering heat and even electricity on demand. Often with a storage medium like sand, rocks, bricks, graphite on the inside. Its very topical now that the world & many houses are ending up with excess cheap renewable energy at certain times of day. Thanks again :)
Can you explain how to wire this setup but using single phase 208/240v?? I’m moderately confident that I have the wiring correct but your validation would be great! I am using a 14/2 SWOOJ cable for the power supply. I will be grounding the components to the electrical component structure and drum as well. I’m also using a GFCI Breaker on its own circuit to power this unit.
I appreciate what you are saying here. I just tested my kiln and at 240v and 20a with his calculations I can only get my kiln to 631 degrees *F. Any suggestions on how to get the temperature higher?? I followed his instructions to the letter. I’m very confused why I’m not getting the same output. Any help. Would be appreciated. Thank you
Hello, is it possible for this kiln to work on Single-phase current? And if i want to use the maximum volume and put on one or two more Rows of Bricks, could it be more kW on Single-phase current and is this insolation suitable for this?
The end of flexible electrical wires shouldn’t be drilled. Leave them straight and put some wire end ferrules on it. Also when you put more than one cable in it. Otherwise it might get loose due too heat expansion
Put the SSR's on the bottom and orientate them so that the airflow goes directly through their fins. It's better to offset the whole box a centimeter from the kiln side so that you do not heat the contents of it unduly. The elements are normally not fastened on to the side of the kiln because it hinders the contraction/expansion of the elements. You design is centered around the placement of the PID controller not the temperature and airflow. You can do better than this ;*
Hi Lauge, you are certainly right in your critique and most importantly I have realised that the PID+SSR needs to be placed further away from the surface of the kiln to protect them from the radiated heat. Best wishes!
@@jakobhalskov it's mostly because it's a very short path from the thermocouple to the PID but you will get a voltage error when not using S-type wires (each thermocouple type uses different type of wires called compensating wires)
Yes, you just do the calculations and design process with one element and remember to correct for the increase voltage if you plan to connect the two phases across the element.


I hope you continue this project, and thank you for sharing even the pitfalls and failures with everyone. A "how NOT to" guide can be every bit as useful as a "how to" guide!
Thanks for sharing your journey! Are you still planning on posting a part 5?
Just an fyi based on my local electrical experience(s), when dealing with mains voltages and current above 5amps you should only use mechanical connections to secure conductors throughout the circuit as solder can & often will soften under load and break free from connections. Take it or leave it, just my 2 cents on an otherwise beautiful build. My hat is off to you sir! 👏🏻
Simply awesome, waiting for part 5.
Just want to add that I really am enjoying this tutorial series. Well done!
I think insulating & sealing around the thermocouple preventing heat leakage into the pid controller panel
You should use Compensation cable for thermocouple,
Complimenti. Seguo da Roma questo importante e bel progetto. spero che tu possa continuarlo a migliorare.
Grazie
ciao Paolo
Wow. Thanks for sharing! This is awesome! Looks like the heat damage is from radient heat being near and touching the surface of the kiln. Seperate the enclosure from the surface (attached but stand off type mount) to create an air gap between and add high heat resistant insulation. to reflect the heat away from the enclosure. Same principle as the heat sinks of the SSR in that the fins have air gaps between to dissipate the heat.
Hi Jacob. It's an amazing work that you are doing. I am making an electric furnace as well, so this is really helpfull.
Hi Ruben, thanks for your kind words and I hope you will have success with your kiln project! What will you be using your kiln for?
Hello @jakobhalskov , love the videos so far. Are you going to release a part 5? I would really appreciate it as it would help me with my kiln build.
I just discovered your channel, amazing work ! I can't wait to see it melt Iron!
Thanks for the kind words! I don't believe I will be melting iron in this; it is simply not powerful enough to reach these temperatures :)
If you are an electrician, this is a piece of cake. If you are not, please do some real electricity courses before attempting! Regards: electtrician.
Is the part 5 video coming anytime soon?
Awesome, thanks
Thank you for continuing your project. I'm working on upgrading an old kiln from 1x 230v 3600w to 3x230v 6600w. It seems SSR relays need to be quite beefy to handle the power.
Indeed it is better to at least double the current ratings of the SSR and even more importantly make sure they are kept cool. I learned it the hard way by having them in the enclosure mounted directly to the kiln without ensuring proper active cooling.
Laboratory Heat Plates use a Semiconductor and a mechanical Switching Element.
Fine Tuning is done using the MOSFET and steady Heating applies the Relais.
I don’t know if there are easy to find Controllers for that, but that Way you have the Upsides of both.
You should turn the big iron bloom into an iron anvil... and then make all the tools for forging starting with stone hammers and wooden mallets.
Thanks for sharing. Obs:Maybe you´ll need to rotate de aluminum heatsink 90 degree.
(to make air flow through the fins verticaly).
Yes, that would improve the cooling and airflow - I am thinking of making the control box a bit bigger to allow for this. The current orientation just made the wiring easier, but was not a good decision regarding thermal performance.
I was told to have the PE always as the longest Conductor so it stays connected the longest if the Cable is ripped out.
That is correct and very good practices to follow!
Hi Jacob. I can't find part 3. Is there an episode for the lid?
This is amazing work. Can't wait for next episode
What tempertures are you able to reach in the kiln?
Hi Dam! I have been able to reach 1110 °C when drawing little less than 5kW for four hours. At that point the temperature increases by around 2°C per minute.
@@jakobhalskovhow hot is the outside of the kiln getting at that point? If you wanted to get hotter, would you use more insulation?
@@timtravelnomad it gets somewhere around 100-150°C on the outside surface of the kiln, depending on hot you warm it up to and for how long. And yes more insulation will make it able to reach higher temperatures quicker :)
@@jakobhalskov thats for the great videos Jakob!
If you're looking for a new interesting project that's has some overlap, but then pushes the boundaries a little, i'd suggest looking at thermal heat storage.
E.g turning your kiln into a heat storage battery, that can be used for delivering heat and even electricity on demand. Often with a storage medium like sand, rocks, bricks, graphite on the inside.
Its very topical now that the world & many houses are ending up with excess cheap renewable energy at certain times of day.
Thanks again :)
Can you explain how to wire this setup but using single phase 208/240v?? I’m moderately confident that I have the wiring correct but your validation would be great! I am using a 14/2 SWOOJ cable for the power supply. I will be grounding the components to the electrical component structure and drum as well. I’m also using a GFCI Breaker on its own circuit to power this unit.
That was great. Thanks.
Hey Jacob, such an amazing job you have made. Could you tell us the total cost of project please? thank you
I appreciate what you are saying here. I just tested my kiln and at 240v and 20a with his calculations I can only get my kiln to 631 degrees *F. Any suggestions on how to get the temperature higher?? I followed his instructions to the letter. I’m very confused why I’m not getting the same output. Any help. Would be appreciated. Thank you
Incredible!
Hej Jacob, virkeligt spændende projekt! Ser frem til næste video :)
Hello, is it possible for this kiln to work on Single-phase current? And if i want to use the maximum volume and put on one or two more Rows of Bricks, could it be more kW on Single-phase current and is this insolation suitable for this?
Where’s part 5 here?
would ceramic fiber insulation blanket protect your control box?
How do you control the ramp in order to not heat too quickly?
The end of flexible electrical wires shouldn’t be drilled. Leave them straight and put some wire end ferrules on it. Also when you put more than one cable in it. Otherwise it might get loose due too heat expansion
This looks a lot better than the giant block monstrosity I created in my home haha xD
You promised me you would be back soon! Why are you not back?
did it melt from the amperage or from the heat from the kiln
where is the part 5?
it didnt work 😮😢
Put the SSR's on the bottom and orientate them so that the airflow goes directly through their fins.
It's better to offset the whole box a centimeter from the kiln side so that you do not heat the contents of it unduly.
The elements are normally not fastened on to the side of the kiln because it hinders the contraction/expansion of the elements.
You design is centered around the placement of the PID controller not the temperature and airflow. You can do better than this ;*
Hi Lauge, you are certainly right in your critique and most importantly I have realised that the PID+SSR needs to be placed further away from the surface of the kiln to protect them from the radiated heat.
Best wishes!
And NOW - after 3 and a half video, You tell me this is a 3-phase...🤕
Is your thermocouple working? It looks like you didn't use themocouple wire(?)
It has been working fine for me for some time now :)
@@jakobhalskov it's mostly because it's a very short path from the thermocouple to the PID but you will get a voltage error when not using S-type wires (each thermocouple type uses different type of wires called compensating wires)
Could you use two phase with a single coil at 20A" I have 2 phase 220v 50A circuit.
Yes, you just do the calculations and design process with one element and remember to correct for the increase voltage if you plan to connect the two phases across the element.