
- 5
- 47 432
OPPAPALAM
Приєднався 16 сер 2021
What's the Best iPod ever❓
Apple to discontinue the iPod after 21 years, iPod is the most innovative product👍🏻
Переглядів: 61
Відео


How to make a 3D Printing Rose Bouquet | Happy Valentine Day | 3D Printing
Переглядів 6132 роки тому
How to make a 3D Printing Rose Bouquet | Happy Valentine Day | 3D Printing Thanks for comment, like and subscribe my 3D printing channel. File link: www.thingiverse.com/thing:152642 Media Gmail:oppapalamhello@gmail.com UA-cam : ua-cam.com/channels/zPOtWwNZuMWpCkEYy91ZuA.html Instagram : oppapalamhello Twitter : OPPAPALAM Reddit : www.reddit.com/user/OPPAPALAM/ Faceboo...

Video Unboxing my Voron V0.1 kit that arrived this week🤘🏻
Переглядів 3472 роки тому
Video Unboxing my Voron V0.1 kit that arrived this week🤘🏻
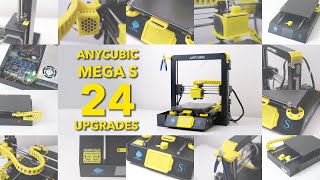
24 Upgrades & Modification for my Anycubic Mega S | 3D Printing
Переглядів 42 тис.2 роки тому
24 Upgrades & Modification for my Anycubic Mega S. Thanks for comment, like and subscribe my 3D printing channel. ♥ Support my Channel ♥ www.buymeacoffee.com/oppapalam Here is the quick link for all modification CAD files : bit.ly/3F8Frd9 FILES / STLS / IMAGES / LINKS FOR ALL UPGRADES: Part #01 tool rig www.thingiverse.com/thing:2793693 by mjuddi Part #02 caliper holder www.thingiverse.com/thin...

24 Upgrades & Modification for my Anycubic Mega S | Trailer | 3D Printing
Переглядів 4,1 тис.2 роки тому
This is a trailer of 24 Upgrades & Modification for my Anycubic Mega S. Thanks for comments, like and subscribe my 3D printing channel, see you soon!
what is the stem made out of?
Metal strips wraps with green paper
Very helpful. Thank you! The exposed cables on my printer drive me crazy.
You are welcome and enjoy happy printing
so, it you have no idea what to do with a 3d printer - mod a printer itself.. I did only those which are really necessary upgrades: 1. motor drivers strongly increase a comfort, 2. heatbed cable holder, preventing its move on a heatbed side (no chain, just a small part which fixing a cable and not allow the cable to break at the weakest point - solder spots), 3. rewiring the heater of the hotend with 2 thick cables, going straight from the heater to the motherboard - no connectors at all!!! Original cable and connectorssss placement is awfully designed. If you have "t0 sensor" problem - 90% chance it is the cable or the connector. 9% - wire connection on a motherboard is loose, or right this connector soldering points broke. The cable to the hotend consists of 14 thin wires, whereas only 6 or 7 are needed, two of which should be at least a 1mm thick. Instead - 14 useless thin wires and a connector that get loose constantly becaus eof the movement, stopping long prints. 4. hotbed isolation mat. reduces power consumption, the bed heats faster. 5. probably another cooling duct. I cant say it changes the world, but sometimes prints are looking better.
part#20 link is failed . How to get the part#20 stl?
Here is the quick link for all modification CAD files : bit.ly/3F8Frd9
Thank you. I have downloaded the tool rig.
Are they compatible with anycubic mega pro? or is it necessary to scale?
Folks...I am stunned how almost no one is commenting on how terrible the print quality is on every part shown. Absolute beginner garbage with most every flaw you can name...stringing, layer lines, banding, elephants foot...etc. These prints are absolute garbage. The designs...awesome. But who shows garbage quality prints like this in a tutorial?!?
I understand your frustration with the print quality displayed in the tutorial. It can be disappointing to see subpar results, especially when the designs themselves are impressive. While it's important to acknowledge the flaws in the prints, it's also worth considering a few factors that might contribute to the situation. Firstly, tutorials often aim to showcase the design process or specific techniques rather than focusing solely on achieving flawless prints. The primary purpose might be to teach design principles or demonstrate a particular workflow, with print quality being a secondary concern. Additionally, printing quality can be influenced by various factors, including the printer settings, filament type and quality, environmental conditions, and even the skill level of the person operating the printer. Beginners, in particular, may encounter challenges in achieving optimal print quality due to their limited experience. Constructive feedback regarding print quality is valuable, as it helps both the tutorial creator and other viewers understand the areas that need improvement. It's possible that the tutorial creator may appreciate such feedback and make adjustments in future tutorials to address these concerns. Remember that the learning process often involves trial and error, and it may take time to refine one's skills and achieve better print quality. By providing feedback and expressing your expectations, you can contribute to the growth and improvement of the tutorial content.
the fan attachment at 7:24 is not available for printing?
Hi Jeff, the blue fan case is bought, here is the reference link : a.aliexpress.com/_mPibgja, you should choose bracket for V5 and 12V
@@oppapalam thank you so very much!
You are welcome👍🏻
The wire hanging I mentioned below is at time stamp 7:00
I am almost done but I noticed that in 7:06 you are configuring the fan for the hotend but there is no part to print for holding the fan next to the hotend? You show it but there is not a part to print? What is the size of the little fan that is attached directly to the hotend? Where are the wire connections to make it connect to the power from? They are hanging there but I don't get which wires they are?
Excellent Job!
Sorry what was the sensor switch called I can't find the link on Amazon. I asked before but lost your answer :)
Here are both links, hope I can help you💪🏻 RLECS 12-24V 2A Single Color Light Emitting Diode Strip Light Brightness Controller On/Off Switch Inline Tact Switch Black DC Mini LED Dimmer Touch Switch a.co/d/9J8JjE6 HKD5.57 34% Off | DC 12V 24V LED Strip Touch Dimme Brightness Control Simpl Dimmer Switch Controller for 5050 3528 2835 Light Strip Single Color a.aliexpress.com/_mNpTiCU
@@oppapalam thank you I have it!
@@oppapalam got it thank you!
thank you this is amazing to have for my old "legacy" mega S...
Really cool! Super excited to get my Mega S and do some of these
Here is the quick link for all modification CAD files : bit.ly/3F8Frd9 Enjoy❗️
@@oppapalam thankyou!
Era exatamente o que procurava obrigada
Thank you
can you show us how to make good lapses like in the video??
bravissimo...ottimo progetto
Some of your upgrades there is no thingiverse number, can you provide the files? Thank you
Thingiverse number can be found in the file link. Here is the quick link for all modification CAD files : bit.ly/3F8Frd9 Enjoy your upgrades‼️
@@oppapalam are these all the prints in your video, example which way to turn knobs to level bed? Thank you again. Much appreciated 👍🏾🙏🏾
@@oppapalam sorry to bother you....printed out your mods and for the links (cable chain) it cannot connect to the pieces that would attach to the printer....please can you assist? Thank you
@@taurus533 As I remember, cable chain and joint are not 100% fitted, so you have to cut out a little bit or use air dryer to heat up the joint before assembling the cable chain
@@oppapalam width of hotend chain is 25.8 mm, but model “AI3M_Schleppkette_B” is 28.5mm. It’s not connect
Nice collection. Which one's your favorite?
I Like the 3rd gen which has lighting control buttons😊
In part 18 Hotend Cover and Fan Cover where did you get the fan and if you printed a mold for it to be attached to the hotend?
I bought all fans from Taobao or you may try to buy it from aliexpress. Yes, I printed hotend cover and attached to the hotend. If you want a strong cover, you should print ABS as well.
Hi, is this Stuff also Compatible with the Mega Pro?
Yes, some stuff are compatible with Mega Pro
I can't fit my hotend cable through the chain. How did you do this
Here is the link for the 10x20 cable chain and print the file named AI3M_complete_chain_V3.stl which is easy to pass through the cable socket easily. www.thingiverse.com/thing:3668667
Wow, you did a good job. I like it and will try to repeat! thank you!
Sorry, but this video ist to fast for 24 Upgrades...
you can play it at 0.25 speed in UA-cam and stop it when you want
Hi, gibt es dazu auch die notwendigen STL Dateien. Vielen Dank.
Hello. Many thanks for your sharing. Are your modifications and improvements valid for the Anycubic Mega x? Cordially.
Hi, thank you for your watching! Many of them are suitable for Mega X except the cable chain and the pulley covers.
@@oppapalam ok thanks.to other shared videos.
Wow, you’ve got a lot of them!
iPod collector😊
Hello! quick question: is it ok to print the hotend cover with PLA?
Hi Eugen, it is good if you keep printing PLA as well. On the other hand, it should be printed by ABS if you will print ABS with enclosure.
@@oppapalam I only print PLA :D Two more things I'm curious about: How exactly did you place the hotend fan inside the case (it's not really visible in the video)? Also, I saw that you placed two part cooling fans on the same wire, is it safe to do so? Will it impact the performance of the fans? I want to do the exact same thing, and this is the only video I found that has this. I want to say that this is the coolest video I've seen about upgrades for anycubic printer and I really appreciate the work you've put into this video, cheers. :D
Thanks for your watching and hope you enjoy my video😊 1. Hotend fan is clamped heat sink easily www.amazon.eg/-/en/distance-J-head-Cooling-thermistor-Printer/dp/B0968ZR9JX/ref=sr_1_1?crid=13PHIDN2TE38L&keywords=e3d+v5+hotend+fan&qid=1648485928&sprefix=e3d+v5+hotend+fan%2Caps%2C216&sr=8-1 2. Both part cooling fans are connected in parallel that means both fans keep using 12V ua-cam.com/video/1OMQL8Xb9s8/v-deo.html
@@oppapalam part cooling fans are connected in parallel, but they both are connected to the same socket on the PCB, right?
Yes, correct
how many fans did you use for this build? i only ask because not all fans are labeled, trying to figure out what fans you used for the board. the dual fans you mounted
Thanks for your watching, 2pcs 5015 blower fan (12V) is used for the nozzle cooling. Part #14 dual hotend fans (12v) taobao: item.taobao.com/item.htm?spm=a1z0k.7386009.0.d4919233.69645f13e458z8&id=43314193976&_u=t2dmg8j26111 amazon: www.amazon.com/winsinn-cooling-50x50x15mm-extruder-makerbot/dp/b079bmx2s6/ref=sr_1_3?crid=f8jytww8i7cr&dchild=1&keywords=5015+blower+fan+12v&qid=1622446875&sprefix=12v+5015+5%2caps%2c357&sr=8-3
Please keep these coming man!!! Want views? -> P R O M O S M!
I love this brand of printer. Holy smokes it's nice
Anycubic mega s is easily to use and well-builded machine.
竟然係廣東話
將會用廣東話繼續出新片,希望多多支持💪🏻💪🏻💪🏻
i bought my first 3d printer a few days ago, its a anycubic mega modded to hell, its got better motor drivers, a custom mobo, direct extruder and other stuff, must say i'm extremely happy with it and i'll def be printing some of these upgrades!
Nice, good to see your first print stuff👍🏻
I will always find it amazing that with a 3d printer you can print stuff to upgrade it. Literally making itself better. So awesome!
Thank you so much❗️I also like to print some toys and play with kids😄
@@oppapalam which toys do you recomment?
www.thingiverse.com/thing:4138701 www.thingiverse.com/thing:3223118 www.thingiverse.com/thing:1396307
Nice kit, can’t wait to see the finished V0.1
I just got an i3 Mega S and I love working on it. Thanks for the video.
Hope you enjoy it👍🏻
Where is this kit from?
TMC2209 driver install is the best upgrade ypu can do imo. My Mega S is almost completely silent aside from the parts cooling fan. Ive also changed all the other fans to Noctua fans.
Yes, TMC2209 is the best upgrade and I just changed one Noctua fans on my extruder as it is quite hot when printing.
Tell us more please. How easy is it to do?
If you are using anycubic i3 mega s, just remove previous stepper drivers and plug new stepper drivers and revert these cable connecters.
what voltages are you runing?
Thats the first kit Ive seen with the functional parts included.. are they aluminum and where from?
Woah a caliper holder, that's awesome! It'll help me clear space off my desk. Honestly I'm going to try doing most of these upgrades asap, do you have any advice for leveling the printer? I've had some ringing issues and I'm wondering if that's the cause.
I do the bed leveling by using A4 paper at all, no more tips for leveling. If you have ringing issues, try to print it at lower speed (40~60mm/s)
@@oppapalam gotchu thanks, already printed the caliper holder and it works great. Going to start on some other upgrades.
@@oppapalam curious what benefit the PCB modification does (and what it is exactly?) As well as the added fans and hotend cover as opposed to the stock option?
@@massir7769 Ph2.0 connector is added to the PCB which is connected to touch sensor as a power source (5V) for the light of the LED ring light. Yes, one of the added fans is opposed to the hotend cover.
Wow. You did so much. I wish I had the patience to upgrade my Mega S this much.
Thank you so much, I have no idea when I got Mega S and I spent more than 3 months to upgrade my printer. That's why I made this video is want to share my upgrade process and everyone can do it as well.
Very Good! Like!
Thank you so much😊
Amazing quality. What 3d printnting settings do you use?
Thank you so much! Here is the link of Cura printer setting. drive.google.com/file/d/1cA6uj6XLS9r6snIjHXhEuf31ohSF17na/view?usp=sharing
Please show you settings about the plastic (petg?) in cura slicer
All parts printed in PLA, resolution 0.2mm, infill 10~20%, no rafts, supports (check my thingiverse link)
支持~~
睇哂,好有心機~~
多謝支持,我都有睇你的影片架👍🏻
@@oppapalam 出年「再」出發
where's the Mega Pro mods????
Just release a video of 24 Upgrades & Modification for my Anycubic Mega S, hope you like it, thanks❗️
good video!
Thanks❤️
Yeah, please link! I can't wait - my Mega Pro arrives in a few days, and that little tool caddy might be one of the first things I make!
Now editing next youtube video with fully modification details and will share all files and links for your upgrades. Next video will be ready in coming week, hope you all like it😊
seems good ! waiting for links now :)
Just release a video of 24 Upgrades & Modification for my Anycubic Mega S, hope you like it, thanks❗️