
- 8
- 95 220
Hardscrabble Garage
Приєднався 24 лис 2020
Adding a C-Notch to a squarebody Truck Frame. 1984 GMC gets a C-Notch lowered ride clearance.
We add a C-Notch to our 1984 GMC truck. It is a Belltech unit, very sturdy. A must-view for lowered '73-'87 GM squarebody trucks.
Переглядів: 13 482
Відео


Affordable Compressed Air System for Auto Finishing
Переглядів 2433 роки тому
I give a brief overview of the DIY design and installation of the shop compressed air system that runs my blasting cabinet, air tools, and HVLP spray setup. The catch is that it can only power one of these activities at a time, but since I am a one-man operation this is hardly significant. Capable of 14.1 CFM @ 90 PSI, 16.1 CFM @ 40 PSI 100% continuous duty cycle. Air is filtered to .1 micron f...

Lowering Front End, 1973-1987 GMC/Chevy Square Body Trucks, Part 4
Переглядів 7693 роки тому
This is Part Four of an ongoing series showing how to lower the front end of a Square Body using drop spindles and shortened springs. This is not a sponsored video, and these are NOT affiliate links. www.summitracing.com/parts/djm-ca2356u Upper Control Arms used in the video. Note the color of the new arms is black, despite Summit Racing's description copy. Also, be SURE to verify that the set ...

Lowering Front End, 1973-1987 GMC/Chevy Square Body Trucks, Part 3
Переглядів 6863 роки тому
This is Part Three of an ongoing series showing how to lower the front end of a Square Body using drop spindles and shortened springs. Part Three (this video) covers assembling the lower a-arm bushings and ball joints, and discusses options when it comes to lubrication. Part Two ua-cam.com/video/7FY2tJPB11o/v-deo.html covers removing bushing shells from the A-arms by hand, without a press or an...

Lowering Front End, 1973-1987 GMC/Chevy Square Body Trucks, Part 2
Переглядів 8823 роки тому
This is Part Two of an ongoing series showing how to lower the front end of a Square Body using drop spindles and shortened springs. Part Two (this video) covers removing bushing shells from the A-arms by hand, without a press or any fancy tools. Part Three ua-cam.com/video/Y60084iTLZ0/v-deo.html covers assembling the lower a-arm bushings and ball joints, and discusses options when it comes to ...

Lowering Front End, 1973-1987 GMC/Chevy Square Body Trucks, Part 1
Переглядів 2,4 тис.3 роки тому
This is Part One of an ongoing series showing how to drop the front end of a Square Body using drop spindles and shortened springs. Part One (this video) covers removing ball joints and control arm bushings by hand, without a press or any fancy tools. Part Two ua-cam.com/video/7FY2tJPB11o/v-deo.html covers removing bushing shells from the A-arms by hand, without a press or any fancy tools. Part...

PSA Lugnut Warning
Переглядів 663 роки тому
A warning to all purchasers of used vehicles that might save you from having a very bad day.
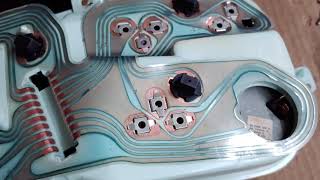
GMC Square body Fuel Gauge Troubleshooting
Переглядів 77 тис.3 роки тому
Take the mystery out of GMC fuel gauges. How they work, and what to do when they stop working. This applies to many GM vehicles, though specifically we are addressing Square Body trucks, both GMC and Chevy, 1973-1987 model years.
What did it get your C notch
What a clear video! Question? Do you just crimp leads to eyes? Or can I get away with solder and not overheat resister?
To build the resistor I soldered them together. To mount it behind the gauge it uses nuts that go on the screw terminals, just like the factory ceramic resistor. Hope that helps, and good luck!
Very helpful
Glad you think so!
After it was finished did you feel like the notch was cut too far forward?
Not at all. The rear end has some forward and back motion, as well as up and down. It moves in an arc defined by the center point of the front leaf spring eye. If you compress the spring as far as you can, the rear axle lines up with the notch - which is the whole point of the notch!
Thank you! Great explanation!
Glad it was helpful!
They there blue and think
Thank you very much for the repair tip. It helped me a lot with my 1984 GMC K 1500 Stepside. Two resistors for less than €1 and the display works like new. Greetings from Germany
Where d id you buy a resistor?
Thank u sir
You are most welcome!
Mine doesn’t move at all
Sorry for the delay. With zero movement it could be lots of things. I'd start with checking the ground connection, and the wire connections on the sending unit itself. Good luck!
Excellent video
Thank you very much!
Good video!
If you remove the clear cover, black plastic, and then screws holding the speedometer in you can remove the cable much easier(through the hole by the headlight switch). Once the speedometer is out the cluster is much easier to remove. When the cluster is back in place you can install the cable then turn the speedometer slightly to line it up with the holes.
What is the issue when a fuel gauge is off??
Great tips. Maybe you can help me out. I have an 1982 GMC Sierra Classic 1500. I can't switch to the passenger tank as of yesterday. I replaced the switch, nothing. I hooked up a new fuel tank selector valve, nothing. I filled up both tanks and the gauge works perfectly on the driver's side tank. I drove around the gauge drops as usual. I just can't switch to the right side tank. Any help would be appreciated. Thanks!
🐺 Thank You
Good video I got a ? I filled my 85 Pontiac stays on full for 3 day and fuel level drops slowly I’d say bout 1/2 should the gas gauge move from half to full as the gas slushes around?
So something weird is going on, new sending unit, cleaned grounds, but gauge sits at overfull and if I turn on hazards it pulses the needle slightly. Also when I disconnect my sending unit wire from the tank my voltage light just gets more dull (dummy lights). Need help😂
Well, that really is strange! A couple of things: 1) Test just your meter, out of the truck. Apply the correct voltage... is the meter itself OK? 2) The thing with removing the sending wire affecting the voltage in the whole truck - it sounds almost as if it's trying to use the sending unit ground as the only ground point in the whole truck. With the lights dimming like that, I'd bet another ground is either dirty/rusty or missing. There should be one by the battery to the body, an engine grounding strap somewhere, and depending on model specifics maybe another one or two (gas tank sending unit, etc.). Check and clean all grounds! Also, watch the video again. If the meter sits overfull at 3 o'clock it tells you something.
@@hardscrabblegarage thank you man, I appreciate the time you took to write this! So it seems like the issue was there’s a ground wire on my filler neck that was missing, got a new filler neck and wire and now the gauge seems to be almost accurate. I know I have a tiny bit more than half tank and it’s saying little less than half. So now I’ll do what you said and check the resister that goes on the back of the gauge itself!
Very helpful and easy to understand tutorial!! Thank you for sharing your knowledge!
Awesome video and explanation
Would be OK to weld It from under
excelente tutorial. gracias.
Can’t thank you enough for posting this. 🙏🙏 This info that you provided is truly invaluable!! My truck does the same as what you mentioned that yours did, the fuel needle only goes up to about between 1/4 - 1/2 tank when my tank is full. So I’m assuming that my issue is also the resistor like you mentioned in your video. Thank you again for the video!!
Nice explanation on making your own resistance.
I bought a ‘72 C10 many years ago. The seller told me occasionally the gas gauge quits working properly and he had a magnet stuck to the kick panel and said just take that magnet and touch it to the two leads on the back of the gauge and it will start working correctly. It does happen occasionally and the magnet touched to the back of the gauge does correct it.....Any idea on the theory that is taking place?
Thank you for explaining how everything works. It's really beneficial to have some insight on these symptoms. Even more helpful is that I'm experiencing the same symptoms you described at the very end of the video.
I’ve got a 1976 Chevy Itasca on a p20 chasis. I can not find out what the green wire is. After I got a new alternator put it my clusters all spin crazily. Any advice?
I appreciate this, I want to get a original tach to go in place of the big fuel gauge on mine and put the small fuel gauge where the clock is, anyway if I find them I wish I could ship you my cluster for a rebuild. Thanks again! 👍🏼
I've been study how gauges work on 1986- mid 90's I took apart a speedometer cluster just for study from a 86' olds delta 88 and the back of the cluster looks exactly what your showing. I had never seen anything like that . The harness plug fitting in that recessed slot, and just pushing against the ribbon wire circuit . I guess for the light bulbs. I've replace the 2005 pontiac speedometer and gauges steppers But I guess the older inst. clusters use some round thing, there not steppers and there not soldered. and prob. don't break like steppers either. I'm reading in my factory 90 bonneville service manual. that the gas gauge used, it say's the pointer on the fuel gauge is moved by magnetic fields , of two coil's. the coil's are at right angles to each other. battery voltage is applied to the to the "E" coil ( for empty I guess ) & the circuit divides at the opposite end of the coil . One path continues to gnd through the "F" coil. another goes to gnd through the variable resistor of the fuel gauge sender. when the tank is low the resistance of the sender is low. A large flow of current passes throu the "E" coil and the fuel gauge sender resistor this movesa the pointer towards "E" on the scale.when the tank is full the sender resistance is high. More current flow's through the "F" coil, movin the pointer towards "F"on the scale. Say's with the 2 coils operating the pointer, the gauge is not effected by the changes in the voltages of the system
That is exactly as I understand it as well. Since both current paths are using the same system voltage, slight variations don't matter. Because the needle is driven by the differential between those two magnetic fields, rather than an arbitrary reference voltage, when system voltage swings up or down it does so on both coils, which cancels out the variance.
@@hardscrabblegarage Great explanation thank you
Just whack it off!
I had two 1980 Corvettes and 181 and everything is exactly the same there the circuit boards other than my shift lever is in the console but I was surprised to see that the 85 mile an hour speedometer is also on the truck because that's all the Corvettes have. I sent one to ecklers and had to change to the 165 mph speedometer it came back with 7 miles on it for testing purposes. But trying to find the output gear for the speedometer cable it seems that the Corvette models have about 10 different ones you would have to know the exact ratio of that transmission and your rear end to make it work or it's going to be off I got one through Summit and it was about 10 to 15 miles an hour off. If you look it up they have a variety of colors of the little gear that's permanent in the transmission that's where the big difference is at. I tried buying different ones at O'Reilly's they have them they're very reasonable the 200 mph speedometer but you would have to buy an adapter cable from them to put it into the car they're not the same they won't bolt in and then you're going to have trouble with the transmission gear probably not worth your trouble
Sorry, I have no idea on the speedo gear ratios. Good luck!
Well what I was mentioning was the Corvette and the replacement speedometers from O'Reilly's they hook up different the cable you'd have to buy a cable but I had an 82 Chevrolet pickup the turn signals were down in the front bumper the only year that it's that way four-wheel drive truck very nice I ended up putting a 454 in it didn't matter about the transmission I could milk the tires after the big engine went in it was modified a little with the RV cam Edelbrock manifold Edelbrock carburetor and a different kind of distributor and it had no smog on it at all the state of Nevada registered that halftime truck as an 8500 lb class truck for 5 years but is the emissions got higher harder rather they wouldn't do it so I sold it off to another County where they did not have emissions and still don't have emissions Nevada has 17 counties only two of them require emissions
My resistor is red and is measuring 45 ohms. 1985 K5. Confused!
great vid
Brother if you're going to give advice about resistors, you need to learn the difference between watts and ohms. Also, instead of "wiring up a couple in parallel", just use one of the correct resistance.
Uh, brother, I used to service fire control radar, troubleshooting to the component level. "Wiring up in parallel" two equal resistors is exactly the same as using a single resistor of half the value. As in EXACTLY the same. Total resistance = 1/R1 + 1/R2 ... +1/Rn. This is like the first thing you learn in a basic electricity class... but thanks for your input.
No response?
Where you order them
Very good explanation. I have the pegged gauge scenario and this tells me what is wrong.
So should I go digital?
No! LOLZ. I don't know, man. I like analog, but I'm old. What a boring world it would be if we all had to build the same thing.
I have a 1980 C10 Big 10 Silverado, None of my gauges are Working. I purchased a new printed circuit board, everything is grounded and working , new wiring harness, fuses .lights etc..., the gauges are 40yrs old. Do the ceramic resistors go bad ?And if they do. Will they cause the gauges not to work? Also do you know what the part number # for the case ceramic resistors. I would like to purchase some.please advise. Any info would be greatly appreciated. Thank you Robert. One more question, I call lmc and ask them if I purchased new gauges would they have resistors applied to the gauges. They didn't know if they did. Anyway do you know if they do? Thanks again.
Great video. Once I had gathered the basic idea of how to circuit works from your video, I was able to repair my non functioning gauge in just a few minutes. Thank you greatly
Do you have to have all the light bulbs in the sockets or can you leave some out
Thank you! I will be troubleshooting my gauge sometime this week. It's showing past full right now.
I have a 6.2 cucv d30 (k30 army) would you know if a civilian type cluster would be plug and play to get regular guages instead of idiot lights? I do know I have 2 alternators
I am having an issue can't figure it out my fuel gauge at full goes lil past quarter tank but will go to empty I disconnected the wires at sending unit and it went to full grounded went to empty so replaced the sending unit still same problem gunna pull the fuel gauge today see if that's the problem but I don't have a meter now got damaged when I moved
Very helpful thank you!
Weird question but what the heck… I had my whole dash Cluster apart for a restoration on it and I happened to completely spin the fuel guage needle 360° around while wiping the guage off. Would this change the readings on the fuel level?
Nice job , but for people up there, leaving the bed on, Will decreases time and will keep the frame straight.
my 87 suburban needs this!!
nice video!
Great informative video, one question can this be done with the bed still on, I know it's probably easier with it off, but I'll be working by myself?
Gauge reads low resistor good float good How go I make sure the instrument cluster is grounded properly
The fuel gauge-specific ground mentioned in the video is located on the inner surface of the frame's c-channel, a bit forward of the gas tank. The wire connects the sending unit on one end, to a grounding bolt on the frame a short distance away. At least on 1984 models the wire is black, passes through a hole on the frame, and bolts to the inside surface of the frame. Just disconnect it and clean it up. Afterward you can use a DVM to check the resistance to ground from the ground terminal on the sending unit (one probe on the terminal, the other on any clean, bare-metal part of the frame).