
- 23
- 460 529
The Bored Robot
United States
Приєднався 10 чер 2020
Welcome to The Bored Robot, your premier destination for hobbyists, students, and enthusiasts eager to explore the world of practical robotics and engineering.
As a passionate advocate for hands-on learning, I've had the privilege of instructing undergraduates in robotics and participating in innovative projects. This channel is a testament to the digital age of education, providing instructional videos and project presentations.
Join me on a journey where we simplify the world of robotics and engineering, making it accessible to everyone. Together, let's unlock the potential of creativity and knowledge.
Don't miss out-subscribe now, and let's embark on an adventure of exploration, creation, and enlightenment together!
An Easy Way to Read All RC Channels at Once with Arduino
Thanks to the sponsor of this video:
www.pcbway.com
Get 10 PCB's for only $5
In this video, I demonstrate the easier way to read RC signals from a receiver with your Arduino Uno
Video Timestamps:
0:00 - Introduction
1:20 - Sponsor
1:51 - Step 1
2:36 - Step 2
2:50 - Step 3
3:07 - Step 4
3:40 - Step 5
4:07 - Conclusion
👉Subscribe for more robotics and engineering tips:
ua-cam.com/channels/MCGV13i2kt4VQuFBH6O2Vg.html
Share this video with a friend:
ua-cam.com/video/MsUL-RY8ZrY/v-deo.html
Parts needed for this example:
Arduino Uno R4 - amzn.to/3V1odcD
Jumper Wires - amzn.to/47DLt30
Flysky Transmitter and Receiver - amzn.to/3SG4QTC
Previous referenced videos:
ua-cam.com/video/WtOd8tsrJbs/v-deo.htmlsi=-zttYfYyMFJhh_Dk
ua-cam.com/video/PdBS_W5tc-0/v-deo.htmlsi=Mn5_htFWBrAJMh0J
Disclaimer: This video contains affiliate links, meaning that if you make a purchase from one of the product links, I'll receive a small commission.
Переглядів: 5 141
Відео


Turning Arduino's LED Matrix into a Serial Plotter
Переглядів 3,2 тис.8 місяців тому
In this video, I demonstrate how to use the LED matrix on the new Arduino Uno R4 Wifi, as a serial plotter and monitor. Video Timestamps: 0:00 - Introduction 0:34 - Wiring 0:42 - Example of turning the LED matrix into a serial monitor 0:50 - Code for the serial monitor example 1:59 - Limitation of serial monitor example 2:07 - Up and down bar graph serial plot example 2:15 - Code for the up and...

How to Change the X and Y Scale on the Arduino Serial Plotter
Переглядів 18 тис.10 місяців тому
In this video, I demonstrate how to change the scale of the X-axis and Y-axis for the serial plotter in the most recent version of the Arduino IDE. Note: In the video, I use the term "data points" to describe the length of the x-axis. What I actually meant is that the x-axis will only have a range of 50. There can be much more than 50 data points within this range. Video Timestamps: 0:00 - Intr...

Synchronizing Motor Position with Encoders, PID Control and Arduino
Переглядів 78 тис.11 місяців тому
In this video, I demonstrate how to use PID Control to synch the positions of two motors with encoders by only using two interrupt pins on the Arduino. Video Timestamps: 0:00 - Introduction 0:33 - PID Control for a single motor 0:40 - Parts needed 0:46 - Pin out for the motor and encoder 0:58 - Wiring the circuit 1:16 - Arduino code for one motor 4:40 - Selecting the gains 5:27 - Beginning of t...

Real-Time Data Visualization and CSV Logging with Arduino and Python
Переглядів 21 тис.Рік тому
In this video, I demonstrate how to send sensor data from the Arduino, plot the data in python, and then automatically save the data to a CSV file. Video Timestamps: 0:00 - Introduction 0:11 - Arduino Code 0:59 - Python Code 4:15 - Data Visualization in Arduino 4:25 - Data Visualization in Python 4:34 - Saving data to a CSV 👉Subscribe for more robotics and engineering tips: ua-cam.com/channels/...
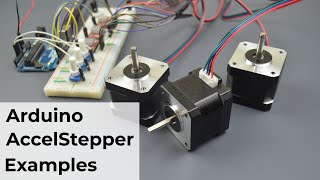
Controlling 3 Stepper Motors with the AccelStepper Library for Arduino
Переглядів 70 тис.Рік тому
In this video, I demonstrate how to simultaneously control three stepper motors with the Arduino Uno and the Accel Stepper Library with discrete examples. Video Timestamps: 0:00 - Introduction 0:25 - Installing the library 0:45 - Parts needed 1:02 - Wiring the circuit 1:48 - Moving a single motor to a specific position (blocking) 4:16 - Sequentially three motors to specific positions (blocking)...

Powering the Arduino Uno without a USB Cable
Переглядів 10 тис.Рік тому
In this example, I demonstrate how to power the Arduino Uno without the USB Cable. 👉Subscribe for more robotics and engineering tips: ua-cam.com/channels/MCGV13i2kt4VQuFBH6O2Vg.html Share this video with a friend: ua-cam.com/video/XDTr1hyQUtY/v-deo.html Parts needed for this example: Arduino Uno- amzn.to/3pGK6Am 11.1V lithium polymer battery - amzn.to/3JxZjLA XT60 to barrel connector - amzn.to/...

Controlling a Stepper Motor with a Remote Control and Arduino
Переглядів 17 тис.Рік тому
In this example, I demonstrate how to use Arduino and remote control to control the speed of a stepper motor. 👉Subscribe for more robotics and engineering tips: ua-cam.com/channels/MCGV13i2kt4VQuFBH6O2Vg.html Share this video with a friend: ua-cam.com/video/vpqQozhfRqY/v-deo.html Parts needed for this example: Arduino Nano - amzn.to/3WO3JkJ Stepper motor - amzn.to/3kReLZ4 A4988 Stepper motor dr...

Simultaneously Reading Two PWM Signals from an RC Receiver with Arduino
Переглядів 15 тис.2 роки тому
This is an example that demonstrates how to use Arduino to simultaneously read two RC signals (50 Hz PWM) using external interrupts. 👉Subscribe for more robotics and engineering tips: ua-cam.com/channels/MCGV13i2kt4VQuFBH6O2Vg.html Share this video with a friend: ua-cam.com/video/PdBS_W5tc-0/v-deo.html Parts needed for this example: Arduino Uno: amzn.to/3IofhnP RC (Remote Control) Transmitter a...
Reading PWM Values from an RC Receiver using Arduino
Переглядів 56 тис.2 роки тому
This is an example that demonstrates how to use Arduino to read RC values (50 Hz PWM) using pulseIn() or external interrupts. 👉Subscribe for more robotics and engineering tips: ua-cam.com/channels/MCGV13i2kt4VQuFBH6O2Vg.html Share this video with a friend: ua-cam.com/video/UZKxUFkwCc8/v-deo.html Parts needed for this example: Arduino Uno: amzn.to/3IofhnP RC (Remote Control) Transmitter and Rece...
Controlling a DC Brushed Motor with the L298N Motor Controller
Переглядів 3,6 тис.3 роки тому
This is an example that demonstrates how to control a common, inexpensive DC brushed gear motor with the L298N motor controller board. 👉Subscribe for more robotics and engineering tips: ua-cam.com/channels/MCGV13i2kt4VQuFBH6O2Vg.html Share this video with a friend: ua-cam.com/video/9-QtE3RsSc4/v-deo.html Parts needed for this example: Arduino Nano: amzn.to/3rAITaL USB Cable: amzn.to/3uBAwf5 Mal...
Simultaneously Controlling Stepper Motors with Arduino
Переглядів 57 тис.3 роки тому
This is an example that demonstrates how to simultaneously control two stepper motors with an Arduino Nano. 👉Subscribe for more robotics and engineering tips: ua-cam.com/channels/MCGV13i2kt4VQuFBH6O2Vg.html Share this video with a friend: ua-cam.com/video/Yvth5tLuXd4/v-deo.html Parts needed for this example: Arduino Nano: amzn.to/3DgG3LO USB Cable: amzn.to/3uBAwf5 Sparkfun Stepper Motor Drivers...
DIY Camera Phone Slider
Переглядів 1,3 тис.3 роки тому
Here's a build of an Arduino camera phone slider that uses two stepper motors for sliding and panning motion. Sliding is created through a lead screw and extruded rail 👉Subscribe for more robotics and engineering tips: ua-cam.com/channels/MCGV13i2kt4VQuFBH6O2Vg.html Share this video with a friend: ua-cam.com/video/_tvxCVfMb60/v-deo.html
Controlling a Brushless Motor with Arduino
Переглядів 30 тис.3 роки тому
This is an example that demonstrates how to control a brushless motor with a potentiometer and the Arduino Uno. 👉Subscribe for more robotics and engineering tips: ua-cam.com/channels/MCGV13i2kt4VQuFBH6O2Vg.html Share this video with a friend: ua-cam.com/video/_tvxCVfMb60/v-deo.html Affiliate Links: Brushless In-Runner and ESC Combo: amzn.to/3omstPS Flyfun Brushless ESC: amzn.to/3olVDOV Emax Bru...
How to Control a Servo with Arduino
Переглядів 2,3 тис.3 роки тому
This is an example that demonstrates how to control a servo with a potentiometer and the Arduino Uno. This also shows how to measure the pulse width and duty cycle of the pulse width modulation (PWM) signal. 👉Subscribe for more robotics and engineering tips: ua-cam.com/channels/MCGV13i2kt4VQuFBH6O2Vg.html Share this video with a friend: ua-cam.com/video/7ZCqjNaSXzM/v-deo.html Affiliate Links: M...
CAD Models for Two Different Motorized Camera Phone Sliders
Переглядів 2433 роки тому
CAD Models for Two Different Motorized Camera Phone Sliders
How to Create an Analog Signal with Arduino
Переглядів 2,6 тис.3 роки тому
How to Create an Analog Signal with Arduino
How to use the Arudino Uno to Read Analog Values from Sensors
Переглядів 4,8 тис.3 роки тому
How to use the Arudino Uno to Read Analog Values from Sensors
How to use Arduino Digital Write and "If" Statements
Переглядів 3,8 тис.4 роки тому
How to use Arduino Digital Write and "If" Statements
Walking Mechanism that Mimics the Human Gait
Переглядів 19 тис.4 роки тому
Walking Mechanism that Mimics the Human Gait
How to Use Digital INPUT and INPUT_PULLUP on Arduino
Переглядів 42 тис.4 роки тому
How to Use Digital INPUT and INPUT_PULLUP on Arduino
Installing the Arduino IDE on Windows and Mac
Переглядів 1 тис.4 роки тому
Installing the Arduino IDE on Windows and Mac
Or you can use Pin Change Interrupt on Atmega328p which is in every pin of Atmega328p (Arduino Uno, Nano, Pro Mini)
Great video! Have tried to work this code for simultaneous motor control, but the motor is not moving smoothly as in the video for the speed and acceleration, its like its starting and stopping each step till final position causing a juddering sound and slow motion of the motors... i cant figure out why its not running smooth
How about s-bus or ppm? Very few people have an I-bus Tx/Rx combo lying around
Two years later and this tutorial is still one of the best. Short, concise and incredibly helpful. <3
Nice video... This can be used to create an data aquisition with a sampling rate of 1000Hz (ADXL3750)?
Can you explain more about direction and pulse pin? I used uln2003 and 28byj48 stepper motor with pin connected to 8, 9, 10, 11 hole. For programing i'm still a very beginner level and i used to find other video write a pin as #define pin1 = 8, pin2 =9, etc. So can you please help me give some suggestion for the coding or the schematics of my arduino?
Great video... Can I use 10k potentiometer ?
Will I need 2 arduinos for 2 stepper motors, how should I be able to connect 2 stepper motors to the throttle with only 1 arduino?
Thanks for releasing a well thought out video about this, got it sorted quickly.
Is this possible but over wifi with a nano 33 iot?.
Thanks for the video . Could you please share the link to your blog ? Thank you
Thank you so much!!! Plan to build a vertical lift bridge (Custom Model Railroads) this winter for my HO railroad layout. Thought about using two dual-shaft steppers, one for each side of the bridge, with two thin steel wires for each side of bridge. With some experience with Arduino & steppers, I have been thinking about how to synchronize the two steppers even though I'll still employ limiting micro switches for top and bottom travel on each side of the bridge. You solved the issues for me with the Accelstepper library and your clear examples!!!
HELLO SIR CAN YOU PROVID ME CODE
The code for my videos can be found here: github.com/TheBoredRobot/UA-cam-Code
wait where is your website? where can I find the wiring diagram?
The website and brand has been shut down. I am keeping the channel active. If you are still struggling with the wiring, you can still email info@theboredrobot.com
you can leave an example using the L298N
At the moment I am not updating the channel with new videos. Stepper motor drivers work fundamentally the same. You'll just have to match up the pins from this controller that I used to the new one.
C:\Program Files\Arduino IDE esources\app\lib\backend esources\arduino-serial-plotter-webapp\static\js useState)(50) welcome
Thanks!
where did you get the code from
I wrote it.
Thanks a lot for this video, I was not having much luck in robotics yesterday and this just saved my day!
I'm glad it helped.
Very informative....Thank you..
Glad it was helpful!
Thank you Can this same code be used when using two tb6600
I want to move them at the same speed
Yes, this should work as long you make sure your pin assignments are updated.
Running two controllers should get the job done. If you want to run off the same controller, make sure there required current draw isn't too large.
@@TheBoredRobotLLCnoted thank you
@@TheBoredRobotLLCnoted sure I’m using two separate tb6600 so hopefully won’t have any issues
// From ua-cam.com/video/UZKxUFkwCc8/v-deo.html #define RCPin 2 volatile long StartTime = 0; volatile long CurrentTime = 0; volatile long Pulses = 0; int PulseWidth = 0; void setup() { Serial.begin(9600); pinMode(RCPin,INPUT_PULLUP); attachInterrupt(digitalPinToInterrupt(RCPin),PulseTimer,CHANGE); } void loop() { if (Pulses < 2000) { PulseWidth = Pulses; } Serial.println(PulseWidth); } void PulseTimer() { CurrentTime = micros(); if (CurrentTime > StartTime) { Pulses = CurrentTime - StartTime; StartTime = CurrentTime; } }
Hi, is it possible to connect Arduino with most popular fs-gt5 receiver? I just want make electric rc car with using stepper motors. But one important thing, I need to use fs-gt5 controller
The receiver doesn't appear to have i-bus protocol, so the library won't work.
@@TheBoredRobotLLC understand. Is it possible then make alternative remote control? I need forward and backward trigger buttons, with speed controller, it might be with encoder
Thank you very much❤ Tell me please, can I use it with nema 8?
Yes, this should work, as long as you use the correct motor controller.
Great video and very helpful! One question, what is the reason that the Arduino R4 version doesn't work?
The specific library used in this video was not created for the hardware of the R4. I haven't looked into if there was an update for the newer version of the Arduino Uno.
Could i get PCB;)?
Sorry, I don't have any spare PCB's.
You have a really great way of explaining things and go into enough detail for someone like me that has very little knowledge of these things. I wish you had more content. Keep up the great work. Thanks for sharing.
I appreciate that!
Amazing, Thanks man.
Glad you liked it!
Hi, can you please add the detail and specs about material used in description of video. Like Motor (voltage/current) rating, battery (voltage/current) rating, Type of Arduino used etc. Thanks.
The motor/ESC combo are in the description of the video. I used an 11.1v Lipo battery.
Does the baud rate need to be that high or can it be 9600?
No it doesn't. It just depends on how much data you want over a given time period.
This is what I needed to know, thanks a lot. I'm building a solar tracking system but didn't know how to get info about the photoresistors. If you had any code for solar tracking using photoresistors and a linear actuator I'd really appreciate it.
I haven't directly created a tutorial on this, but for photoresistors, you'll need a voltage divider circuit.
can i stop the motor at specific angles ?
Yes, if you can relate number of encoder counts to motor angle.
This is cool!!! Thank you.
Glad you like it!
Banger of a tutorial !
Thanks!
Thank you so much for the content 🙏🏻 I want to ask, can the program be used if using a 3 phase AC motor and using a relay as the contactor? Thank you in advance🙏🏻
This program specifically is meant for brushed DC motors, but fundamentally PID can be used for if your problem, if you know the inputs and outputs.
As others have said your code explanation is excellent! I am thinking of implementing this to control three ball valves - I just need to know do stepper motors have free movement when unpowered? I ask this as I need to consider how I can provide manual override in the event of power failure or other faults. In your opinion would stepper motors be suitable for my use case? Thanks
Stepper motors can move freely when they are unpowered. They will hold their torque when powered. They are generally used when precision is required. It's hard to say if this is best for your use case without knowing more. If the movement is just and open and close, perhaps a solenoid can be an easier option?
@@TheBoredRobotLLC Thanks, I was hoping that would be the case. It sounds like steppers may be my best option as I need fine control of opening %. The specific kind of valve is a 180 degree throw metering valve (to achieve a more linear relationship with opening % and flow than a regular ball valve).
Is there a way for us to find The script for your arduino program, so we can copy and paste? The library I downloaded only shows "blocking", unlike in the video's "blocking_fixed_position"
github.com/TheBoredRobot/UA-cam-Code
So, if I want to run DC motor follow a sinewave. What I have to do?
You'll set your desired position as the particular sine wave you want to follow.
@@TheBoredRobotLLC position 1200 and 250 (in sinewave equation) is the position of the pulse correct?
@@trilinh9169 I don't exactly know exactly what you're asking here. If the equation you're trying to follow is y=sin(t), where t is some value for time, then y is the value that will be your desired set point in the PID controller.
Thx bro
You're welcome!
very helpfull!!!
Glad it was helpful!
Great video, well explained! Using PID, can you achieve absolute position control with these encoded motors? Thanks!
Yes, PID control can be used to control position when encoders are used.
I am just getting my feet wet with this, and this video is incredibly helpful!
Glad it was helpful!
thanks so much its realy useful
You're welcome!
The code for those who want to try it out : import serial import matplotlib.pyplot as plt from matplotlib.animation import FuncAnimation import csv # Constants SERIAL_PORT = 'COM4' BAUD_RATE = 115200 # Initialize serial connection ser = serial.Serial(SERIAL_PORT, BAUD_RATE) # Initialize empty list to store data x_vals = [] sensorValue_data = [] # Create a function to raed and process data from Arduino def read_and_process_data(): line = ser.readline().decode('utf-8').strip() sensorValues = line.split(',') x_vals.append(float(sensorValues[0])) sensorValue_data.append(int(sensorValues[1])) # Print the received values print(f'Time: {sensorValues[0]}, Sensor 1: {sensorValues[1]}') # Creat a function to update the plot def update_plot(frame): read_and_process_data() plt.cla() plt.plot(x_vals, sensorValue_data, label='Sensor') plt.xlabel('Time') plt.ylabel('Sensor value') plt.legend() # Creat a function to save data to a CSV file when the plot window is closed def on_close(event): with open('arduino_data.csv', 'w', newline='') as csvfile: writer = csv.writer(csvfile) writer.writerow(['Time', 'Sensor']) for x, s1 in zip(x_vals, sensorValue_data): writer.writerow([x, s1]) # Register the callback function for when the plot window is closed fig, ax = plt.subplots() fig.canvas.mpl_connect('close_event', on_close) ani = FuncAnimation(fig, update_plot, interval=10) plt.show()
Thank you so so so much !! This is exactly what I needed, short and effective, really good tutorial.
Great to hear!
thanks
You're welcome!
Is anything like this able to be done with an elrs rc link?
I don't know, I haven't looked into that RC brand.
@@TheBoredRobotLLC Not a brand, it's a powerful open source code based on S-BUS protocol.
Thanks bro Does anyone know what is the x axis, like is it milliseconds or is it related to the baud rate
This depends on the baud rate you select in your code.
Thank you!
You're welcome!
Thank you! Phenomenal video! I love the style I love the explanations, to the point and easy to follow!! You may was to consider adding to the end of the ser.close() in the in_close() function. My system doesn't automatically close serial communication and this may save some headaches for other viewers as well!
Glad it was helpful and thank you for the suggestion!
since arduino is running before the python script activates the time stamps do not start at 0. is there a way to make the timestamp start at zero once the python code starts?
I'm sure there is a number of ways you can do this, but one of the ways is to use a timer in python and plot the x axis with that value instead.